Potato Gnocchi with Fresh Tomatoes and Pesto
introduction
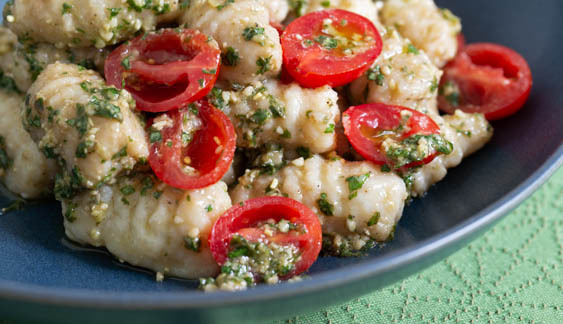
Gnocchi are generally defined as Italian dumplings made with potato or wheat semolina and served with sauce. But in point of fact there are more types of gnocchi than regions in Italy. Gnocchi can be made from vegetables, like beets, or with special flours, like chestnut. They can be formed and sauced in a manner altogether at odds with their usual presentation, as in gnocchi alla romana. The small potato gnocchi here—in which russets and Anson Mills ‘00’ pasta flour combine to create a soft, haunting sweetness—get the Ligurian treatment: simmered and drained, then rolled around in spoonfuls of aromatic basil pesto. For us, this simple, satisfying dish represents the season’s last hoorah.
Cooking Remarks
The notion that potato gnocchi should possess an ethereally light texture is axiomatic. And since gnocchi, in its highest form, comprises only potato and flour—no egg—the correct ratio of each is crucial. But it isn’t quite that simple. The chief ambition for anyone making potato gnocchi is to use the driest potatoes possible (some chefs age their potatoes en masse), and to drive as much moisture from the potatoes as possible as they cook. The more moisture the potatoes bring to the game, the more flour required by the dough. The more flour required by the dough, the heavier the gnocchi. Too little flour puts gnocchi at risk of being slimy or gooey—and even dry russets vary substantially in their starch character and moisture content, making an exact recipe difficult.
It felt like a slippery slope as we struggled with potato vagaries, proportion of ingredients—and, frankly, what technique produced the best gnocchi. We struggled until we found an online video of chef Marco Canora’s fleet gnocchi rendering. We immediately adopted his technique. One thing we learned in our own exercises is that gnocchi dough doesn’t like to be kneaded. The potato becomes gummy and gluey. We also had better luck with a food mill for processing than a ricer. And we adopted the practice of baking the potatoes on a bed of salt, thought by some to draw out additional moisture and by others to be utter nonsense. Empirically, we found the former statement to be true.
The temperature of the potatoes when processed is critical. They must be hot!
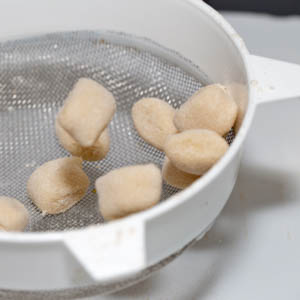
Potato gnocchi are classically imprinted with a fork and rolled into a dimpled cylinder, or, similarly, dragged down a small grooved board resembling a butter paddle. (The ridge and hollows catch the sauce.) But our dough is a bit too delicate for dragging. A heavily floured gnocchi board or the backside of a fork and moderate pressure with the thumb or forefinger will be more effective. Alternatively, you can cut off small pieces of dough, flour them lightly, and toss them around in a fine mesh colander. The bouncing softens the edges of the dough and gives the gnocchi a pretty shape. Complete directions below.
equipment mise en place
For this recipe, you will need a digital kitchen scale; a 12 by 9-inch baking dish; a paring knife; a metal skewer for testing the potatoes’ doneness; a food mill; a large, deep bowl; a pair of tongs; a rubber spatula; a ruler; a bench knife; a clean kitchen towel; two rimmed baking sheets, parchment paper; a gnocchi board or fine-mesh strainer (optional); a 6- to 8-quart pot; a small measuring spoon; a wire skimmer; a warmed large bowl; and warmed individual serving bowls.
-
-
3pounds russet potatoes
-
Kosher salt
-
6ounces Anson Mills Pasta Maker’s Flour, plus additional for dusting the work surface, baking sheets, and gnocchi board
-
Fine sea salt
-
1pint ripe cherry tomatoes
-
⅓
-
Ground black pepper
-
Grated Parmesan Reggiano, for serving
-
-
Adjust an oven rack to the middle position and heat the oven to 375 degrees. Pour at least 1 full inch of kosher salt into a 13 by 9-inch baking dish. Scrub the potatoes well and stab them all over with the tip of a paring knife. Roll the wet potatoes around in the salt to coat (fig. 1.1), then arrange them in the baking dish so none touch each other. Shake the baking dish so the salt settles into an even layer. Bake the potatoes until a metal skewer inserted into the center of the largest meets no resistance, 1 hour to 1½ hours. The potatoes must be completely tender so that they will easily pass through the disk of a food mill.
-
Set a food mill fitted with a fine disk over a large, deep bowl. When the potatoes are done, remove them from the oven and use a pair of tongs to transfer them to a cutting board, knocking excess salt off the skins (don’t be overly concerned by the salt—the dough needs salt anyway). Immediately split each potato in half lengthwise with a paring knife to allow steam to escape (fig. 2.1). Let the split potatoes rest for a couple of minutes as additional steam is released, but do not let them cool too much! Working with one potato half at a time, use a spoon to scoop the flesh from the skin and transfer it to the food mill (fig. 2.2); discard the skin. When you have scooped half of the potatoes into the food mill, process them into the bowl (fig. 2.3) and scrape the underside of the disk with a rubber spatula. Repeat with the remaining potatoes. The potatoes will look fluffy and dry (fig. 2.4). Work quickly so the potato flesh stays hot! You will have between 19 and 22 ounces of riced potatoes.
-
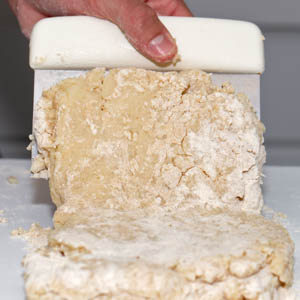
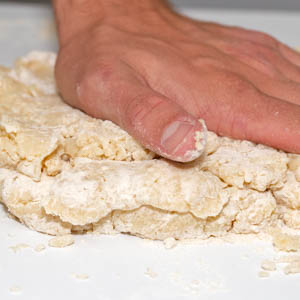
Turn the hot riced potatoes directly onto the counter and use a fork to spread them into a rectangle roughly 12 by 8 inches and ½ inch thick. Sprinkle 1 teaspoon of sea salt across the surface of the potatoes, then sprinkle with 3 ounces of the flour. Using a bench knife with the blade held perpendicular to the counter, chop across the surface of the potatoes as if cutting a fine chiffonade (fig. 3.1). The flour will be incorporated as you chop. Repeat the process, changing the chop direction from top to bottom and creating a cross-hatch pattern. Make sure to pull in stray bits of flour from the outer band of dough with the bench knife. The dough will feel tacky, but the rectangle will have become smaller—about 10 by 7 inches—but should remain about ½ inch thick. Sprinkle 2 ounces of the remaining flour across the dough and repeat the chopping process in each direction. Using the bench knife, press and mold the dough into a rectangle about measuring about 9 by 7 inches. Sprinkle 1 ounce of the remaining flour across the surface of the dough. Fold the dough into thirds with the bench knife, as if making turns in a pastry dough (fig. 3.2). Press and patty-cake the flour into the dough without kneading it (fig. 3.3). Under your hands, the dough will transform, becoming less tacky and increasingly supple. Pat it out into a rectangle about 7 by 6 inches and ½ inch thick. The surface of the dough should retain the imprint of your finger when pressed but your finger should not stick! Cover the dough with a clean kitchen towel and allow it to rest on the counter for about 10 minutes.
-
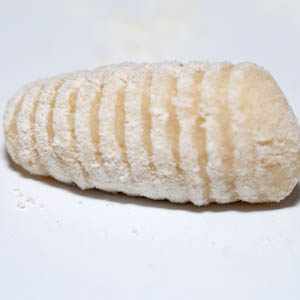
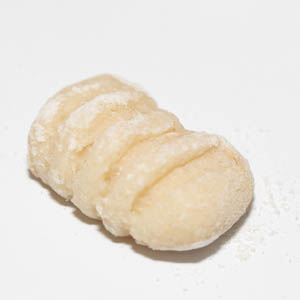
Line two rimmed baking sheets with parchment paper and dust each with flour. Lightly flour the work surface. With the bench knife, cut a 1½-inch section of dough from the rectangle, flour it lightly, and roll under your palms into a ½-inch diameter rope approximately 16 inches long (fig. 4.1). Cut the rope into ¾-inch squares (fig. 4.2.) with the bench knife. Heavily flour a gnocchi paddle, if using. Place a piece of lightly floured dough on the paddle and, with the side of your thumb and moderate pressure, roll the dough downward on the board so it is imprinted with grooves, creating a nearly closed cylinder with a hollow center (fig. 4.3). The finished gnoccho will look like this (fig. 4.4). You may perform the same action using the tines of an overturned fork; fork-pressed gnocchi look like this (fig. 4.5). Alternatively—and most efficiently—lightly flour the small pieces of dough and toss a few of them in a fine-mesh strainer (fig. 4.6). The bouncing will soften the edges of the dough and give the gnocchi a pretty shape. Whatever method you’ve chosen, transfer the finished gnocchi piece by piece to the prepared baking sheets. Repeat with the remaining pieces of dough. You should end up with about 90 gnocchi. Freeze the gnocchi uncovered on the baking sheet until firm, about 30 minutes. (If you want to cook the gnocchi on a later day, freeze the gnocchi until frozen solid, then transfer them to two gallon-size zipper-lock bags and return them to the freezer for up to 1 month.)
-
When you’re ready to cook the gnocchi, bring 4 quarts of water to a boil in a 6- to 8-quart pot over high heat. Cut each tomato in half and pull the seeds out with a small measuring spoon. Set the tomatoes aside.
-
Bring the water to a simmer over medium-high. Have ready a warmed large bowl. Add 2 teaspoons sea salt to the water, then drop half the gnocchi into the water (fig. 6.1). Cook, stirring very gently with a wire skimmer once or twice and adjusting the heat as needed so that the water does not return to a full boil, until the gnocchi float to the surface. Allow them to cook for about 20 seconds more, then use the skimmer to scoop the gnocchi into the bowl; cover with foil to keep warm. Cook the remaining gnocchi in the same way, making sure the water returns to a simmer before adding more gnocchi. Don’t discard the cooking water after all the gnocchi have been removed from the pot—you need some to toss with the gnocchi.
-
Add about ¾ cup finished pesto, the tomatoes, and 2 tablespoons of the cooking water to the hot gnocchi and toss very gently to combine. Taste for seasoning, adding additional pesto if you want. Divide the gnocchi among warmed individual bowls, sprinkle with black pepper, and shower with Parmesan. Serve right away.
-
-
1.1

-
-
-
2.1

-
2.2

-
-
-
3.1

-
3.2
-
3.3
-
-
-
4.1

-
4.2

-
4.3

-
4.4
-
4.5
-
4.6
-
-
-
6.1

-