Don’t Call Me Angel Biscuits

introduction
If you spend any time in the South, you’ll hear angel biscuits mentioned with reverence. “So light!” Sigh. “So airy!” Sigh. Despite the fuss, we were not able to determine when angel biscuits first appeared on earth or precisely where they came from, but one thing’s for sure: Angel biscuits don’t hew back deeply into Southern biscuit tradition. We know angel biscuits are raised, or yeast-leavened, and, since yeast predates quick, chemical leavening in culinary applications, it seemed reasonable to assume that some iteration of angel biscuits—or some variety of yeasted biscuit—would be the precursor to chemically leavened biscuits. Not so. There are no records of angel biscuits until the 1950s, a full generation after commercial baking powder took the biscuit form to new heights. Colonial yeasted biscuit recipes are rare, leaving us to infer that biscuits morphed from their original unleavened state to one of chemical enhancement without skipping a beat. In our travels backwards, we found only one raised biscuit recipe, but it speaks the language of dinner roll more than that of biscuit.
Slogging through a veritable stack of angel biscuit recipes we discovered something curious: Angel biscuits aren’t merely yeasted. They ingest an explosive trifecta of leavening agents that begins with yeast, ends with baking soda, and throws baking powder around in between. Hard to see the point: Baking soda and powder are quick leavens, but yeast needs time (though, not apparently, in an angel biscuit—an overwhelming number of recipes slam the biscuits in the oven with no more than 5 minutes of proofing time). Plus, for all the ammo issued on their behalf, angel biscuits appear, in photographs, oddly flat. Why? Well, if you ask us, it’s because biscuit dough is not moist enough, not lean enough, and the dimensions of a biscuit not roomy enough, for all this leavening to make any sense. Angel biscuits explain this excess by falling back on their charming alias, bride’s biscuits. Young brides, we’re told, were such poor bakers they needed baking powder, baking soda, and yeast to get a rise out of their biscuits. Really? This sounds like a young wives’ tale to us. These aren’t soufflés, folks—they’re biscuits. We’d guess whoever came up with angel biscuits was using yeast as a flavor, not as a leaven, creating a kind of latter-day revisionist biscuit hybrid.
Anyway, we decided to craft a raised biscuit recipe that would make raised biscuits proud. (There aren’t any real raised biscuits around, so competition was light.) Using classic biscuit dough proportions and hydration, we made a foundation dough with flour, milk, salt, and a modicum of instant yeast—in French culinary parlance, a détrempe. We added butter to the biscuit dough as one adds butter to a Danish dough. This means the butter is “sheeted,” or spread over the yeasted foundation dough and, through a series of rolling-pin driven mechanical turns, the dough becomes interleaved with butter. The technique produces biscuits with thin, crisp layers, a moist, webby interior, and a gorgeous rise.
Of course, we’re not pretending this is a bis-quick recipe, but the biscuits it produces are ethereal—far, far loftier than any angel biscuit we know. Not only have these biscuits the sweet, developed flavor of properly fermented dough and the lightness of a fine yeast-risen pastry laminated with butter, they also have some gumption. These biscuit meet the challenges of gravy without quaking. They reheat splendidly. They are so sublime in fact, we wouldn’t dream of tarnishing them with a name like “angel.”
Baking Notes
The foundation dough of this recipe is so miraculous to work with we’re not even recommending an electric mixer to put it together. It’s a joy to knead by hand, quickly moving beyond straggly and sticky into soft and claylike with a talcous finish.
Expect this dough to seem a little messy at the first set of turns, after the initial sheeting of butter. Don’t panic. Relax and have faith that with additional turns the butter will be sandwiched into ever-thinner sheets between the flour layers and the dough will become increasingly easier to work with each rest-and-rise period.
equipment mise en place
For this recipe you, will need a digital scale, a small saucepan, a medium mixing bowl, a rolling pin, a stand mixer with a flat-beater attachment, a rubber spatula, a bench knife, two or three baking sheets, parchment paper, a pizza stone, a 2¼-inch (give or take) biscuit cutter, and a pastry brush.
-
-
12ounces (1½ cups) whole milk, plus additional for brushing the biscuits before baking
-
1½teaspoons instant yeast
-
18.8ounces (about 4 cups) Anson Mills Colonial Style Fine Cloth-Bolted Pastry Flour, plus additional for dusting
-
1teaspoon fine sea salt
-
8ounces (16 tablespoons) unsalted European-style butter, cool room temperature
-
-
Warm the milk in a small saucepan over medium heat until small bubbles appear around the edges. Remove from the heat and let cool to the temperature of a hot bath. Sprinkle the yeast over the surface of the milk, let soften for a minute or two, and then stir to dissolve.
-
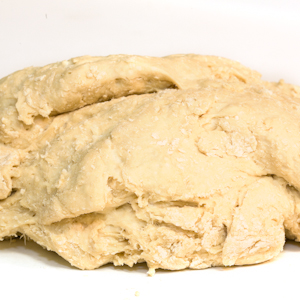
Turn all but 2 tablespoons of the flour and the salt into a medium mixing bowl. Add the milk-yeast mixture and stir with your fingers to combine. Begin kneading directly in the bowl, and then turn the dough out onto a clean, dry work surface. (Use the dough ball as an adhesive to bring along any flour still clinging to the sides of the bowl.) Knead briefly just to combine (fig. 2.1). Invert the bowl over the shaggy dough ball and let the dough rest for 20 minutes.
-
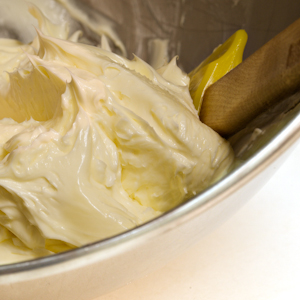
While the dough is resting, cream the butter in the bowl of a stand mixer fitted with the flat-beater attachment until light and fluffy. Detach the bowl from the mixer and, using a rubber spatula, scrape the butter from the sides of the bowl into a ragged heap in the center of the bowl (fig. 3.1). Set the bowl aside.
-
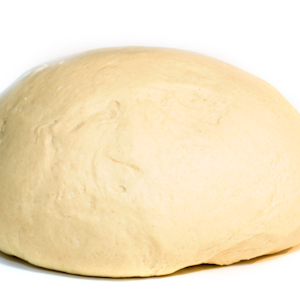
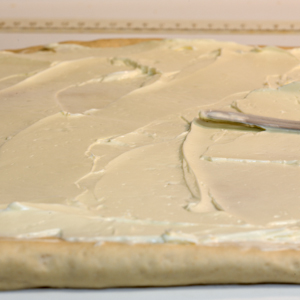
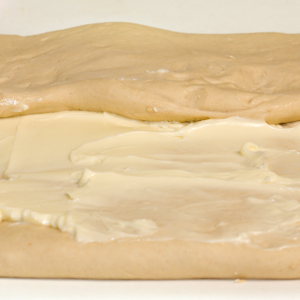
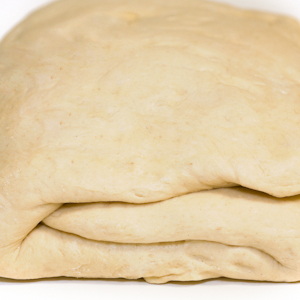
Knead the dough on the work surface until it is smooth, supple, and elastic, 10 to 15 minutes (fig. 4.1), adding the reserved 2 tablespoons of flour as needed if the dough is very sticky. If the dough feels tough or if you have difficulty working in any dry bits, wet your hands with water and continue kneading (and wetting your hands), until the dough becomes more supple. Lightly dust the work surface with flour, set the dough on top of the flour, lightly flour the top of the dough, then roll the dough into a rectangle about 10 inches wide by 15 inches long (its length should be perpendicular to the edge of your work surface). Spread the butter over the dough (fig. 4.2). Fold the top third of the dough down (fig. 4.3) and the bottom third of the dough up to create a rectangle measuring about 5 inches by 9 inches. Turn the rectangle so that the shorter sides are on the top and bottom and the open edge of the dough is facing right, like a book (fig. 4.4). Use a bench knife to block the sides of the dough. You have completed one turn. Set the dough on a baking sheet lined with parchment paper, cover with plastic wrap, and refrigerate for 30 minutes.
-
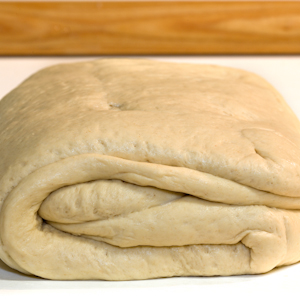
After 30 minutes, the dough will have risen substantially (fig. 5.1). Lightly flour the work surface, set the dough on the work surface with the spine of the book on the left, and again roll the dough into a rectangle about 10 inches wide by 15 inches long. Fold the top third of the dough down and the bottom third of the dough up to create a rectangle measuring about 5 inches by 9 inches. Rotate the rectangle one-quarter turn so that the spine of the book is on the left. Repeat the rolling and folding process. You have completed three turns. Use a bench knife to block the sides of the dough. Return the dough to the parchment-lined baking sheet, cover with plastic wrap, and refrigerate for 30 minutes. Repeat the double rolling and folding process one more time. You will have given the dough a total of five turns. Refrigerate the dough 30 minutes.
-
Adjust the oven racks to the lowest and upper-middle positions. Place a pizza stone on the lower rack and heat the oven to 425 degrees.
-
Sprinkle flour evenly over a fresh sheet of parchment paper. Remove the dough from the refrigerator, lift off the plastic wrap, and invert the dough onto the floured parchment. Lightly flour the top of the dough and roll it into a 12-inch square. Loosen the dough from the parchment and lay it back down. Drape a sheet of plastic wrap over the dough and let it rise at room temperature until soft and spongy, about 30 minutes.
-
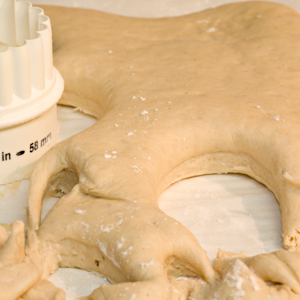
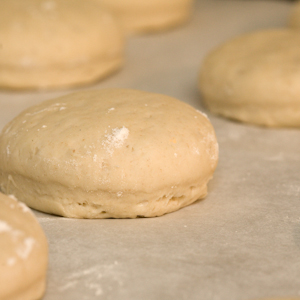
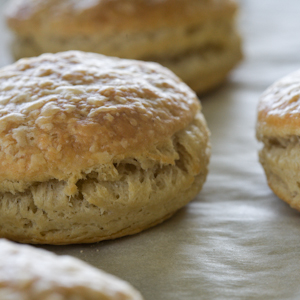
Line 2 baking sheets with parchment paper. Using a 2¼-inch round biscuit cutter dipped in flour, stamp out 15 biscuits (fig. 8.1) without twisting the cutter as you push it through the dough. Set the rounds on a prepared baking sheet (fig. 8.2). Gently reshape the remaining dough and re-roll it until about ¾ inch thick. Stamp out more rounds with the flour-dipped biscuit cutter. Repeat until you have 27 biscuits. Brush the tops of the biscuits with milk and let them 5 to 10 minutes to allow them to recover from the trauma of being stamped out. One baking sheet at a time, bake the biscuits on the pizza stone for 15 minutes until nicely risen, then transfer to the upper rack and continue to bake until golden brown, about 5 minutes longer (fig. 8.3). Serve hot with anything. (The biscuits are extremely well suited to Sausage Gravy).
-
-
2.1
-
-
-
3.1
-
-
-
4.1
-
4.2
-
4.3
-
4.4
-
-
-
5.1
-
-
-
8.1
-
8.2
-
8.3
-