Rustic Red Fife Natural Levain Boule

introduction
Flour, water, salt. That’s all you need to create a great loaf of bread. Coaxing these humble ingredients into a striking, nutritious loaf is something just shy of magic. But as with any magic trick, a bag of tools and a little sleight of hand is required to unlock the trick and reveal its mysteries. The following recipe is your backstage pass. Once you know the steps and have obtained the right tools, it’s only a matter of practice until you’re wowing your friends and family with millennium-old sorcery and a memorable finale.
To debut Anson Mills first naturally leavened bread recipe we chose new crop Red Fife whole grain flour, our staple bread wheat for nearly 20 years. Red Fife is capable of outstanding aroma and flavor, remarkable Maillard, excellent crisping, and a wonderfully moist open crumb. These qualities are possible, however, only when Red Fife is grown with proper field density using plant spacing of 10 inches (as opposed to the typical 2- to 3-inch crowding in modern wheat production). Red Fife also likes to grow with complementary legumes and root crops. But wait, there’s more: these field conditions support flavor development in Red Fife only when the land is perfect—or in excellent natural tilth. Excellent natural tilth means balanced soil minerality, high organic matter, and beneficial nematode presence. It means that no chemicals or inputs have touched the soil. Ever. Oh, and here’s another reason we love new crop Red Fife: properly grown, the seed isn’t dormant or dead but breathing oxygen like the rest of us. Aerobic new crop cereals are the foundation of live versus provision flour bread making. Red Fife can be new crop live or dormant provision, but ours is always new crop and aerobic. Flavor expression is extremely robust in live culture breads made from our flour.
Naturally leavened breads are an investment of time and may be an intimidating detour for the home baker. But if you follow the guidelines we’ve presented in the following recipe you’re bound for success. The loaves that emerge from your oven will fill the room with an intoxicating aroma. Round in shape and substantial in size, the 100-percent whole grain boule is surprisingly light for a loaf made with whole wheat flour. It will have a supple, glossy crumb and a crisp, thin crust. It will sit on your table and beg to be ripped apart and dipped or sliced thin and piled high with tasty toppings. It won’t lay heavily in your gut, for the lengthy fermentation process it enjoys has rendered otherwise bound nutrients digestible. Your assumptions about whole wheat will be completely reimagined.
Baking Notes
Executing this recipe is a demanding, yet largely hands-off, process. You will need to be around to watch over the dough and handle it when required. In time, you’ll begin to appreciate its presence in the background of your day and develop a routine and schedule that allows you down time to multitask. Below is a suggested timetable over the course of a three-day period.
When producing naturally leavened breads, paying close attention to the ambient temperature and the temperature of your dough is critical, but the temperature of your ingredients is also important. Anson Mills products are best stored in the freezer to stave off staling, but the Red Fife flour used in two stages of this recipe—for feeding the final levain and to make the final dough—must be at room temperature. We suggest that on day one, while you have the flour out to refresh your levain, you also weigh out the flour for the final levain and the autolyse, placing them into separate bowls. Cover the bowls and let stand at room temperature until you’re ready to use them the next day.
Handling and shaping high-hydration dough like this one can be frustrating, but with time and repetition, the process will feel comforting and familiar. It’s okay if the boules aren’t perfect. Maybe one tore a little or another comes out of the oven a bit flat, and denser than you would have liked. They’ll still be delicious, and you’ll have a benchmark for improvement next go around. Watch this video on our Instagram page!
The hazards of baking with very hot cast-iron pans is worth noting. Please exercise caution while handling the combo cookers at all stages and remember that they have incredible heat retention. Also, be cautious of steam burns when removing the lid halfway through the bake time.
Day 1
10:00 p.m. – Refresh the levain
Day 2
12:00 p.m. – Feed the final levain & mix autolyse
4:00 p.m. – Mix final dough
4:30 p.m. – Bulk fermentation
8:00 p.m. – Divide & pre-shape the dough
8:30 p.m. – Final shape the dough
9:00 p.m. – Cold-proof overnight
Day 3
7:00 a.m. – Heat the oven & combo cookers
8:00 a.m. – Bake
equipment mise en place
For this recipe, you will need a digital kitchen scale; a digital instant-read thermometer; a small saucepan; a pint-size mason jar; a small silicone spatula; a medium and a large bowl (a large bowl made of heavy ceramic is ideal); a plastic bowl scraper; a metal bench knife; two 8- to 9-inch round proofing baskets known as brotforms (aka bannetons); two Lodge 3-quart cast-iron combo cookers; parchment paper; a pizza peel; heavy-duty oven mitts; a baker’s lame or a small, razor-sharp knife; a ruler; and a wire cooling rack.
-
for refreshing your levain:
-
25grams spring or filtered water
-
10grams Red Fife Natural Levain
-
25grams Anson Mills Rustic Red Fife Bread Flour, freezer-cold (about 5 degrees)
-
-
for feeding the final levain:
-
95grams spring or filtered water
-
60grams refreshed levain
-
120grams Anson Mills Rustic Red Fife Bread Flour, room temperature
-
-
for the autolyse:
-
650grams spring or filtered water
-
900grams Anson Mills Rustic Red Fife Bread Flour, room temperature
-
-
for the final dough:
-
230grams final levain
-
70grams spring or filtered water
-
25grams fine sea salt
-
Anson Mills Rustic Red Fife Bread Flour, for dusting
-
-
Day 1, 10:00 p.m.—refresh your levain: In a small saucepan, warm the water to 105 degrees. Pour the water into a pint-size mason jar, add the levain, and stir with a small silicone spatula until homogenous. Add the flour and mix thoroughly. Scrape down the sides of the container and cover, loosely tightening the metal band. Let stand overnight at room temperature.
-
Day 2, 12:00 p.m.—feed the final levain: In a small saucepan, warm the water to 90 degrees. Pour it into a medium bowl, add the 60 grams refreshed levain, and stir until well combined. Add the flour and mix until no dry bits remain and the mixture is homogenous. Cover the bowl with plastic wrap and place in a warm area, a spot where the dough will maintain an internal temperature of about 80 degrees.
-
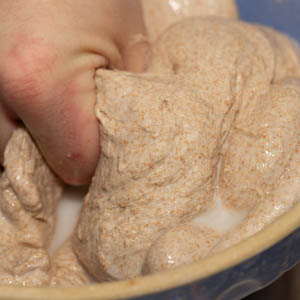
Day 2, 12:15 p.m. —mix the autolyse: In a medium saucepan, warm the water to 90 degrees. Pour it into a large bowl (ideally one made of heavy ceramic, though metal will work, too), then add the flour. Incorporate by squeezing and kneading with your dominant hand while rotating the bowl until the flour is fully hydrated and has gained a little strength (fig. 3.1); occasionally scrape down the bowl with a plastic bowl scraper. Cover with plastic wrap and place the bowl next to the one containing the final levain.
-
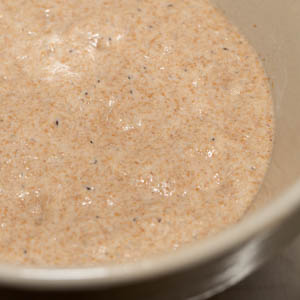
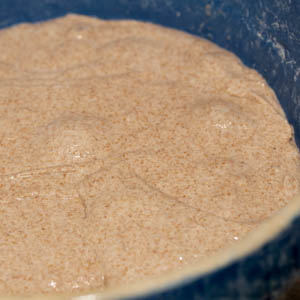
Day 2, 4:00 p.m. —mix the final dough: At this point, the final levain will be nearly tripled in size (fig. 4.1) and boast a pleasant, yeasty aroma; the autolyse will not appear very different than when mixed. Add the 230 grams final levain (reserve the remainder for future levain feedings) to the autolyse and squeeze with your hand, forcing the two to combine into a dough. Initially the mixture will look ruined, but after a few minutes it will come together into a single mass. Lightly knead the dough in the bowl for about 1 minute. Cover with plastic wrap and let rest for 10 minutes.
-
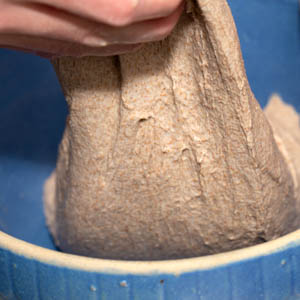
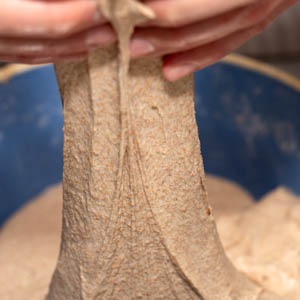
In a small saucepan, warm the water to 90 degrees, then stir in the salt. Add the saltwater to the dough and, utilizing the same squeezing and kneading method, squeeze and fold the dough until all the water has been absorbed; the dough will break apart but will eventually come together again into a uniform mass. Now it’s time to develop strength in the final dough before its bulk fermentation. Lightly moisten your dominant hand with water and, with the bowl near the edge of the counter, insert your hand, fingers first, down the side of the bowl at the 12 o’clock position and slide it down to the base of the bowl. Grab the dough, stretch it up, and fold it over to the opposite side of the bowl (fig. 5.1).
-
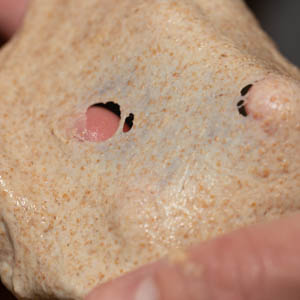
Rotate the bowl 90 degrees and repeat the process; moisten your hand as needed to prevent sticking and try to work swiftly and with decisive movements. Continue stretching, folding, and rotating the dough until it feels resilient and springy; this may take anywhere from 5 to 10 minutes. To test the dough for sufficient gluten development, pinch off a 2-inch piece of dough and gently stretch it using both hands; it should reach translucency but will tear rather quickly and jaggedly (fig. 6.1). If it tears before it reaches translucency, continue to stretch and fold the dough, then retest.
-
Day 2, 4:30 p.m. —bulk fermentation: If there are a few inches of headroom in the bowl for the dough to rise, leave the dough in the bowl; if the sides of the bowl are mucky, scrape them clean with a plastic bowl scraper. If the bowl lacks adequate headroom, transfer the dough to a larger thick-walled bowl. Cover tightly with plastic wrap and place in a warm area, where the dough will maintain an internal temperature of about 80 degrees. Let the dough rise for 30 minutes.
-
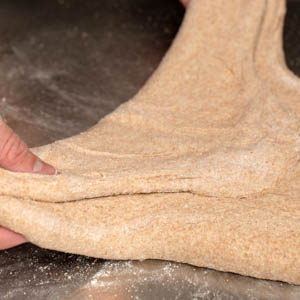
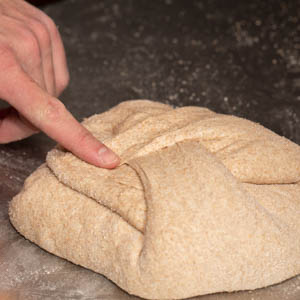
Once again, moisten your dominant hand with water and insert it down the side of the bowl at the 12 o’clock position, then stretch and fold the dough down to the opposite side of the bowl (fig. 8.1). Rotate the bowl 180 degrees and stretch and fold the dough in the same way. Now rotate the bowl 90 degrees in the same direction and fold, then rotate the bowl 180 degrees in the same direction and fold. Rotate the bowl 90 degrees and fold, then 180 degrees and fold, then 90 degrees and fold, and finally 180 degrees and fold; always rotate the bowl in the same direction. You will have given the dough a total of 8 folds. Cover the bowl with plastic wrap and let the dough rise in a warm spot for 30 minutes.
-
Repeat the stretching and folding process once again, this time using a lighter touch (fig. 9.1); even while developing the dough’s strength, you want to retain the gases that have built up during the rising periods. Cover the bowl and let the dough rise once again for 30 minutes. Repeat the stretching and folding process for a third and final time, using an even gentler hand. The dough should now be strong enough to stand away from the sides of the bowl. Cover the bowl with plastic wrap and return it to the warm spot.
-
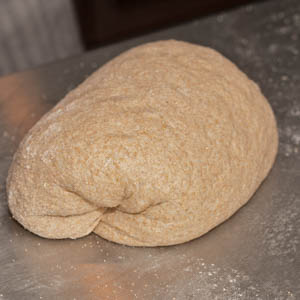
Day 2, 8:00 p.m.— divide and pre-shape: At this point, the dough will have increased about 30 percent in volume. It should have a bubbly surface and appear very active (fig. 10.1). Lightly dust the top of the dough with flour, as well as a large area of your work surface. Run a plastic bowl scraper around the inside of the bowl to release the dough from the sides. Flip the bowl onto the floured work surface and allow the dough to drop from the bowl. Set the bowl aside and lightly flour the dough. With a metal bench knife, evenly divide the mass in two. Flip over one half, positioning it directly in front of you. Take the bottom of the dough, at 6 o’clock, and fold it to the center, then fold the top of the dough, at 12 o’clock, to the center. Repeat with each side, at 3 o’clock and 9 o’clock. The dough should now be squarish in shape. Using the bench knife, to flip the dough over once again.
-
Hold the bench knife in your dominant hand, perpendicular with the counter’s edge and at about a 45-degree angle to your work surface, and push—essentially scraping—the dough to your free hand. As the dough moves, the surface will start to tighten. Its shape will be oblong. Gingerly lift the dough, rotate it 90 degrees, and repeat the pushing/scraping process until the dough is spherical and its surface is nice and tight (fig. 11.1). Lightly dust the top with flour and drape with a clean kitchen towel. Shape the other half of the dough in the same way, set it at least 4 inches away from the first dough round, and cover with another clean kitchen towel. Let the dough rounds rest for at least 20 minutes or up to 40 minutes; they will sink and pool out but should maintain a round shape. While the dough is resting, dust each of two 8- to 9-inch round brotforms with a about 25 grams of flour, evenly coating the sides and the bottom.
-
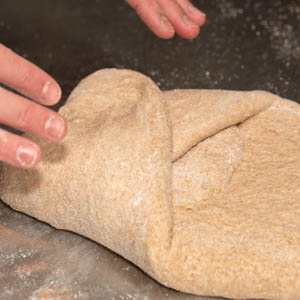
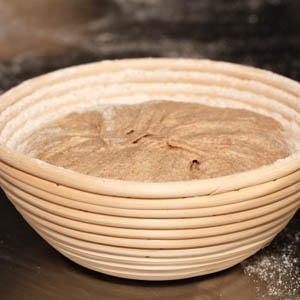
Day 2, 8:30 p.m.— final-shape and proof the dough: Uncover one portion of dough and lightly dust it with flour. Using the bench knife, gently flip the dough over. You’ll now use a series of folds and “stitching” to build strength in the final shape. Gently stretch and fold the bottom third of the dough, at 6 o’clock, up to its center (fig. 12.1). Do the same at 9 o’clock, 3 o’clock (fig. 12.2), and finally 12 o’clock. Now fold the top left corner of the dough toward the center, pressing gently so it sticks and grabs (fig. 12.3), then do the same with the top right corner (fig. 12.4). Continue folding down the corners, alternating sides, until you’ve reached the bottom edge of the dough; the dough will look like a stitched-up football. Gently stretch the bottom edge and pull it up and over the dough, rolling the whole thing up while flipping it over; it will now be a plump log, seam side down on the work surface. Holding a bench knife at a 45-degree angle to your work surface, scrape and lift one end of the dough toward the other end, tightening the surface and creating a spherical shape with sealed seams (fig. 12.5). Shape the second portion of dough in the same way. Lightly dust each shaped dough with flour and invert it into a prepared brotform; what was facing up is now against the bottom of the basket (fig. 12.6). Cover each brotform with a clean kitchen towel and place in the refrigerator.
-
Day 3, 7:00 a.m.— heat the oven and combo cookers, then bake the loaves: Adjust the oven rack to lower-middle position and heat the oven to 500 degrees. When the oven comes up to temperature, carefully slide two Lodge 3-quart cast-iron combo cookers, the two pieces stacked in place, in the oven and allow them to heat for about 20 minutes.
-
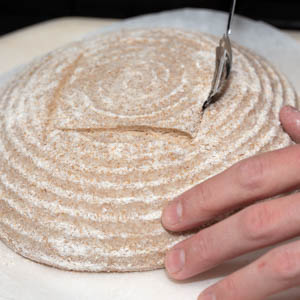
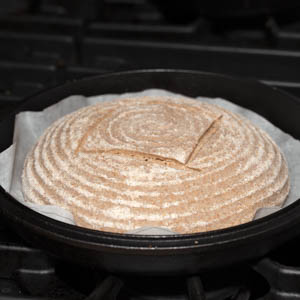
Remove the brotforms from the refrigerator. Cut out two 10-inch rounds of parchment paper and place one on a pizza peel. Uncover one of boules and lightly dust it with flour. Using heavy-duty oven mitts, very carefully remove one of the combo cookers from the oven; close the oven door. Separate the combo cooker into its two components; the boule will be loaded into the shallower pan and the deeper pan will serve as a cover to create a sealed environment. Using your fingertips, very gently pull the edge of the dough away from the brotform to release it from the sides, then carefully tip the dough out of the basket onto the parchment round on the peel. With a baker’s lame or small, razor-sharp knife held at about a 45-degree angle to the boule, slash a 4-inch square at the center (fig. 14.1); don’t cut too deep, as this could collapse the dough’s structure. Swiftly slide the boule with its parchment into the shallow pan of the combo cooker (fig. 14.2); center the boule in the pan if needed. Cover with other part of the combo cooker and place in the oven. Repeat the process with the remaining loaf and combo cooker.
-
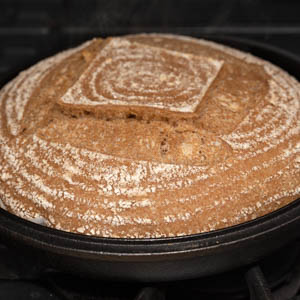
Bake for 20 minutes, then remove the first boule and its combo cooker from the oven. Carefully remove the lid of the cooker; the loaf will have expanded and risen (fig. 15.1). Return the pan to the oven, then repeat with the second loaf. Reduce the oven temperature to 450 degrees and continue to bake until the loaves are deeply browned and the internal temperature registers about 210 degrees on an instant-read thermometer, 15 to 20 minutes longer. Another way to test doneness is to tap the boules on the bottom—they should sound hollow. As the loaves are done, remove them from the oven and quickly transfer to a wire rack; remove and discard the parchment. Let cool to room temperature before slicing; if you aim to thinly slice the loaves, allow them to cool for at least 4 hours.
-
-
3.1
-
-
-
4.1
-
-
-
5.1
-
-
-
6.1
-
-
-
8.1
-
-
-
9.1

-
-
-
10.1
-
-
-
12.1
-
12.2
-
12.3

-
12.4
-
12.5
-
12.6
-
-
-
14.1
-
14.2
-
-
-
15.1
-