Sweet Rice and Ricotta Pie
introduction
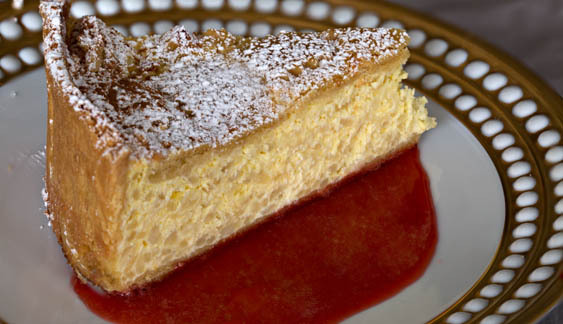
One might reasonably expect an Easter pie possessed of rice and ricotta to land firmly on the plus-size rack of postprandials. Who among us hasn’t plunged a fork into a cannoli only to stagger away, ourselves mortally wounded? Some ingredients lay heavy. (To say nothing of the weight of rice.) Yet this lovely pie with its closed lattice virtually whispers grace. It owes its lightness to the elegance of a whole egg and sugar foam and exceptional ricotta—oh, and some awesome Carolina rice! It owes its composite appeal, we believe, to the crust.
We twinned this pie with a simple strawberry syrup made from frozen berries.
We aren’t going to suggest the execution of this pie is a casual proposition. It requires skill and commitment, not to mention a big chuck of time. But what a lovely Easter confection it is! It travels beautifully, too.
Baking Notes
There is absolutely no point in bothering to execute this pie only to curse it with supermarket ricotta. Ricotta should be gloriously bland, with the flavor of sweet, fresh milk and a delicately soft texture. The only way we can think to describe supermarket ricotta is by the distinctly off flavor it possesses and the distinctly fresh flavor it lacks. There are cheesemakers out there—a fair number of them, in fact—who make artisanal ricotta: to name but two, Bellwether Farms in Petaluma, California and Salvatore Bklyn in New York both make whole-milk ricotta. (Bellwether ricotta is available for online purchase). Formaggio Kitchen, based in Cambridge, Massachusetts, sells artisanal ricotta online. And, believe it or not, making ricotta at home is not rocket science. New England Cheesemaking Supply Company and Cultures for Health each have the goods.
In terms of baking vessel, we tried the whole removable sides getup (aka a springform pan). It’s convenient: you unfasten the little metal belt and slip the ring over the pie’s head. Problem is, we didn’t get respectable browning—or much browning at all—on the bottom crust. So we headed straight over to JB Prince and into their French ring mold section. Ring molds are essentially giant biscuit cutters. You set the mold on a baking sheet and line it with pastry as you would with any other tart pan. The bottom crust makes direct contact with heat-conducting surfaces—in this case, an aluminum baking sheet and a toasty warm pizza stone—which promotes browning. They may be a bit tricky in the execution, but ring molds produce crisp, straight-sided pastry shells with elegant lines.
Lattice weaving produces great anxiety in us, especially in pies with liquidy fillings. Bad things tend to happen: the lattice strips drown and we end up with an irregular weave because we were so nervous. For this pie, we decided to weave the lattice apart from the pie. It felt a bit like a crash course in chair caning, but the results were sooo much better. We prebake the lattice to set the shape, stamp out a round, and then slide it on top of the pie, allowing the entire lattice to rest within the inner perimeter of the pie.
Oh, yes, the pastry recipe: you might recognize it as our very own Pâte Sablée posturing under an Italian name. The truth is, pasta frolla and pâte sablée don’t diverge much, if at all, except in their accents. We worked with varying ingredient proportions in the dough, and with confectioners’ sugar favored by Italians, but nothing came close to our existing recipe, which is short, buttery, and has an absolutely superb flavor.
One final word. This recipe requires a digital kitchen scale. In addition to guaranteeing good results, a digital scale makes measuring the ingredients much, much easier. If you have the 14-cup food processor, ring mold, pizza stone, and commitment needed to continue on, we’ll bet you have a digital scale, too.
equipment mise en place
For the filling, you will need a digital kitchen scale, a rasp-style grater, a small bowl, a fine-mesh strainer, a heavy-bottomed medium saucepan, a wooden spoon, a medium bowl, a rubber spatula, and a standing mixer fitted with the whisk attachment.
For the pasta frolla, you will need a digital kitchen scale, a small bowl, a 14-cup food processor, parchment paper, a rolling pin, a ruler, two baking sheets, a pizza stone, an 8-inch-diameter by 2⅜-inch-high ring mold, heavy-duty aluminum foil, 1½ quarts pie weights or dried beans, an 8-inch round cake pan, and a wire rack.
-
for the filling:
-
3.5
-
16ounces spring or filtered water
-
16ounces whole-milk ricotta
-
3ounces heavy cream
-
Finely grated zest of 2 lemons
-
¼teaspoon fine sea salt
-
2large eggs, room temperature
-
4large egg yolks, room temperature
-
7.5ounces granulated sugar
-
1ounce dry Marsala
-
-
for the pasta frolla:
-
2large egg yolks
-
1ounce heavy cream
-
1½teaspoons vanilla extract
-
15ounces Anson Mills Colonial Style Fine Cloth-Bolted Pastry Flour, plus additional for rolling out the dough and forming the lattice
-
4ounces granulated sugar
-
½teaspoon fine sea salt
-
8ounces cold unsalted European-style butter, cut into 1-inch cubes
-
-
for serving:
-
Confectioners’ sugar
-
Ground cinnamon
-
1recipe Strawberry Syrup
-
-
Begin the filling: Turn the rice into a small bowl and cover it with spring or filtered water. Let soak at room temperature for 2 to 3 hours while you prepare the pasta frolla.
-
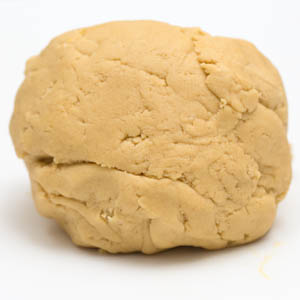
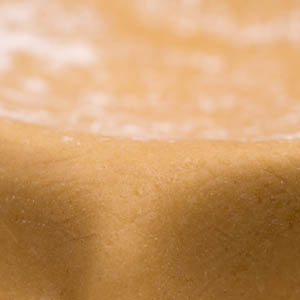
Make the pasta frolla: Combine the egg yolks, cream, and vanilla in a small bowl and stir with a fork until blended. Place the flour, sugar, and salt in a 14-cup food processor and pulse a few times to combine. Scatter the butter pieces over the surface and pulse until the mixture resembles coarse meal, about ten 1-second pulses. With the machine running, pour the egg-yolk mixture through the feed tube and process until the dough forms a ball that chases itself around the bowl, about 20 seconds. Transfer the dough to a work surface; it should be soft and pliable (fig. 2.1). Divide the dough into two equal (13-ounce) pieces. Press each half into a disk, wrap in plastic wrap, and refrigerate for at least 30 minutes or up to 2 hours.
-
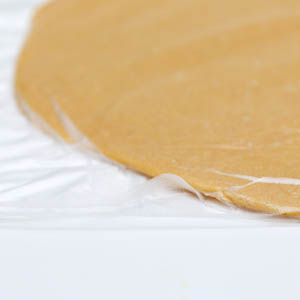
Unwrap one piece of dough and place it between two large sheets of plastic wrap or parchment paper. Roll out the dough to a rectangle measuring about 12 by 16 inches and about 1/16 inch thick. Slide the dough, sandwiched between the plastic, onto a baking sheet and refrigerate. Repeat the process with the second piece of dough, rolling it to a 14-inch round (fig. 3.1). Slide the round on top of the rectangle and return the baking sheet to the refrigerator. Chill for 15 to 30 minutes.
-
Adjust the oven racks to the lowest and middle positions and place a pizza stone on the middle rack. Heat the oven to 425 degrees and allow the pizza stone to heat as you finish assembling the pie.
-
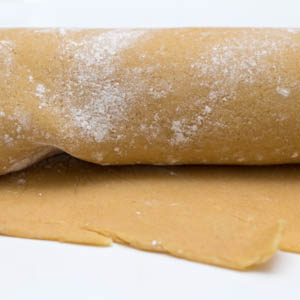
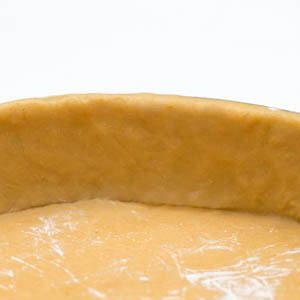
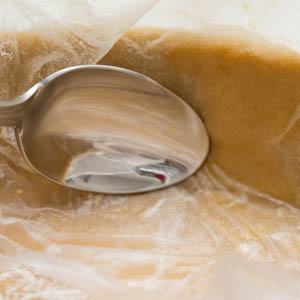
Line the ring mold: Line a baking sheet with parchment paper and set an 8-inch round by 2⅜-inch high ring mold on top. Remove the 14-inch round of dough from the refrigerator and give it a light pass with the rolling pin. Peel off the top sheet of parchment, sprinkle the dough with flour, and drape the parchment back on top. Holding the parchment corners, flip over the dough, peel away the second parchment sheet, and sprinkle the dough with flour. Roll the dough around the rolling pin (fig. 5.1), and then gently unfurl it over the ring mold (fig. 5.2). Ease the dough into the base of the mold, pleating it for support (fig. 5.3), and then patch any tears or holes. Drape a sheet of plastic wrap over the dough and smooth the sidewalls using the back of a spoon (fig. 5.4). Roll the rolling pin over the top of the dough-lined mold to trim away excess. Refrigerate until the dough is firm, about 30 minutes.
-
Fit a sheet of heavy-duty aluminum foil snugly against the dough, allowing ample overhang. Pour about 1½ quarts of pie weights or dried beans into the foil; they should come flush with the edge of the mold. Refrigerate for 45 minutes.
-
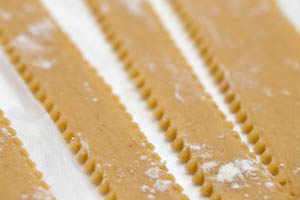
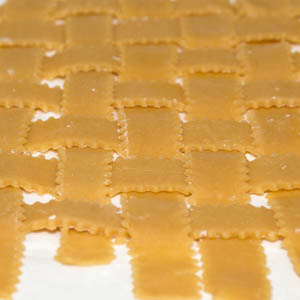
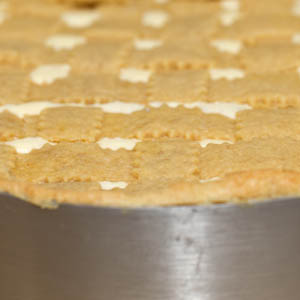
Make the lattice: Remove the dough rectangle from the refrigerator. Peel off the top sheet of parchment, sprinkle the dough with flour, and drape the parchment back on top. Holding the parchment corners, flip over the dough, peel away the second parchment sheet (reserve it as a liner on which to form the lattice), and sprinkle the dough with flour. Using a ruler and a fluted pastry wheel, cut the dough lengthwise into 14 strips, each about h inch wide (fig. 7.1). If the dough becomes warm and soft, slide the parchment with the dough back onto the baking sheet and refrigerate for a few minutes. Using one of any number of online instructions as a guide (simplyrecipes.com is a good one), weave the strips into a tight lattice on the reserved parchment sheet (fig. 7.2). Slide the parchment with the lattice onto the baking sheet and refrigerate for 30 minutes.
-
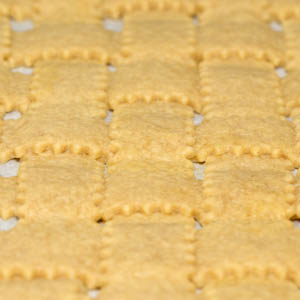
Slide the baking sheet with the chilled lattice onto the hot pizza stone and reduce the oven temperature to 350 degrees. Bake until the dough is set but not browned, about 15 minutes (fig. 8.1). Remove the baking sheet from the oven and immediately invert an 8-inch round cake pan onto the lattice, pressing firmly to stamp out a circle. Sweep the extra pieces away—or eat them. Let the lattice cool on the baking sheet, and then slip it onto the bottom of the inverted cake pan. Increase the oven temperature to 425 degrees.
-
Prebake the dough-lined mold: Slide the baking sheet pan with the dough-lined mold directly onto the pizza stone. Bake for 20 minutes, rotating halfway through baking. Remove from the oven, let cool for 5 minutes, and then carefully lift the foil and pie weights out of the mold. Return the baking sheet to the oven to continue baking until the pastry is uniformly crisp and light brown, about 5 minutes longer. Let cool on a wire rack. Reduce the oven temperature to 350 degrees.
-
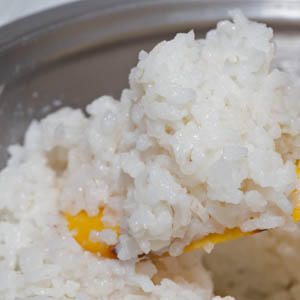
Finish the filling: Drain the rice in a fine-mesh strainer. Bring the 2 cups of water to a simmer in a medium saucepan over high heat. Add the rice, turn down the heat to medium and simmer gently, uncovered, stirring occasionally, until the rice is very tender (more tender than how you would like to eat it), about 20 minutes (fig. 10.1). Remove from the heat and let the rice cool uncovered.
-
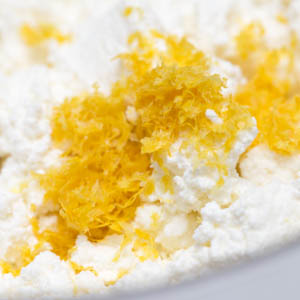
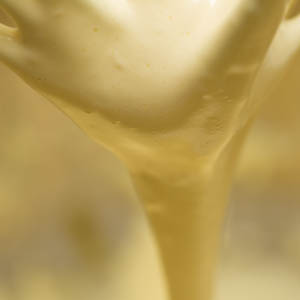
Stir together the ricotta, cream, lemon zest, and salt in a medium bowl (fig. 11.1). In the bowl of a stand mixer fitted with the whisk attachment, beat the eggs and egg yolks on medium speed until beginning to thicken, about 1 minute. With the mixer running, stream in the sugar and continue beating until the mixture has thickened, increased in volume, and falls in heavy ribbons when the whisk is lifted (fig. 11.2), about 2 minutes more. Add the marsala. With the mixer running on low speed, add the ricotta and the cooled rice and mix until well combined. Pour the filling into the prebaked pastry. It should come up to the rim. Slide the lattice onto the pie (fig. 11.3). Slide the baking sheet with the pie onto the pizza stone and bake until the filling has risen but still jiggles in the center and the lattice is golden, 45 to 50 minutes.
-
Let cool on the baking sheet on a wire rack for at least 1 hour. Lift off the ring mold and transfer the pie to a platter. To serve, sift confectioners’ sugar and cinnamon over the pie and cut into wedges. Spoon Strawberry Syrup on the side.
-
-
2.1
-
-
-
3.1
-
-
-
5.1
-
5.2
-
5.3
-
5.4
-
-
-
7.1
-
7.2
-
-
-
8.1
-
-
-
10.1
-
-
-
11.1
-
11.2
-
11.3
-