Lost and Found Chili

introduction
If you consider chili a spicy stew with beef and chiles—and possibly beans—you need to get out more. Chili is actually a competitive sport in which grown men engage in reiterative acts of targeted one-upsmanship that seek to drive the heat scale and flavor dimensions of chili beyond all reasonable limits.
It’s the old “my chili is bigger, beefier, hotter, fierier, and fiercer than yours” trope we’ve come to expect from Texans—and would-be Texans.
But chili does not have to be a tongue-searing, life-altering event to be memorable. In the late 19th and early 20th centuries, a handful of mostly Latina women who were schooled in nuanced Native American cookery made chili and served it streetside in San Antonio, Texas. Known as Chili Queens, it is their style of chili we chose to discover—a quieter bowl of “red.” As we began to experiment with dried chile combinations to create a new flavor, we sensed how elegant and sustaining chili must have been at one time—not on the level of a swift punch in the face.
In particular, we became fascinated with two varieties of the great pasilla class of sauce chiles, the dark, rich pasilla negro, and the fruity and lightly smoked pasilla de Oaxaca. With these, we combined a touch of ancho, sweet and raisiny; for heat the diminutive árbol; and for general congeniality, bright red color, and sweet berry notes, the guajillo.
Cooking Remarks
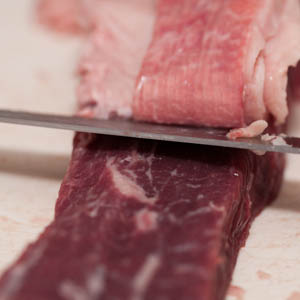
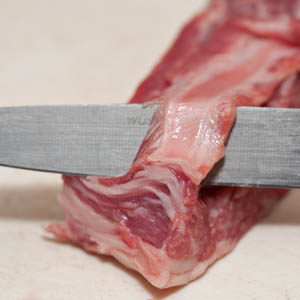
In developing this recipe, we tried every imaginable beef stew meat from chuck, to brisket, to shank, to short ribs—with bone and without. (Despite our determination to go with preservation-style chili, we just couldn’t make it over to cured venison.) In the end, it was the unsurpassed flavor and tenderness of boneless short ribs that moved the jury. We were thus able to remove the gnarly non-dissolving band of connective tissue from the meat while it was still raw (see fig. 3.2 below). Short ribs aren’t cheap, but this isn’t lunchroom chili. It is an elevated dish, every inch the dinner-party entrée.
The chiles threw us for a loop, too. We sought desperately to assemble a fluent set of flavors—some heat, some bright fruit, some raisin, some smoke. Getting the correct combination was tricky on its own, and it didn’t help to discover utter mayhem among chile packages. We found packs of chiles bearing the same names that bore no resemblance to each other! We found packs of chiles with different names that looked exactly alike! We began to feel helpless and traduced. So we turned to Native Seeds Search. The pedigree of their chiles is as inexorable as the pedigree of Anson Mills corn. If you’re serious about chili, get serious about chiles and buy from these guys!
After initially rehydrating chiles and pureeing them to a paste, we advanced to grinding dried chiles directly into an aromatic powder. It was easier to establish a pleasing ratio this way. Commerical chili powder, of course, has been beaten to death as a shelf item in grocery stores. It possesses no character, is usually stale and inexplicably out of balance, and trends toward enough cumin to burn the enamel off your teeth. In contrast, our freshly ground chile powder, with its bright and diverse aromatics, expresses a brilliant dimension of flavors beyond the sum of its individual contributors. This nonlinear notion of flavor development is inherently Native American—fitting, because these chiles are their plants anyway, no matter who grows them.
Toasting chiles isn’t so much about toasting in the usual sense. It is performed to move the chiles from leathery to parchment-like, and thereby persuade them to relinquish their seeds and allow their skins to be ground to a powder.
Oh, cumin! You aren’t even native to North America, but what would chili be without you? Still, we’d like to slap you with a restraining order most of the time. Ground or whole seed, who cares, you nearly always commit a crime. We cannot count how many soups, bean dishes, servings of guacamole, and you-name-its we’ve purchased or were served in restaurants that have been brutalized by the impact of cumin. So readers, get yourselves some really fresh cumin seeds, please, and use the suggested amounts in this recipe.
equipment mise en place
For this recipe, you will need a medium cast-iron skillet, a pair of rubber gloves, a pair of tongs, an electric coffee grinder or spice grinder, a fine-mesh sieve, a roasting pan fitted with a flat wire rack, a large Dutch oven, a small saucepan, a 2-cup glass measuring cup or small pitcher, and a small heatproof bowl.
-
for the chile powder:
-
3guajillo chiles (0.7 ounces)
-
2pasilla negro chiles (o.4 ounces)
-
2pasilla de Oaxaca chiles (0.3 ounces)
-
1ancho chile (0.4 ounces)
-
8árbol chiles (0.1 ounces)
-
-
for the spice mix:
-
2whole cloves
-
1star anise
-
2teaspoons cumin seeds
-
½teaspoon coriander seeds
-
2teaspoons whole-leaf dried oregano, preferably Mexican oregano
-
2Turkish bay leaves
-
-
for the chili:
-
4pounds boneless beef short ribs
-
Fine sea salt and freshly ground black pepper
-
2tablespoons beef suet or olive oil
-
1medium yellow onion, chopped very fine (1 cup)
-
6garlic cloves, minced with 1 teaspoon salt (2 tablespoons)
-
4cups Good Old-Fashioned Beef Stock, simmering
-
2tablespoons tomato paste
-
-
for the nixtamal mush:
-
½cup spring or filtered water
-
¼teaspoon culinary lime, such as Mrs. Wages or calcium hydroxide from Modernist Pantry
-
3
-
-
accompaniments:
-
1
-
1recipe Cornbread Croutons
-
-
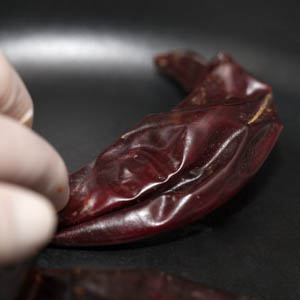
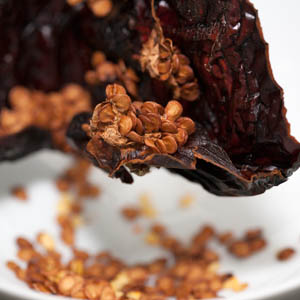
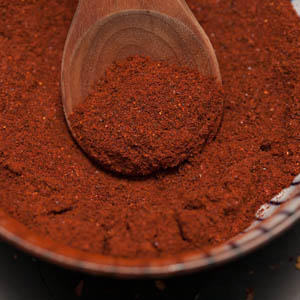
Make the chile powder: Heat a medium cast-iron skillet over low heat until hot, about 3 minutes. Pull on a pair of rubber gloves. Working with one type at a time, toast the guajillo, pasilla negro, pasilla de Oaxaca, and ancho chiles (do not toast the árbol chiles) until fragrant, 1 to 2 minutes, turning them occasionally and pressing them against the skillet with tongs or your gloved fingers (fig. 1.1). Pull the tops off the chiles (including the árbols) to remove the stems, and then shake out the seeds into a small bowl. Rip open the pods, pull out and discard the ribs (fig. 1.2), tear the chiles into pieces, and allow to cool until crisp. Grind the chiles in 3 batches to a fine powder in a coffee or spice grinder. Empty each batch into a fine-mesh sieve over a small bowl and sift the chile powder to remove bits of skin or ribs. Discard the contents of the sieve after sifting each batch. When all the chiles have been ground and sifted, stir the chile powder to ensure that it’s well blended (fig. 1.3). Turn the powder into a jar with a tight-fitting lid and set it aside.
-
Make the spice mix: Again heat the medium cast-iron skillet over low heat until hot, about 3 minutes. While the pan is heating, pull off and reserve the buds of the whole cloves. Break 2 petals from the star anise and crack them open to release the shiny seed within each. Toss the clove buds, the star anise seeds, and the oregano into the coffee grinder. Toast the cumin and coriander seeds in the hot skillet, tossing constantly, until fragrant, about 2 minutes. Transfer to a small plate and let cool. Add the toasted seeds to the coffee grinder and grind the mixture to a fine powder. There will be about 1 tablespoon. Turn the spices into a bowl, toss the bay leaves on top, and set aside.
-
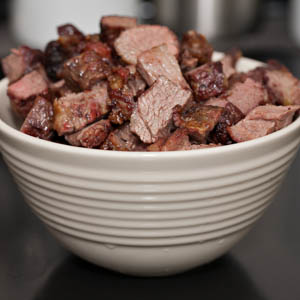
Make the chili: Adjust an oven rack to the middle position and heat the oven to 425 degrees. Pat the short ribs dry with paper towels. If the short ribs are still in a slab, cut them into 3-inch-wide bands about 1 inch thick. Trim away excess fat and remove any silver skin (fig. 3.1). Trim off the tough band where the bone was attached (fig. 3.2). Sprinkle the meat with salt and pepper and place on a flat wire rack set in a roasting pan. Roast until the beef is browned and much of the fat has rendered, 45 minutes to 1 hour, turning the pieces after 30 minutes with tongs. Remove from the oven and let cool slightly. Cut the meat into 1-inch cubes (fig. 3.3); there will be about 1½ pounds.
-
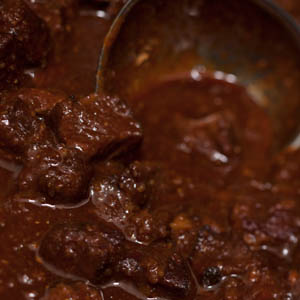
Melt the suet or heat the olive oil in a large Dutch oven over medium-low heat. Add the onion and sauté until translucent, about 10 minutes. Add the garlic and sauté until fragrant, about 10 seconds. Stir in the spice mix followed by ¼ cup of the chile powder Sauté for 30 seconds, and then add the simmering stock, the tomato paste, and the cubed beef. Stir to combine. Cover partially, bring to a simmer, turn down the heat to low, and simmer gently, stirring occasionally, until the meat is tender, 2 hours or longer. Remove from the heat, let cool slightly, and refrigerate overnight.
-
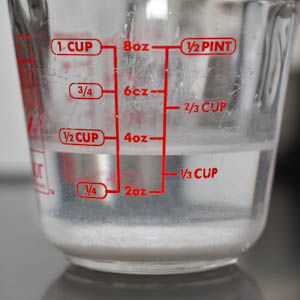
Make the limewater for the nixtamal mush: While the chili chills, in a small saucepan, bring the water to a simmer over low heat. Pour it into a 1-cup glass measuring cup or pitcher. Add the culinary lime and stir with a wooden spoon until the powder dissolves. Allow the limewater to stand for 2 hours without agitating the solids that settle on the bottom. There will be a thin, crisp lime skin on the surface of the water. The liquid beneath will be clear, and a layer of cloudy lime solids will be hover over the bottom of the container (fig. 5.1). Set a fine-mesh strainer over the small saucepan. Pour the limewater gently through the strainer leaving the cloudy solids in the measuring cup (the lime skin will remain in the strainer). Pour the lime skin and solids down the drain and rinse the sink well. Cover the limewater and set aside until needed.
-
When you’re ready to serve, skim the fat from the chili while the chili is still cold. You won’t be able to remove it all, and you don’t want to remove it all—chili is no lean cuisine, and the residual fat packs a ton of flavor. (The residual fat will bind with the nixtamal mush that’s used to thicken the chili). Bring the chili to a simmer over low heat.
-
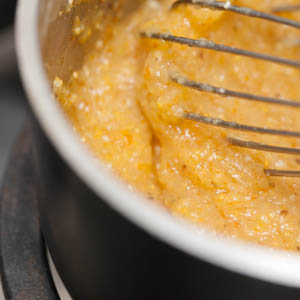
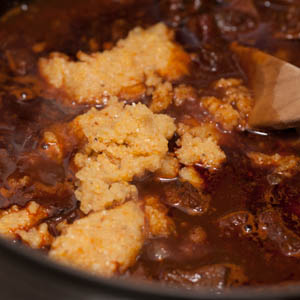
Make the nixtamal mush and finish the chili: Bring the limewater to a simmer over low heat. Measure the cornmeal into a small heatproof bowl. Drizzle the hot limewater into the cornmeal, whisking to keep it from lumping. Scrape the slurry back into the saucepan and cook it over low heat, whisking constantly, until the slurry thickens to a thick corn mush, about 2o seconds (fig. 7.1). Scrape the mush into the simmering chili (fig. 7.2) and whisk to break it up. Use a wooden spoon to mash pockets of mush against the side of the pot to melt them into the chili. Continue to simmer the chili until it has reached the consistency you like (fig. 7.3). Taste for seasoning, and serve hot with accompaniments.
-
-
1.1
-
1.2
-
1.3
-
-
-
3.1
-
3.2
-
3.3
-
-
-
5.1
-
-
-
7.1
-
7.2
-
7.3
-