Flaky Lard and Butter Pastry
introduction
I remember my father exulting the flakiness of lard pastry years and years ago as he described the local restaurant’s ethereal raisin pie he ate as a boy in Clay City, Indiana. Yet when I bought a block of Armour lard and made some dough, “ethereal” wasn’t a word that leapt to mind. I didn’t know much about baking, but I knew factory farming when I smelled it—even if I couldn’t identify the odor. From then on when my shortening was white, it was Crisco, not lard.
Fast forward. Crisco is out of the game. For me anyway. The trans fats brouhaha took care of that. On the other hand, lard—leaf lard, the kind that made up my dad’s favorite raisin pie pastry—has regained ascendancy in culinary terms. Not only are its properties considered more wholesome than those of hydrogenated vegetable shortening, but leaf lard’s performance in a pastry is unparalleled.
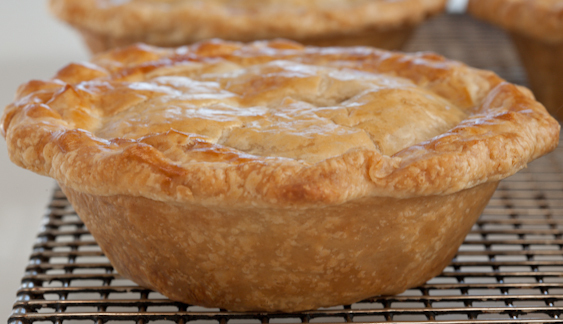
Those pasty, ultrashort, suede-like pie crusts? Leaf lard, which is the hard fat hiding around a pig’s kidneys, produces pastry that is flaky, but not self-dissolving. Mix leaf lard and butter together and you get unparalleled flavor and performance in a pastry. Put some turns in the pastry in the tradition of semi-puff, and you’ll be astounded, frankly, to be eating the best American pastry you’ve ever tasted.
Baking Notes
This pastry recipe, a standard pie dough with “turns,” can also be called a semi-puff pastry. Semi-puff has the virtue of being simpler to execute than classic puff pastry while producing exquisite flakiness and a bit of lift that gets close to the real deal. Close enough for us. The turns also give the dough unflappability in terms of handling. Each full turn involves rolling the dough out into a long rectangle and folding it across itself into thirds. Then the process is repeated. The dough will show chunks of butter at the early stages and look scraggly and ragged. But with successive turns it will become easier to work with and progressively tidier. As with all of Anson Mills heirloom flours, this pastry flour hydrates slowly. The initial rough dough may feel dry, but resist the impulse to add additional water.
We ordered fabulous leaf lard from Prairie Pride Farm in Minnesota. It comes in a 4-pound pail, snowy white and ready to use. It keeps exceptionally well and makes really, really good fried chicken, too.
All the ingredients for this crust should be frozen first. Of course, your flour is already frozen, right? Because Anson Mills flour lives in the freezer! The lard will be frozen, too. Freeze the butter for a half hour before making the pastry.
equipment mise en place
For this recipe, you will need a digital kitchen scale, a food processor, a large mixing bowl, a rubber spatula, a bench knife, plastic wrap, a rolling pin, and a ruler.
-
-
9.4ounces (2 cups) Anson Mills Colonial Style Fine Cloth-Bolted Pastry Flour, chilled, plus additional for dusting the work surface
-
¾teaspoon fine sea salt
-
Generous ⅛ teaspoon baking powder
-
2ounces (4 tablespoons) frozen leaf lard, cut into ½-inch pieces and kept in the freezer until ready to use
-
4ounces (8 tablespoons) unsalted European-style butter, cut into ½-inch pieces and frozen for 30 minutes
-
3.2ounces (about 7 tablespoons) iced water
-
-
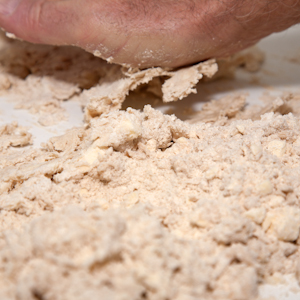
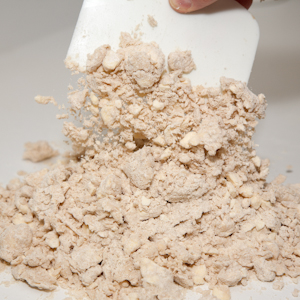
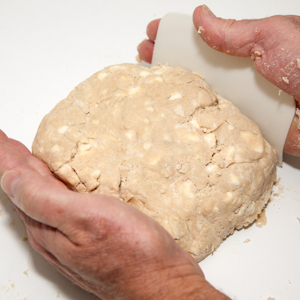
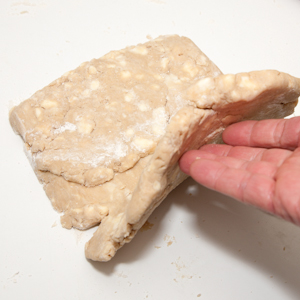
Place the flour, salt, and baking powder in a food processor bowl and pulse to combine. Scatter the lard over the dry ingredients and process to a coarse meal, about 20 seconds. Stop the machine, scatter butter pieces over the top, and pulse until the butter is partially cut into the dry ingredients, but still shows large pieces, 10 to 15 one-second pulses. Turn the contents of the work bowl into a large mixing bowl. Make a well in the center of the dry ingredients, add the iced water, and mix lightly with a rubber spatula until evenly moistened. Turn the mass out onto a clean work surface. Use the heel of your hand and short, forward thrusts against the counter top to smear the cold butter chunks into the flour (fig. 1.1). This technique, known as fraisage, will create layers of butter and flour that serve to laminate and lift the dough. Scrape everything together with a bench knife (fig. 1.2) and repeat the fraisage. Shape the dough into a rough 6 by 6-inch block (fig. 1.3). It will be crumbly and not inclined to hold together. Wrap it in plastic wrap and refrigerate for 20 minutes.
-
Sprinkle flour lightly over the work surface. Unwrap the dough, sprinkle the top lightly with flour and roll it out into a rectangle 7 inches wide by 14 inches long (fig. 2.1). Fold the top third of the dough down and the bottom third of the dough up (fig. 2.2) to create a rectangle, which, when turned with the open side on the right, looks like a book and measures about 5 inches wide by 7 inches long. Flour the work surface very lightly and repeat the process. Use a bench knife to block the sides of the dough. You have completed 2 turns. Re-wrap the dough and refrigerate it for at least 20 minutes. Repeat this process 2 more times. You have now given the dough 6 full turns. Refrigerate it for 1 hour or overnight, or wrap well and freeze for up to a month. Refer to the specific recipe you’re making for additional directions.
-
-
1.1
-
1.2
-
1.3
-
-
-
2.1

-
2.2
-