Buttermilk Biscuits

introduction
Our version of the proper Southern biscuit: soft, pillowy, as demure as a plump maiden aunt. Easy, too. No moving parts, save the blur of your fingers racing to get these beauties into the oven.
Baking Notes
If you can find Kate’s buttermilk (which is real buttermilk, not milk with added yogurt culture and odd little beads meant to look like buttermilk), use it! If you can’t buy the real stuff, try to find some good fake stuff, like Organic Valley.
equipment mise en place
For this recipe, you will need a digital kitchen scale, a baking sheet, parchment paper, a large mixing bowl, a whisk, a box grater, a dinner fork, a rolling pin (optional), a ruler, a 2½-inch biscuit cutter, and a clean kitchen towel.
-
-
8ounces Anson Mills Colonial Style Fine Cloth-Bolted Pastry Flour, plus additional for dusting the work surface and biscuit cutter
-
5
-
2teaspoons baking powder
-
2teaspoons sugar
-
½teaspoon fine sea salt
-
2ounces (4 tablespoons) cold unsalted European-style butter, in a single chunk
-
8fluid ounces (1 cup) buttermilk, plus additional if needed
-
-
Adjust an oven rack to the upper-middle position and heat the oven to 450 degrees. Line a baking sheet with parchment paper.
-
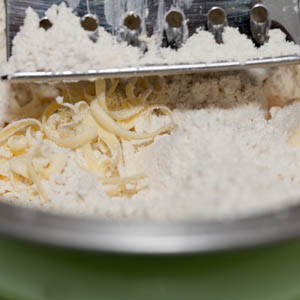
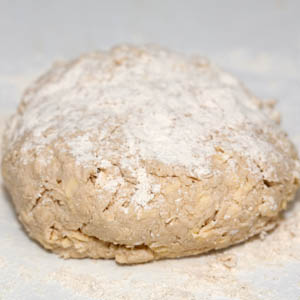
Turn the two flours, the baking powder, sugar, and salt into a large mixing bowl. Whisk to combine and break up any fine lumps in the flour. Drop the cold butter into the flour mixture and roll it around until coated. Grate the butter into the flour mixture on the large holes of a box grater, pausing from time to time to toss the butter shreds into the flour and to re-coat the chunk of butter (fig. 2.1). Pour the buttermilk into the flour mixture and toss lightly with a dinner fork to combine. With your hands, knead lightly and briefly in the bowl to bring the dough together (fig. 2.3). It should feel very soft and moist. If it does not, drizzle additional buttermilk little by little into the dough, and work it together lightly with your fingertips. Turn the dough onto a lightly floured work surface.
-
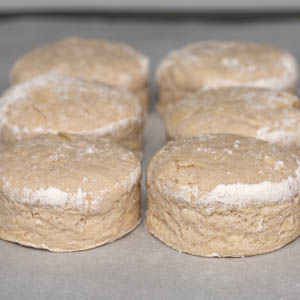
Lightly dust the top of the dough with flour (fig. 3.1), and then pat it with your hands or roll it with a rolling pin to an even ¾-inch thickness. Dip a 2½-inch biscuit cutter into flour, stamp out 8 biscuits, and arrange them shoulder to shoulder in rows of three on the prepared baking sheet (fig. 3.2). Gather the scraps and, without adding more flour, pat or roll them to a ¾-inch thickness. Stamp out 4 more biscuits and arrange them on the baking sheet, forming four shoulder-to-shoulder rows of three.
-
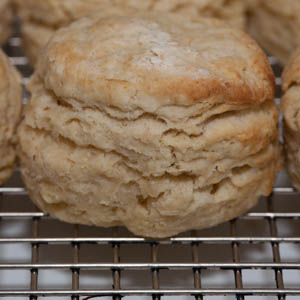
Bake the biscuits for 5 minutes, and then lower the oven temperature to 425 degrees. Continue baking until the biscuits have risen and are beginning to color, about 5 minutes more. Rotate the baking sheet, lower the oven temperature to 350 degrees, and continue baking until lightly golden on top and golden brown bottom, 7 to 10 minutes longer. Cover the biscuits with a clean, dry kitchen towel to keep them soft and let cool on a wire rack for 5 to 10 minutes (fig. 4.1). Serve warm with butter and jam, honey, or ham.
-
-
2.1
-
2.2

-
-
-
3.1
-
3.2
-
-
-
4.1
-