Cheese Straws
introduction
Consider the wiles of cheese straws: They are crisp, cheesy, salty, buttery. They stick in your teeth and make you wipe your fingers—or at least lick them. It’s no wonder these leggy beauties come with a warning label and a cult of obsession. (The warning label is from your physician.) We’re not sure of their provenance, but the first cheese straws were almost certainly the result of a stolen moment between a scrap of biscuit or pie dough and a bit of cheese. Later they were burdened by the sweeping nostalgia induced when the adjective “Southern” gets ahead of any culinary noun. From then on, cheese straws were anybody’s game, anybody’s recipe, anybody’s cottage industry, anybody’s cute little gift box. Bottom line: there are cheese straws—and then there are cheese straws. The best cheese straws result from a perfect proportional balance between good butter, soft flour, and the right amount of the right kind of cheese. This precludes, in our opinion, pastry so loaded with butter you have to pipe it out like a cookie.
Baking Notes
This recipe is super easy—one of the easiest hors d’oeuvres you’ll ever make. A quick run through the food processor makes the dough. You add some “turns” in the dough to enhance its flakiness, then you roll the dough out into a plank and cut slender ¼-inch square batons from it with a bench knife. These batons are rolled directly by hand on the counter with your fingertips into swizzle sticks and baked.
The colder the dough, the better the batons will roll.
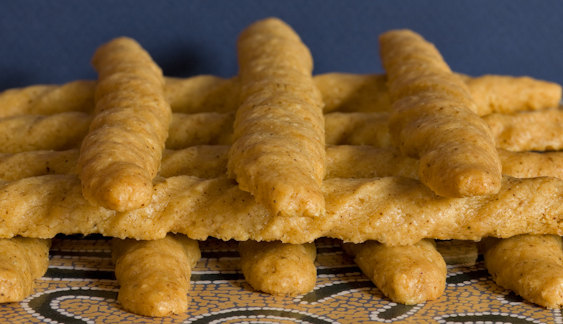
We’re not generally big fans of pale baked goods—the American cult of the blond—but cheese straws need to be blond. The cheese becomes disagreeable when it bakes too darkly. You’ll want the bottoms a crackly straw color and the tops a strawberry blond. Cheese straws don’t so much bake as “dry” to perfection.
And speaking of color, our cheese straws get theirs not from yellow cheddar, but from paprika. This turns out to be a good thing. Aged cheddar, which is essential to the recipe, comes in but one color: white.
We like this recipe with smoked paprika. The smoke here works more elegantly than straight smoked cheese (which we also tried). Smoked paprika, however, may require a special trip to the Internet, though many grocery stores are beginning to offer it. But the straws are just as good made with regular hot paprika. Do yourself a favor and buy a fresh container, though. The paprika isn’t strictly for color—it gives the straws a bit of devilishness as well.
equipment mise en place
For this recipe, you will need a digital kitchen scale, a small bowl, a fine-mesh sieve, a liquid measuring cup, a food processor, a rolling pin, a bench knife, parchment paper, and two baking sheets
-
-
1large egg
-
4.7ounces (1 cup) Anson Mills Colonial Style Fine Cloth-Bolted Pastry Flour, plus additional for the work surface
-
3.5ounces 1- or 2-year-old sharp cheddar cheese, coarsely shredded (about
2 very loosely packed cups) -
½teaspoon smoked paprika or hot paprika
-
⅛teaspoon cayenne pepper, or less if using hot paprika
-
½teaspoon fine sea salt
-
3.5ounces (7 tablespoons) cold unsalted European-style butter, cut into
½-inch pieces
-
-
Beat the egg in a small bowl and pour it through a fine-mesh strainer set over a liquid measuring cup. When the egg has dripped through, discard what remains in the strainer.
-
Place the flour, cheese, paprika, cayenne (if using), and salt in a food processor and process until the cheese is broken down into small bits, about 10 seconds. Scatter the butter pieces over the surface and process to a fine meal, about ten 1-second pulses. With the food processor running, add the egg one drop at a time (you may need only a couple of drops) and process just until the dough forms a mass and clears the sides of the bowl. Transfer the dough to a clean, dry, lightly floured work surface. Roll out the dough into a plank 12 inches long by 6 inches wide. Fold the top third of the dough down and the bottom third of the dough up, then rotate the dough clockwise one quarter turn so that the open side is on the right and the rectangle resembles a book. Very lightly flour the work surface and again roll and fold the dough. You have completed 2 turns. Use a bench knife to block the sides of the rectangle, wrap it in plastic wrap, and refrigerate until slightly firmed, 15 to 20 minutes. Repeat this process 2 more times. You have now given the dough 6 turns.
-
Adjust the oven racks to the lowest and upper-middle positions and heat the oven to 350 degrees. Line 2 baking sheets with parchment paper. Lightly flour the work surface and roll out the dough into a plank 10 inches long by 7 inches wide and ¼ inch thick. Using the bench knife, trim the edges and cut the dough crosswise into ¼-inch-wide strips. On an area of the work surface that is not floured, form each strip into a twist by positioning your palms on the ends and gently rolling in opposite directions. Lay the twists on the baking sheet, spacing them about 1½ inches apart. One baking sheet a time, bake on the lower rack for 8 minutes. Rotate the baking sheet, place on the upper rack, and continue baking until the cheese straws are pale golden and firm to the touch, 6 to 7 minutes longer. Let the cheese straws cool on the baking sheet. Serve with cocktails. (The cheese straws will keep without complaint for a few days in an airtight container, but they are truly superb the day they are baked.)