Coconut Layer Cake
introduction
There are cakes, and then there are legacy cakes. Legacy cakes convey a sense of place and stature in local history. In the South—particularly, in Charleston—coconut cake is the indisputable legacy cake, having earned and held its reputation for generations.
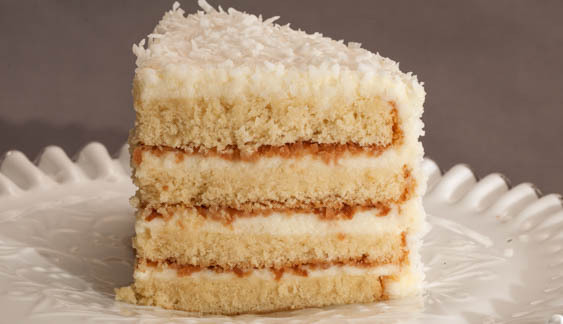
Coconut cakes are towering creatures—layered, frosted, and coiffed. They are also faintly dizzy with sugar. If you are familiar with the vibrating sugar and butter zing that grabs the back of the palette and glands in the throat just as cake and frosting converge on the brink of a swallow, you’ll know that coconut cake offers this sensation in spades. It is a sensation we enjoy . . . to a point. But coconut cake can go too far and actually trip that excess switch. Still, we chose sweetened coconut over unsweetened for its moist properties and bold flavor. Fresh coconut? Nah. A tall, frosted layer cake is labor enough—never mind needing a hammer to make one.
Coconut cake is all about coconut, of course. But preoccupation with it can invite excess, in our opinion. We didn’t want each element of the cake burdened by a single flavor dimension, especially one as outspoken as coconut. The cake and frosting both went vanilla.
Speaking of frosting, we chose German buttercream. The historically correct companion to red velvet cake, German buttercream—also called ermine frosting—is a milk, flour, and sugar pudding that is cooled, then beaten into whipped butter. Arguably less refined than its French or Italian variants with their egg yolks and whites, German buttercream is the lightest and fluffiest buttercream of all, with restrained sweetness. Having experienced a fair number of failed German buttercreams in the past, we put some real attention into the proportion, ingredients, and execution of this frosting. It’s dead easy to make and a perfect complement to both the cake and the coconut.
What sets this recipe apart from other butter cakes, however, are the contributions of Anson Mills Artisan Fine Cloth-Bolted White Lammas Cake and Fine Cloth-Bolted Pastry Flours. Together, they produce a butter cake with a nice structure, a plush, velvety crumb, and pure step-back-in-time flavor. It is worth noting that our White Lammas is the only cake flour on the market that is processed by hand without bleach. Imagine what that does for a cake.
Baking Notes
There is only so much creative fondling a butter cake recipe will countenance. Cake formulas are bound by certain proportions and that’s all there is to it. Any butter cake of note is likely to be but a tweak or two away from one of Rose Levy Beranbaum’s butter cake recipes—and those who pretend otherwise are kidding themselves, or trying to kid you. We tried in vain to improve her formula, but in the end, we could not. We did, however, abandon the reverse creaming method popularized by Ms. Beranbaum.
To get the most out of what coconut offers both as flavor and textural components, we toast and then crush the portion that goes between the layers, giving it fuller flavor and an almost praline type of crunch. For the outer cloud of coconut, we let it dry just a bit in the oven to give it a little chew, then crush it up, making the shreds rounder, plumper, and more fun to eat.
equipment mise en place
For the cake, you will need a digital kitchen scale; two 8-inch-round by 2-inch-high cake pans; parchment paper; a fine-mesh sieve or sifter; a medium bowl; a whisk; a 2-cup liquid measuring cup or small bowl; a stand mixer fitted with the flat-beater attachment; a silicone spatula; a small offset spatula; and a wire rack.
For the frosting, you will need a medium heavy-bottomed saucepan, a whisk, a small bowl, a silicone lid (or plastic wrap), a stand mixer fitted with the flat-beater attachment, and a silicone spatula.
To prepare the coconut for assembly and finishing, you will need two parchment paper–lined baking sheets, a metal spatula, a wire rack, a small bowl, and a food processor (optional).
To assemble the cake, you will need a serrated knife to cut the cake into layers, an 8-inch cardboard cake round, an icing spatula, and a small offset spatula. Like all layer cakes, the finished cake will slice more neatly with an electric knife.
-
for the cake:
-
6ounces unsalted European-style butter, room temperature, plus additional for greasing the pans
-
7.5ounces Anson Mills Artisan Fine Cloth-Bolted White Lammas Cake Flour, plus additional for dusting the cake pans
-
3
-
4teaspoons baking powder
-
¾teaspoon fine sea salt
-
4ounces egg yolks (from 6 large eggs)
-
2½teaspoons vanilla extract
-
10.5ounces sugar, preferably superfine
-
8.5ounces whole milk, room temperature
-
-
for the frosting:
-
7.5ounces sugar
-
1.8
-
⅜teaspoon fine sea salt
-
12ounces whole milk
-
12ounces unsalted European-style butter, room temperature
-
2teaspoons vanilla extract
-
-
for assembly:
-
10.5ounces sweetened shredded coconut
-
-
Make the cake: Adjust an oven rack to the lower-middle position and heat the oven to 350 degrees. Generously butter two 8-inch-round by 2-inch-high cake pans. Line the bottoms of the pan with parchment paper rounds and butter the parchment. Sprinkle the pans with flour, tilting them to coat the bottom and sides, then knock out the excess. Set the pans aside.
-
Sift the cake flour, pastry flour, baking powder, and salt into a medium bowl, then whisk the mixture to ensure the ingredients are well combined. In a liquid measuring cup or small bowl, whisk together the egg yolks and vanilla.
-
In the bowl of a stand mixer fitted with the flat-beater attachment, beat the butter on medium-high speed until fluffy, about 2 minutes, scraping down the bowl once with a silicone spatula. Add the sugar and continue to beat, scraping the bowl again with a silicone spatula, until the mixer is light and fluffy, about 3 minutes more. With the mixer running on medium speed, add the yolks in two additions, beating until well combined after each. Scrape down the bowl. With the mixer running on low speed, add about one third of the flour mixture, followed by about half of the milk, then mix until just incorporated. With the mixer still running, add about half of the remaining flour, then the remaining milk, and finally the remaining flour. Mix until the ingredients are just combined; do not overmix. Detach the bowl from the mixer and give the batter a few folds by hand, making sure to scrape along the bottom of the bowl. The batter will be fairly thick (fig. 3.1).
-
Divide the batter evenly between the prepared cake pans. Using a small offset spatula, spread the batter to the edges of the pan and smooth the surfaces. Bake the cakes until nicely risen, golden brown, and a toothpick inserted into the center comes out clean, about 30 minutes.
-
While the cakes are baking, begin the frosting: In a heavy-bottomed medium saucepan, whisk together the sugar, flour, and salt. Gradually whisk in the milk, then continue to whisk until no lumps remain. Set the pan over medium heat and cook the mixture, whisking constantly, until it comes to a boil and thickens, about 5 minutes. Scrape the pudding into a small bowl. Cover flush with a silicone lid (or plastic wrap) and let cool completely.
-
When the cakes are done, set the pans on a wire rack and let cool for about 10 minutes. Invert the cakes onto the rack, then lift off the pans and peel off the parchment. Let the cakes cool for 30 minutes, then carefully turn them right side up. Let cool completely, about 2 hours.
-
Prepare the coconut: Heat the oven to 300 degrees. Line two rimmed baking sheets with parchment paper. Spread 3.5 ounces of the coconut onto one of the prepared baking sheets, then separate the flakes with your fingers, rubbing away any lumps. Toast the coconut until golden brown, 25 to 35 minutes, turning occasionally with a metal spatula. Meanwhile, spread the remaining 7 ounces of coconut on the second prepared baking sheet. Separate the flakes with your fingers, rubbing away any lumps. When the coconut in the oven is toasted, set it on a wire rack to cool and turn off the oven. Place the untoasted coconut in the oven and leave it there to dry until you’re ready to assemble the cake.
-
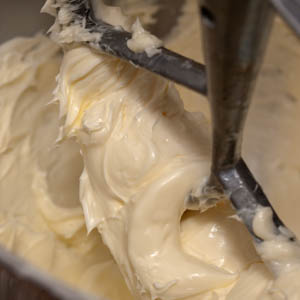
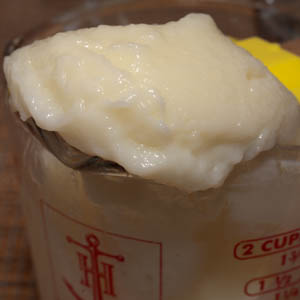
Finish the frosting: In the bowl of a stand mixer fitted with the flat-beater attachment and beat the butter on medium speed until very light and fluffy, about 3 minutes, scraping down the bowl once or twice (fig. 8.1). Add the vanilla, mix until incorporated, and scrape down the bowl. With the mixer running on low speed, add the chilled pudding (fig. 8.2) a few tablespoons at a time, occasionally scraping down the mixer bowl, until all the pudding has been incorporated and the buttercream is smooth and fluffy. Transfer the frosting to a smaller bowl for ease during assembly.
-
Using your hands, crush the toasted coconut into fine pieces and turn it into a small bowl. Remove the coconut from the oven; it should be dry, but not browned. Crush it between your palms or turn it into a food processor and process until the shreds are fine, then return the coconut to the baking sheet.
-
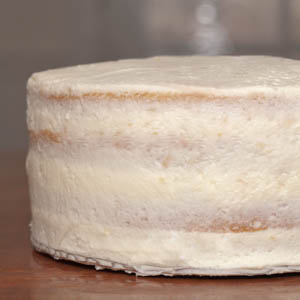
Assemble the cake: Using a serrated knife, cut each cake layer in half horizontally; reserve the two bottom layers for the top and bottom layers of the frosted cake. Drop a dollop of buttercream onto an 8-inch cardboard cake round and set a bottom layer on top, crust side down. Using an icing spatula, apply a generous amount of frosting to the layer (about ½ cup), then sprinkle with about one-third of the toasted coconut (fig. 10.1). Press the coconut into the frosting with a small offset spatula. Top with a second cake layer and press gently to secure. Frost with buttercream and sprinkle half of the remaining toasted coconut, then press the coconut into the frosting. Top with a third cake layer, frost it, and sprinkle the remaining toasted coconut. Top with the final cake layer, placing it crust side up (fig. 10.2). With an icing spatula, apply a crumb coat of frosting onto the top and sides of the cake, frosting to the edge of the cake round (fig. 10.3). Refrigerate the cake until the crumb coat sets, about 15 minutes.
-
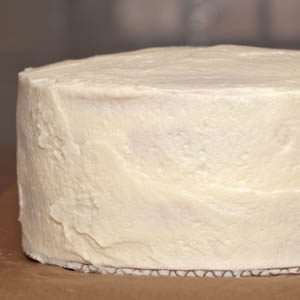
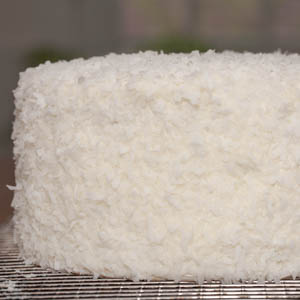
Remove the cake from the refrigerator and frost the cake with the remaining buttercream (fig. 11.1). Hold the cake on your non-dominant had over the baking sheet containing the coconut and use your free hand to gently press coconut into the sides and on top of the cake, allowing what doesn’t adhere to fall back onto the baking sheet, until the sides are evenly covered (fig. 11.2). Sprinkle the top of the cake with coconut and press lightly all around to secure.
-
-
3.1

-
-
-
8.1
-
8.2
-
-
-
10.1
-
10.2
-
-
-
11.1
-
11.2
-