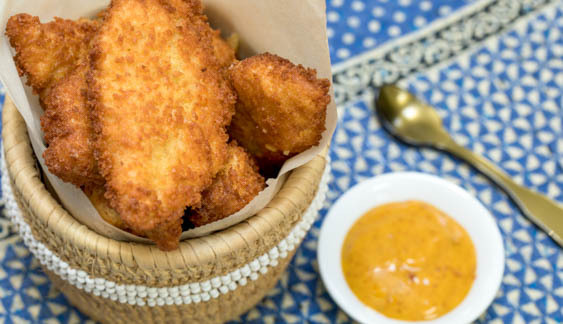
Pan-Fried Gluten-Free Chicken Fingers
introduction
You know you love them. Even the little machine-pressed, deep-fried clones adored by your kids taste pretty good on occasion. But imagine chicken fingers made from breast meat boned off a fresh whole chicken, cut into strips, brined briefly, and breaded with crumbs from one of our own bread formulas—Gluten-Free Pain de Mie, in this case, which produces improbably beautiful golden crumbs. A quick pan-fry, two easy dipping sauces, and there it is: remorse-free food for the whole family.
Cooking Remarks
“Parts is parts,” they say in the South, but parts will never be as fresh as a whole bird. Consider buying a fresh chicken and boning it yourself. You’ll have two boneless skinless breasts for chicken fingers, legs for a braise, and the rest of the chicken to make stock. Of course, if the convenience of a pack of boneless breasts is impossible to resist, use them, but don’t skip the quick brine. Brining the breasts for an hour ensures that seasoning gets into the meat and the chicken remains moist. Air-drying, post-brine, also enhances the breading process and creates a crisper fry.
The mayonnaise base we developed for the dipping sauces, with an assist from Melissa Clark at the New York Times, not only improves the sauce quality enormously, but is easy as can be. Whip up the base, then add the flavorings. Or go double on the mayo and make both dipping sauces.
For the bread crumb coating, trim the crusts off half a loaf of Gluten-Free Pain de Mie, then tear or cut the bread into smallish pieces, spread them out on a rimmed baking sheet, and let them stale for a few hours at room temperature. In a food processor, pulse the pieces until evenly fine. You will have more than the 6 cups needed for this recipe; store the remainder in an airtight container in the freezer for up to a month or so.
Though best when burn-your-tongue hot straight off the fry, these chicken fingers are remarkably crisp and tasty at room temperature. This recipe is easily doubled.
equipment mise en place
For this recipe, you will need a digital kitchen scale; a small saucepan; two 8-square baking dishes (or other similarly sized baking dishes); parchment or waxed paper; a meat pounder or meat cleaver; two rimmed baking sheets and two wire racks that fit into the baking sheets; a 1-cup liquid measuring cup; a small whisk; a small bowl; a pair of tongs; a 9- or 10-inch cast-iron skillet; a digital instant-read thermometer; and paper towels.
-
for the chicken fingers:
-
2cups spring or filtered water, plus 2 teaspoons for breading
-
2½tablespoons kosher salt
-
1small sweet onion, finely chopped
-
8garlic cloves, crushed
-
1lemon, sliced
-
2teaspoons black peppercorns, crushed
-
2(6- to 8-ounce) boneless, skinless chicken breasts from a 3- to 3½-pound whole chicken
-
3ounces (½ cup) Anson Mills Gluten-Free Flour
-
2large eggs
-
2teaspoons peanut oil, plus ¾ cup for frying
-
6ounces (1 cup) fresh bread crumbs from ½ loaf Anson Mills Gluten-Free Pain de Mie (see Cooking Remarks)
-
Flaky sea salt, for sprinkling
-
-
for the mayonnaise base:
-
1large egg yolk
-
2teaspoons juice from 1 lemon
-
1teaspoon spring or filtered water
-
½teaspoon fine sea salt
-
½teaspoon Dijon mustard
-
½cup avocado oil
-
-
to make chipotle dipping sauce:
-
1tablespoon ketchup
-
2teaspoons Dijon mustard
-
1small garlic clove, grated
-
½teaspoon chipotle powder
-
Fine sea salt
-
-
to make honey-mustard dipping sauce:
-
¼cup Dijon mustard
-
1tablespoon honey
-
Fine sea salt
-
Tabasco
-
-
Brine the chicken: In a small saucepan over medium heat, warm 1 cup of the water and the kosher salt, stirring, just until the salt dissolves. Pour the salted water and the remaining 1 cup water into an 8-inch square baking dish (or other similarly sized baking dish). Stir in the onion, garlic, lemon slices, and peppercorns; let cool to room temperature.
-
Place each chicken breast between sheets of parchment or waxed paper and, with a meat pounder or the flat side of a meat cleaver, pound the thicker section to flatten it to about a 1-inch thickness. Cut each breast diagonally across the grain into 1½-inch-wide strips and place them in the brine (fig. 2.1). Cover and refrigerate for 1 hour.
-
Set a wire rack in a rimmed baking sheet. Remove the chicken from the brine and arrange the pieces on the rack, spacing them apart. Refrigerate uncovered for at least 2 hours or up to 4 hours.
-
Meanwhile, make the mayonnaise base and sauce: In a 1-cup liquid measuring cup, combine the egg yolk, lemon juice, water, salt, and mustard, then whisk until frothy, about 40 seconds. Now, while whisking constantly, begin to dribble the avocado oil into the yolk mixture a drop at a time until the mixture is thick and emulsified, then add the remaining oil in a slow, steady stream while whisking constantly (fig. 4.1). Whisk in the ingredients to make chipotle dipping sauce or honey-mustard dipping sauce, then season to taste with salt (and Tabasco, if making honey mustard). Cover and refrigerate until ready to serve.
-
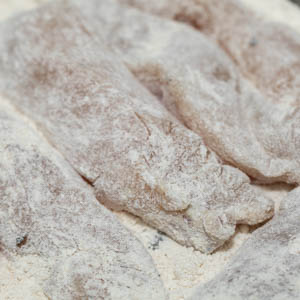
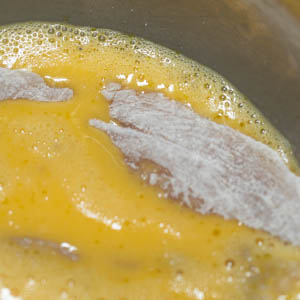
Bread and fry the chicken: Place the flour in a shallow baking dish and the bread crumbs in another. In a small bowl, whisk the whole eggs, the 2 teaspoons peanut oil, and the remaining 2 teaspoons water until well combined. Set a second wire rack in a second rimmed baking sheet and place near the breading station. Place a 9- to 10-inch cast-iron skillet over medium heat.
-
Drop half of the chicken strips into the flour (fig. 6.1) and turn to coat on all sides. Remove the strips from the flour, shaking off the excess, place them in the egg wash (fig. 6.2), and shake the bowl to coat the pieces. Using tongs, lift the strips one at a time from the bowl, allowing excess egg to drip back in the bowl, and drop them into the bread crumbs. Pack each strip with bread crumbs so the pieces are completely coated, then place them on the prepared rack to dry and set the breading (fig. 6.3). Repeat with the remaining chicken strips.
-
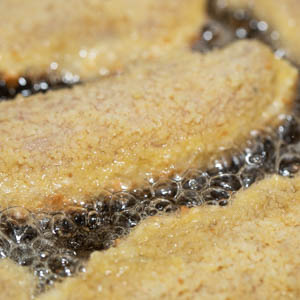
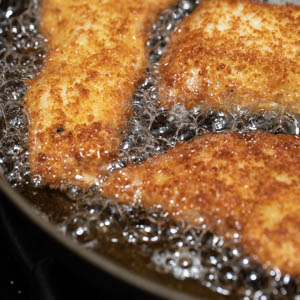
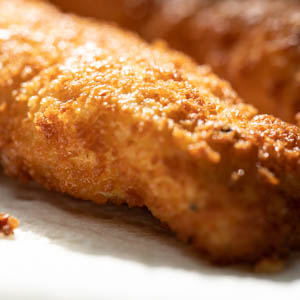
Pour the remaining ¾ cup peanut oil into the preheated skillet and allow it to heat 350 degrees. Using tongs, lower the chicken one piece at a time into the hot oil, taking care not to overcrowd the pan (fig. 7.1); as the chicken fries, it shrinks a bit and you will be able to add additional strips to the oil. Cook until golden brown and crisp on the bottom, 2 to 3 minutes, then turn (fig. 7.2) and fry until the second sides are golden brown, 2 to 3 minutes more. As the pieces are done, transfer them to several thicknesses of paper towels to drain (fig. 7.3) and fry the remaining pieces. Sprinkle with flaky sea salt and serve with the dipping sauce(s).
-
-
4.1

-
-
-
6.1
-
6.2
-
6.3

-
-
-
7.1
-
7.2
-
7.3
-