Popovers
introduction
Considering the fact that popover and crêpe batters are essentially the same formula (eggs, milk, flour, and butter) and the same consistency (thin), their final forms couldn’t be any different. But it is much harder to be a popover than it is to be a crêpe.
We thought this recipe would be a breeze, maybe even a zephyr: five minutes in the blender, a nap, pour the batter into cups, and bake. But the variables go on and on: hot pan or cold; warm milk or cold; all milk or water and milk; pastry flour, bread flour, or both; reduce the oven temp or leave it the same; poke the baked pastries with a skewer or spare the rod. Popovers can leave you with a bad case of performance anxiety.
With ingredients as limited as those in a popover, each one is critical—and this part of the exam we knew we could ace. Heirloom flours like ours, when milled fresh, carry nuances of dairy, minerals, and nuttiness over into the baking process, augmenting the ever-seductive Maillard browning alchemy—something commercial flours simply cannot do.
Heirloom flours crave hydration, and so do popover batters. They like a nice rest. Popover batter must be thin enough to loft, but the flour strong enough to support their rise. Anson Mills French Mediterranean White Bread Flour, though it would be classified as low- to medium-strength on the contemporary bread-flour strength scale, has just the properties a popover requires.
We will spare you the various permutations and performance failures of our baking trials. But we did, finally, nail the art of the popover—and simple knows best. We sought but found no magic in the abracadabra of warm milk or a hot pan, or even in starting with room temperature ingredients. Once the ratio of liquid to dry ingredients for favorable texture had been established, it was all about resting time and oven temp. These popovers have a glorious rise and desirable textural contrast and surface tension between their inside and out. Gauzy and buoyant with wafer-crisp and pliantly peelable skins, and a moist cobwebby center, they hold their shape and taste great hot or cold. They love gravy, they love jam, they love holidays and weekdays—and you’ll love them. Meet your new best friends, the Popovers.
Baking Notes
We use a 6-cup nonstick popover pan. Two very nice and affordable performers are the Bellemain and the Chicago Metallic, each available on Amazon.
This might sound crazy, but an accurate digital scale and oven thermometer could be the single greatest predictors of success with this recipe. The freshness and quality of the eggs factor significantly as well. Once you’re sure your oven temperature is accurate, leave the baking popovers alone and don’t open the oven. We enjoy sitting on the floor and watching their time-lapse progress through the oven window.
It is easy to produce two batches of batter back to back, and then bake them back to back.
equipment mise en place
For this recipe, you will need a digital kitchen scale, a medium bowl, a whisk, a 4-cup liquid measuring cup, a blender, a rubber spatula, a nonstick standard popover pan, and a wire cooling rack. An oven thermometer is helpful for checking the accuracy of your oven.
-
-
6.5
-
1teaspoon sugar
-
¾teaspoon fine sea salt
-
11ounces whole milk
-
1ounce spring or filtered water
-
5.5ounces shelled eggs (about 3 large)
-
1ounce unsalted European-style butter, melted and slightly cooled, plus 1 tablespoon, room temperature
-
-
In a medium bowl, whisk together the flour, sugar, and salt. Combine the milk and water in a 4-cup liquid measuring cup.
-
Put the eggs in a blender and blend at medium speed until well combined, 10 seconds. With the blender running, stream in the milk. Stop the blender, add half of the flour mixture, and blend until combined, about 10 seconds. Add the remaining flour mixture and blend until incorporated, about 10 seconds more. Using a rubber spatula, scrape down the blender. With the blender running on medium, stream in the melted butter. Increase the blender speed and combine for 5 seconds. Pour the batter back into the liquid measuring cup. You’ll have just shy of 3 cups. Cover and allow the batter to rest. If you’ll be baking it within 4 hours, leave the batter at room temperature; if you’ll be resting it for longer (it’ll hold for up to 24 hours), put it in the refrigerator.
-
If the batter has been refrigerated, allow it to come to room temperature. Adjust an oven rack to the lower-middle position and heat the oven to 425 degrees. Grease the cups of a nonstick standard popover pan, including the rims of the cups, with the 1 tablespoon softened butter.
-
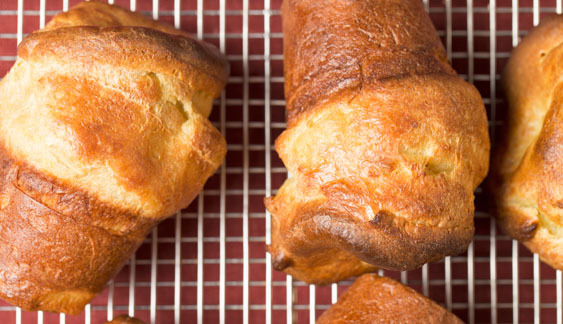
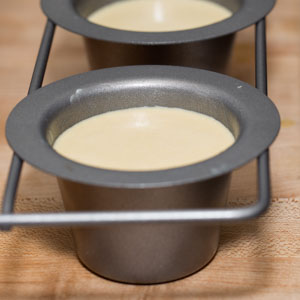
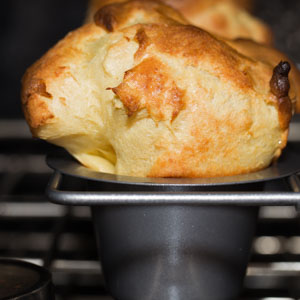
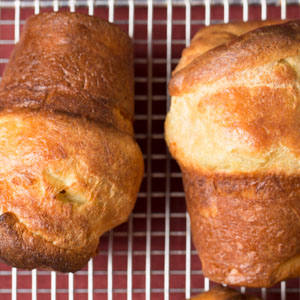
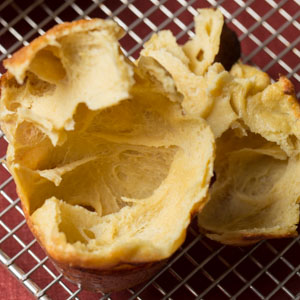
Stir the batter gently to recombine and divide it equally among the 6 popover cups (about ½ cup per cup) (fig. 4.1) Bake for 20 minutes. (Resist the urge to open the door of the oven at all until the popovers are done.) Through the oven window, the popovers will look like soft, towering cyclones. Reduce the oven temperature to 400 degrees and continue to bake until the popovers are deep golden-brown, well risen, and have begun to split on the top (fig. 4.2), about 15 minutes more. Remove the pan from the oven and immediately transfer the popovers to a wire rack (fig. 4.3). The inside of the popovers will be basically hollow with some creamy, webby bits (fig. 4.4). Serve warm or at room temperature.
-
-
4.1
-
4.2
-
4.3
-
4.4
-