Danish Apple Braid
introduction
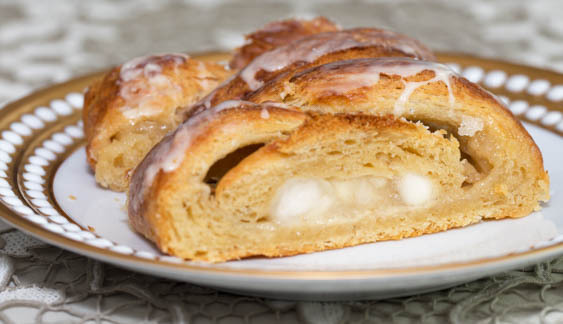
This old-fashioned Danish apple braid is like the best apple turnover you’ve never had, light and crisp, romanced with remonce—the fluffy confectioners’ sugar and butter frosting favored by the Danes for all things Danish—and sparkling with a tart-sweet fragrant apple filling. It has a lustrous prettier-than-toaster-strudel glaze, too. Best part—no individual handwork required. One piece: fill, plait, bake, swoon!
Baking Notes
For the filling, choose an apple variety that will retain its texture with cooking (no McIntoshes!) and that offers a nice interplay of sweet and tart (no Fujis!). We had success with Braeburn, Rome, and Pink Lady apples, but no doubt there are many other cultivars that would work wonderfully in the braid.
When cutting the side panels of dough into strips to form the braid, be sure to cut them so that they angle in the same direction from the center panel. They should form a chevron-like pattern.
equipment mise en place
To make the apple filling, you will need a digital kitchen scale; a medium bowl; heavy-bottomed 12-inch skillet, and a wide, shallow container.
To make the remonce, you will need, a medium bowl, a handheld mixer, and a rubber spatula.
To roll, shape, and bake the Danish, you will need a couche or 3-foot-square heavy canvas cloth, parchment paper, a bench knife, four half sheet pans, an empty baking dish or pie plate, a pizza stone, a teakettle, a ruler, a pizza wheel, a thin metal spatula, and two wire racks.
To make and apply the glaze, you will need a small bowl and a whisk.
-
for the apple filling:
-
1large, juicy lemon
-
1¼pounds Braeburn, Rome, or Pink Lady apples
-
1ounce granulated sugar
-
½teaspoon ground cinnamon
-
Pinch of fine sea salt
-
-
for the remonce:
-
5ounces European-style unsalted butter, room temperature
-
3ounces confectioners’ sugar
-
0.5
-
1teaspoon vanilla extract
-
⅛teaspoon fine sea salt
-
-
-
Anson Mills French Mediterranean White Bread Flour or Colonial Style Fine Cloth-Bolted Pastry Flour, for dusting
-
1recipe Classic Danish Pastry Dough
-
1large egg
-
0.5ounce water
-
-
for the glaze:
-
4ounces confectioners’ sugar
-
3ounces heavy cream
-
-
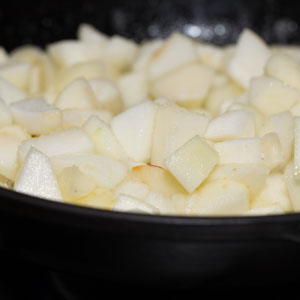
The night before you plan to bake, make the apple filling: Cut the lemon in half and squeeze the juice into a medium bowl; discard any seeds. Peel, core, and cut the apples into ½-inch dice, tossing them in the lemon juice as you go. Turn the apples and their juice into a 12-inch skillet set over medium heat. Sprinkle with the sugar, cinnamon, and salt. Cook, stirring constantly, until the apples are dry and tender but still have dimension and texture (fig. 1.1), about 5 minutes. Transfer them to a bowl and let cool, then cover and refrigerate overnight.
-
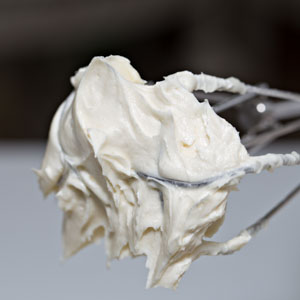
The day of baking, make the remonce: Turn the butter into a medium mixing bowl and beat it with a handheld mixer on medium-high speed until light and fluffy, about 2 minutes, scraping down the bowl as needed. Add the sugar and continue to beat until the mixture is once again fluffy and aerated, about 2 minutes longer, pausing once to scrape down the bowl. Add the flour, vanilla and salt and beat until incorporated (fig. 2.1), about 15 seconds. Scrape down the bowl, cover with plastic wrap, and set aside.
-
Roll out the dough: Lay a couche or 3-foot-square heavy canvas cloth on the counter. Cut a sheet of parchment paper to fit a half sheet pan, lay the parchment on the couche, and lightly flour the parchment. Remove the dough from the refrigerator and cut it in half crosswise with a bench knife; each half should weight 18-plus ounces. Rewrap one piece and return it to the refrigerator. Lay the second piece of dough on the floured parchment. Cover lightly with plastic wrap and allow it to rest for 15 minutes.
-
While the dough is resting, adjust the oven racks to the lowest and upper-middle positions. Set an empty baking dish or pie plate on the lower rack and a pizza stone on the upper-middle rack. Fill a teakettle with water and set it on the stove, but don’t turn on the burner.
-
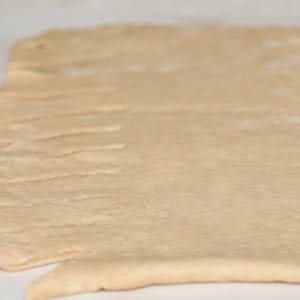
Sprinkle the dough with flour. Roll it into a 10- by 14-inch rectangle. Using a ruler, score 2 parallel lines along the length of the dough 3 inches in from either edge, leaving a 4-inch-wide panel in the center. Using a pizza wheel or a sharp knife positioned on one score mark about 1 inch in from the edge, make a diagonal cut to the nearest corner. Make additional cuts parallel with the first cut, spaced 1¼ inches apart, along the margin (fig. 5.1). Do the same along the other margin, making sure the cuts run in the same direction as the opposite side (fig. 5.1). Slide the dough-bearing parchment onto a half sheet pan and refrigerate for 10 minutes. Meanwhile, in a small bowl, beat the egg and water; set aside.
-
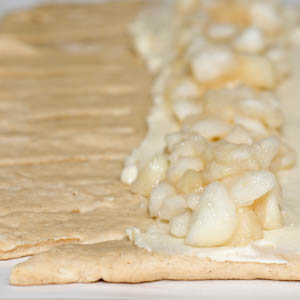
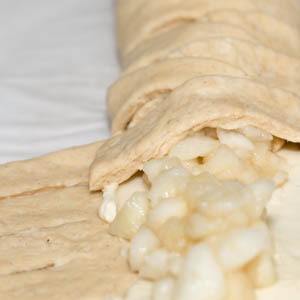
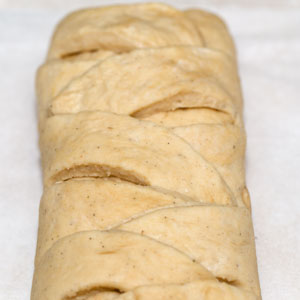
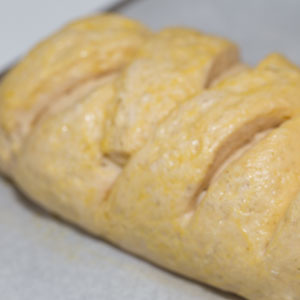
Remove the sheet pan from the refrigerator and set it on the counter with the dough strips pointing toward you. Loosen the dough strips from the parchment by running a thin metal spatula under them. Spread half of the remonce in an even layer on the center panel of dough, then spoon on half of the apple filling, distributing it evenly (fig. 6.1.). Beginning at the end furthest from you, fold the dough strips to run diagonally over the filling, alternating sides, to create a braided design (fig. 6.2). The finished braid will be about 12 inches long and 3 inches wide (fig. 6.3). Lightly brush the braid with egg wash. Invert a second half sheet pan over the top, forming a proofing box, and let rise until the braid is soft and spongy (fig. 6.4), about 2 hours. About 30 minutes into the rising, repeat the process with the remaining half of the dough, remonce, and apple filling.
-
After the first braid has proofed for about 1 hour, heat the oven to 400 degrees. After about 1¾ hours of proofing, bring the kettleful of water to a boil. About 5 minutes before baking, pour 1 inch of the boiling water into the empty dish on the lower oven rack.
-
Bake the Danish: Slide the first braid into the oven on the pizza stone and immediately lower the temperature to 375 degrees. Bake until deep golden brown and well-risen (fig. 8.1), about 25 minutes, turning the sheet pan front to back halfway through.
-
Set the sheet pan on a wire rack and let cool for 5 minutes. Increase the oven temperature to 400 degrees and return the kettle of water to a boil. Slide the braid directly onto the rack set over a sheet pan, then set the rack in the now-empty sheet pan.
-
While the braid is still hot, make and apply the glaze: In a small bowl, whisk the confectioners’ sugar and cream until it forms a smooth, thickly fluid frosting. Dip the tines of a fork into the glaze and stipple the braid with glaze while it is still hot. Let cool for 5 to 10 minutes or until cooled to room temperature, then cut into slices; for optimal enjoyment consume within the first few hours of baking.
-
Bake and glaze the second braid as you did the first braid, pouring additional water in the dish on the lower oven rack about 5 minutes before baking.
-
-
1.1
-
-
-
2.1
-
-
-
5.1
-
-
-
6.1
-
6.2
-
6.3
-
6.4
-
-
-
8.1

-