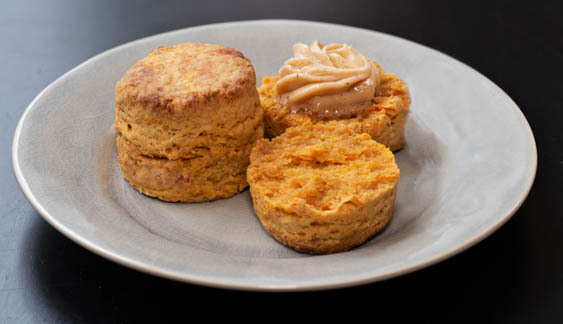
Sweet Potato Biscuits
introduction
Just as sweet potatoes comprise a signature staple of the Southern larder, biscuits claim pride of place in the bread basket (quiet down over there, cornbread!). Thus, the union of the two surprises no one, though precisely when, why, or where they came together isn’t altogether clear. Beyond the well-trod stories that place sweet potato biscuits in Thomas Jefferson’s diaries, their being served to the first Continental Congress in Philadelphia at his behest—or even a recipe for same associated with Montecello—history keeps its cards close to the vest.
What became abundantly clear to us, however, after eating sweet potato biscuits hither and yon and perusing stacks of recipes, is that the decades have not been kind to sweet potato biscuits. They’ve been sweetened to a fare-thee-well and spiced carelessly—each to the detriment of their character. Perhaps in protest, the biscuits have let themselves get heavy and dense.
We made immediate amends, disinviting all but a tiny amount of sugar, banishing warm spices altogether, and coaxing the sweet potatoes themselves into maximum impact by baking them on a bed of salt and drawing out some of their moisture. In truth, producing a light biscuit with a stodgy ingredient is no easy feat. Yet the best of breed capitalizes on the richness and moistness the humble potato provides, while managing to stay light and flaky at the same time. Cold butter and minimal manipulation also help. Because sweet potatoes fundamentally challenge the biscuit form, we commit the unspeakable and add a percentage of bread flour to the formula. And because the dough is deliberately moist and not fond of fondling, we give it a couple of turns to build structure and encourage layering.
Baking Notes
Choose slender, similarly sized orange-fleshed sweet potatoes. Japanese sweet potatoes, while desirably dry and dense, fail to produce the pleasing warm orangish hue associated with traditional sweet potato biscuits. Color aside, a major challenge of this recipe was getting the sweet potatoes to work in favor of the biscuit texture. This required persuading the potatoes to give up liquid, which also concentrated their flavor. It also kept the biscuit dough desirably short. Our ingredient list calls for 2.5 pounds of sweet potatoes—seems like a lot for 10 little biscuits, right? We err on the side of incaution for two reasons. The first is to compensate for potential bruised areas that need to be excised and are only evident when the baked potatoes are split open. The second is to account for varying degrees of moisture in the raw sweet potatoes, which has to do with their variety and how long they were cured after harvest. In very limited samplings, East Coast sweet potatoes ran much drier than those on the West Coast.
You’ll need to stab the sweet potatoes with a fork, like, a trillion times before baking them on a deep bed of kosher salt. The salt draws moisture from the potatoes during the initial bake.
European-style butter is also de rigueur in this recipe—not just because its low water content offsets the potatoes’ ample moisture, but because high fat butter offers real pliability, as well. Grated on the large perforations of a box grater, the butter readily forms small ribbons that help create a laminated effect in the dough. This lamination translates to lots of layers in the baked biscuits.
If Spiced Rum Butter sounds appealing and you plan to serve it with the biscuits, we suggest adding no sugar to the recipe. If the biscuits are to be served on their own, use the 2 teaspoons recommended.
Handle the biscuit dough lightly and use as little additional flour as possible when shaping and stamping the biscuits. The suggested ½-inch spacing on the baking sheet induces the biscuits to brush shoulders as they bake and offer each other support.
These biscuits taste even more of sweet potatoes the second day. Warm them in a 350-degree oven for 10 minutes and have some butter on call.
equipment mise en place
To make this recipe, you will need a digital kitchen scale, a shallow baking dish large enough to accommodate the sweet potatoes, a dinner plate, a box grater, a medium bowl, a 13 by 18-inch rimmed baking sheet (aka half sheet pan), a 9 by 13-inch rimmed baking sheet (aka quarter sheet pan), parchment paper, a potato ricer, a spatula, a bench scraper, a small bowl, a ruler, a rolling pin, a clean kitchen towel, a 2-inch biscuit cutter, and a wire rack.
-
-
A box of kosher salt
-
2.5pounds slender orange-fleshed sweet potatoes, scrubbed well and patted dry
-
3.5ounces unsalted European-style butter, frozen
-
5ounces Anson Mills Colonial Style Fine Cloth-Bolted Pastry Flour, plus additional for dusting
-
5
-
1tablespoon baking powder
-
2teaspoons sugar (optional; see Baking Notes)
-
⅝teaspoon fine sea salt
-
1ounce cold whole milk or buttermilk
-
Spiced Rum Butter, for serving (optional)
-
-
Adjust an oven rack to the middle position and heat the oven to 350 degrees. Fill a shallow baking dish, one large enough to accommodate the sweet potatoes, with kosher salt to a depth of 1 inch. Using a fork, poke many, many holes all over each sweet potato, then arrange them on the salt bed. Bake until the potatoes are completely tender when poked with a skewer and the skins have begun to shrivel, about 2 hours, turning them once or twice during baking.
-
While the potatoes are baking, place a dinner plate in the freezer and let it chill for 10 minutes or so. Grate the frozen butter on the large holes of a box grater directly onto the chilled plate, then return the butter to the freezer until ready to use. In a medium bowl, whisk together the flours, baking powder, and sugar (if using), and salt. Line a 13 by 18-inch rimmed baking sheet (aka half sheet pan) and a 9 by 13-inch rimmed baking sheet (aka quarter sheet pan) with parchment paper; set both aside.
-
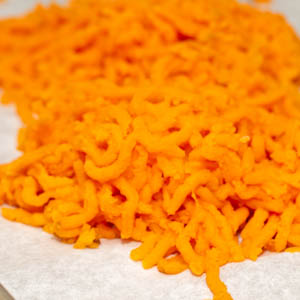
Remove the potatoes from the oven and from the salt bed, then immediately rub the salt off their skins, using paper towels to protect your hands from their heat. Let cool slightly, then split each potato in half lengthwise and scoop the still-hot flesh from the skins. Using a potato ricer, rice the flesh directly onto the prepared larger baking sheet (fig. 3.1); for those keeping score, there should be 1 to 1.25 pounds of riced potatoes. Smooth the riced potatoes with a spatula into a thin, even layer and return them to the oven to for 20 minutes to dry a bit more, occasionally turning and spreading the flesh with a bench knife to release steam. Remove the potatoes from the oven. Set a small bowl on the kitchen scale, tare the scale, and weigh out 10 ounces of the potatoes; reserve the remainder, if any, for another use. Increase the oven temperature to 400 degrees.
-
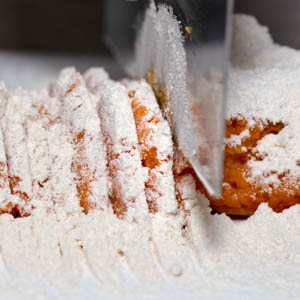
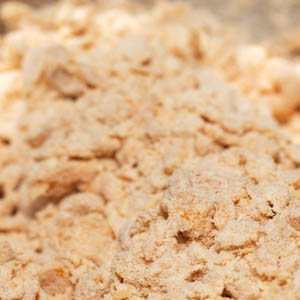
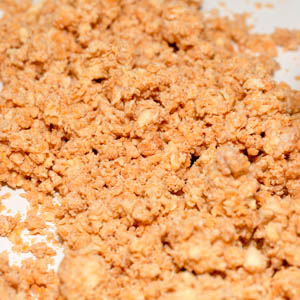
Turn the hot potatoes directly onto the counter and chop and spread them with the bench knife until barely warm to the touch, then distribute them into a ½-inch thick layer. Sprinkle the potatoes with one-third of the flour mixture. Holding the bench knife perpendicular to the counter, chop across the surface of the floured potatoes as if cutting a fine chiffonade (fig. 4.1); the flour will be incorporated as you chop. Now chop from top to bottom, creating a crosshatch pattern. Scrape up and flip the mixture, redistribute it on the counter, then give it a few more chops. Incorporate the remaining flour in two more additions in the same way. After the final batch of flour has been added, continue to chop, scrape, and flip the crumbs until they are fairly uniform and resemble a streusel (fig. 4.2).
-
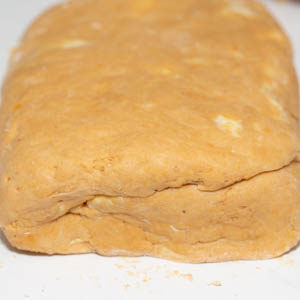
Using the bench knife, gather the potato-flour crumbs into a rectangle, then scatter on the frozen butter. Fluff lightly with your fingertips until the butter is evenly distributed. Sprinkle on the milk and fluff until the crumbs are evenly moistened, about 10 seconds (fig. 5.1). Gather the crumbs and quickly fraisage them by using the heel of your hand to smear the crumbs, section by section, against the counter. Using the bench knife, gather the mixture and press it into a cohesive dough rectangular in shape; it will feel very moist and tacky. Lightly dust the counter and your hands with pastry flour, then pat the dough into 9 by 6-inch rectangle, a short side nearest you. Square the edges with the bench scraper, then, using a rolling pin, roll the rectangle to a length of about 12 inches. Use the bench knife to scrape the top section of the dough rectangle from the counter, then fold down the top third (fig. 5.2); scrape up the bottom section and fold it up. Turn the rectangle so the closed side is facing left, like the spine of a book. Again pat the dough into a 12 by 6-inch rectangle, flouring minimally if at all, then give the dough another set of folds. Turn the rectangle so the closed side is facing left. Gently roll the dough into a 11 by 5-inch by 1-inch-thick rectangle (fig. 5.3); the thickness of the dough is more important than the dimensions of the rectangle!
-
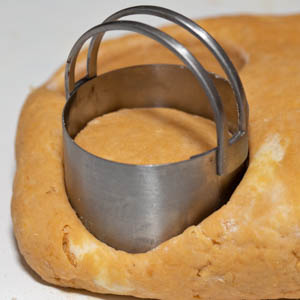
Dip a 2-inch biscuit cutter into flour and, using decisive, straight-down punches, stamp out rounds of dough (fig. 6.1) as closely as possible to one another; dip the cutter into flour before each cut. Gather the dough scraps, form them into a fat cylinder by rolling them against the counter top, then pat the cylinder into a 1-inch thickness. Dip the cutter into flour and stamp out as many rounds as possible. The last bit of scraps can be gathered and formed into a single round; it will bake into a homely little biscuit. Arrange the rounds on the smaller prepared baking sheet, spacing them about ½ inch apart (fig. 6.2).
-
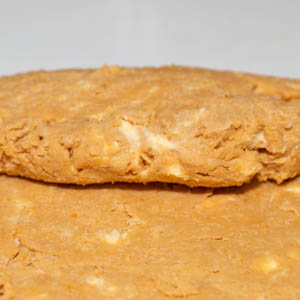
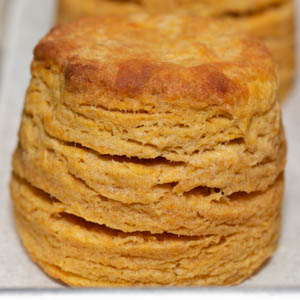
Bake the biscuits until golden brown and nicely risen (fig. 7.1), about 20 minutes, rotating the baking sheet halfway through. Transfer them to a wire rack and let cool for about 20 minutes. If desired, serve with Spiced Rum Butter.
-
-
3.1
-
-
-
4.1
-
4.2
-
-
-
5.1
-
5.2
-
5.3
-
-
-
6.1
-
6.2

-
-
-
7.1
-
recipe by Adam Ried