Red Fife Natural Levain
introduction
Starting a wild levain from flour and water sounds easy. And it is. But it’s easy like making a baby is easy. Once the baby is born, it demands care and nurturing. Like a child, a levain gets hungry. And sometimes it gets stinky, requiring a little clean-up. It can be finicky and colicky, but eventually, with a little persistence and a lot of patience, you’ll be in tune with the wild little beast and you’ll begin to bake bread that tastes great and makes you proud.
Cultivating wild yeasts and bacteria to produce a levain begins when a slurry of water and flour is stirred together, put into a glass jar, covered with cheesecloth, secured with string or a rubber band, and set out to gather wild yeast present in the atmosphere and on the surface of the flour. And “set out” can mean quite literally outside under a plant, weather permitting. As the slurry is fed and refreshed with additions of flour and water over the course of several days, it becomes carbon dioxide-rich and yeast-populated enough to rise a whole loaf of bread. It has become a levain.
Leavening breads using wild yeast levain is the oldest bread-baking technique known to man. Only in relatively recent history has it been abandoned. The initial stride away from levain as a leavener for breads was barm, the yeasty froth that gathers on the surface of wort, or unfermented beer. The Celts and Gauls were among the first to inoculate their loaves with this yeasty bubble bath in lieu of levain. Over time, bakers came to prefer barm because it was a consistent, concentrated source of yeast and removed uncertainty from the bread-baking process.
By the mid 19th century, the introduction of commercial yeast simplified bread’s quintessential fungal players even more: one pinch of pure Saccharomyces cerevisiae from a convenient little packet got any bread up and on its way to the oven. No more waiting for a brewer to provide barm or for microbes to populate the dough. Commercial yeast allowed bakers to speed up their schedules and ramp up production. It was an important invention and we don’t want to throw too much shade. We’ve used—and will continue to use—commercial yeast in many of our bread recipes. But we’re also strong proponents of naturally leavened breads. They are rich with history and wonder, and packed with flavor achievable only through these old methods.
Why take the time to raise and train microbial pets? Here is the simple answer: flavor.
Even ugly, imperfect loaves of levain-based breads will be more nuanced and interesting on the palate than perfectly shaped, commercial yeast–raised French boules. The abundant blend of lactic acid bacteria and wild yeasts come together in an explosion of flavor that knows no equal. Throw Anson Mills whole grains and flours into the mix as foundation ingredients and the result is a flavor grand slam that brings home all the hard work.
More runs—er, points—for levain? The higher acidity of the dough reinforces its gluten structure, allowing a baker to push hydration (the percentage of water relative to flour) to great heights, resulting in a custardy crumb and blistered crust otherwise not possible. The acidity also extends the shelf life of the bread, as active bacteria fend off mold growth. What’s more, as delicious and enticing as levain-based breads are when freshly baked, they actually improve with age, reaching their peak flavor, on average, after three days.
The following recipe for levain provides the information you need to get your own bread renaissance rolling. Don’t be scared—it’s going to be just fine. We’re doing it right here with you!
Cooking Remarks
Use a digital kitchen scale to weigh out ingredients. Weights are important to the success of bread recipes. You’ll also need to pay attention to the temperature of each element that contributes to the recipe, including ambient temperature, as well as the temperature of the flour. The best tool for the job is a digital instant-read thermometer.
Once the levain has been mixed, it will feel most comfortable in an environment in which the ambient temperature is between 70 and 80 degrees Fahrenheit. Higher temperatures will occasion rapid development that can produce off-flavors; lower temperatures will cause the levain to move sluggishly. Maintaining a consistent temperature will also allow the aforementioned strains of yeasts and bacteria to flourish and assist in the development of a bread culture unique to your own kitchen.
If baking naturally leavened bread is only an occasional endeavor in your home kitchen, you may wish to maintain your levain under refrigeration. At such drastically lower temperatures, feedings are needed only once a week. However, after some time in the fridge, acetic acid will start to dominate the levain, producing an acidity that’s puckery and harsh like vinegar. Before you use the levain to make bread, you’ll need take steps to adjust its acidity. Remove it from the fridge and bring it to room temperature, rousing it from hibernation, then feed it with flour and water (refer to step 3 of the recipe for instructions) once a day for three days. The ferment’s lactic profile will normalize and the levain will be ready to use.
equipment mise en place
For this recipe, you will need a digital kitchen scale; a digital instant-read thermometer; a small saucepan; two pint-sized, wide-mouthed mason jars (with measurement markings on the side; and a small silicone spatula; and a 4-inch square of doubled-up cheesecloth.
-
for the spontaneous ferment:
-
50grams spring or filtered water
-
50grams Anson Mills Rustic Red Fife Bread Flour, freezer-cold (about 5 degrees)
-
-
for each feeding:
-
50grams Anson Mills Rustic Red Fife Bread Flour, freezer-cold (about 5 degrees)
-
50grams spring or filtered water
-
-
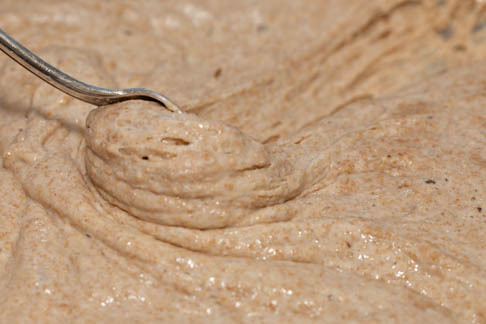
Make the spontaneous ferment: In a small saucepan, warm the water to 100 degrees. Pour the water into a clean, pint-size mason jar (the type with measurement markings on the side), then spoon in the cold flour. With a small silicone spatula, thoroughly mix the ingredients; the water and flour must be completely homogenous, with nary a clump (fig. 1.1). Make sure to check the bottom and sides of the jar for any dry patches, then scrape down the sides so you may get a good reading of the volume; you should have just shy of 100 ml. Using a clean instant-read thermometer, take the temperature of the slurry; it should register about 70 degrees, a good temperature for the initial fermentation. Cover the jar with a 4-inch square of doubled-up cheesecloth and secure the cheesecloth with the lid’s metal band. Make sure there are no gaps that might allow unwanted visitors, such as fruit flies, to enter. Set the jar in a spot where the ambient temperature is about 70 degrees. At warmer temps, the fermentation will kick off at a faster rate; in colder climes, it will be slower to initiate.
-
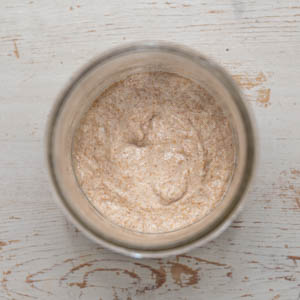
Every 12 hours or so, uncover your slurry and give it a stir with a clean spatula, then scrape down the sides of the jar and replace the cheesecloth and metal band. Stirring incorporates yeasts from the air that have landed on the surface, encourages even fermentation, and may slightly hasten the process. Each time you stir, note the volume, aroma, and flavor. Minor changes will be detectable after about 24 hours (fig. 2.1).
-
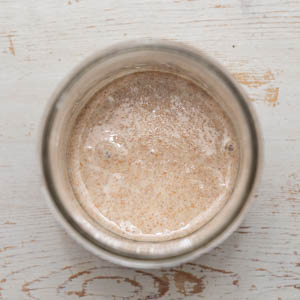
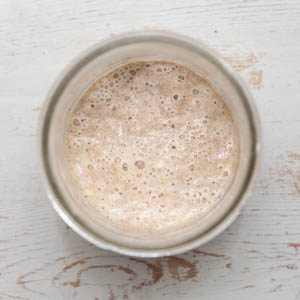
Feed the levain: After about 45 hours at an average ambient temperature of 70 degrees, your slurry will have transformed into a levain (fig. 3.1). It will be bubbly with carbon dioxide and its volume will have increased to about 150 ml but it should not have any liquid (which would be ethanol) on its surface. If it does, don’t fret—simply stir in the liquid and proceed; the levain will simply be a litter slower to react to the feeding. In a small saucepan, warm the water to 100 degrees. Pour the water into a second clean, pint-size mason jar. To the warm water, add 10 grams of the levain; discard the remainder. Stir with the small silicone spatula until well combined. Now add the cold flour and stir until homogenous, as you did a couple days ago when making the slurry, then scrape down the sides of the jar. Clean the sides of the jar, cover with the metal lid, and loosely seal with the band. Allow the mixture to ferment for 24 hours at the same ambient room temperature.
-
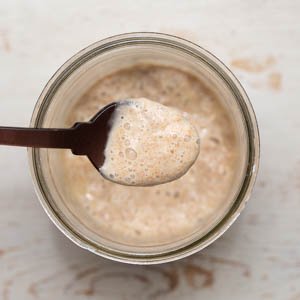
Repeat the feeding process for the next couple of days, with one feeding of fresh flour and water each day; discard the remaining levain each time. Feed the levain at an hour that works best for you and try to space the feedings 24 hours apart. After a total of 3 feedings, you will have a yeasty, bacterial culture—i.e., levain—that can be employed in naturally leavened bread recipes (fig. 4.1). Refer to specific bread recipes for detailed instructions on how to condition your levain for the recipe you’re preparing.
-
-
1.1
-
-
-
2.1
-
-
-
3.1
-
-
-
4.1
-