Focaccia with Sea Salt and Black Pepper
introduction
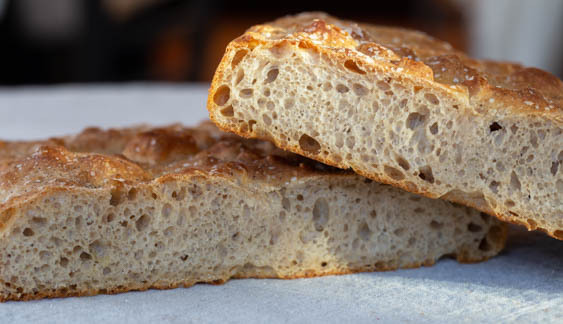
As breads go, focaccia is easy. It doesn’t require specialized equipment or an experienced baker’s hand to shape, and it won’t turn your kitchen into a sauna. Yet focaccia is unassailably delicious when pressed into the service of sandwiches, croutons, or toast. An olive oil–scented pan bread with modest rise; moist, open interior; and top and bottom crusts so delicately crisp they might be fried, focaccia is an ancient bread—so ancient it was originally just an average unleavened flatbread knocking around Italy. Something peculiar to the ancestral climate—Etruscan, pre-Roman northern Italian, or whatever its provenance—made it fluffier and loftier than breads from neighboring regions. Perhaps a result of a spontaneous fermentation of yeasts and bacteria in the flour, ur-focaccia experienced an unplanned but fortuitous oven-spring that resulted in an appealing chew. In time, the Romans moved in and called this bread panis focacius—panis meaning bread and focacius, hearth. In Roman ovens, focaccia was baked directly in the hearth on still-hot ash rather than in a pan above the heat source as it is today.
You’ll notice that our recipe for focaccia is not based entirely on a levain, but a combination of leaveners. You’ll also notice that its crumb is not pure white like breads made with commercial all-purpose flour; it possesses a color reminiscent of high-quality cream. With a foundation of Anson Mills French Mediterranean White Bread Flour, the loaf is light and supple and brings the missing link back into your kitchen that connects Old World and New.
Baking Notes
We choose a combination of levain and other leaveners when a particular outcome is essential for a type of bread. In this instance we didn’t want a too-sour focaccia, so the straight levain method was a bit too much. Instead, we deployed commercial yeast in the form of a poolish. By most bakers’ definitions, a poolish is equal parts water and flour (by weight), along with just a tiny pinch of commercial yeast. The ingredients are mixed into a wet slurry and the slurry is left to ferment for as little as four hours and up to 12 to develop flavor. A poolish is essentially a levain, but with commercial yeast taking the place of the wild culture grown by the baker. It speeds a dough’s proofing time so bread-baking can be a single-day affair (although our focaccia requires two days), and it provides the yeastiness we desire in focaccia as it’s known today.
As always, temperature is key with bread baking. We encourage you to keep the final dough between 74 to 76 degrees. This temperature is slightly cooler than that suggested for a loaf based entirely on natural levain to accommodate the commercial yeast, which ferments differently. Keep your thermometer close by and start to pay attention to the microclimates of your house. It will make you a more confident fermenter and a better bread baker.
Our vessel of choice for baking focaccia is a 9 by 13-inch heavy-gauge nonstick metal baking pan. Despite its high dose of fat, this wet, sticky dough will try to cling to the pan; a nonstick finish guarantees an easy release. We like the 9 by 13-incher made by OXO, as well as one made by USA Pan.
-
for refreshing your levain:
-
25grams spring or filtered water
-
10grams Red Fife Natural Levain
-
25grams Anson Mills French Mediterranean White Bread Flour, freezer-cold
-
-
for feeding the final levain:
-
60grams spring or filtered water
-
60grams refreshed levain
-
60grams Anson Mills French Mediterranean White Bread Flour, room temperature
-
-
for the poolish:
-
80grams spring or filtered water
-
⅛teaspoon instant yeast
-
80grams Anson Mills French Mediterranean White Bread Flour, room temperature
-
-
for the autolyse:
-
250grams spring or filtered water
-
20grams extra-virgin olive oil
-
385grams Anson Mills French Mediterranean White Bread Flour, room temperature
-
-
for the final dough:
-
150grams final levain
-
155grams poolish
-
20grams spring or filtered water
-
10grams fine sea salt
-
-
for the pan and topping the dough:
-
2½tablespoons extra-virgin olive oil
-
1teaspoon flaky sea salt, such as Maldon
-
½ to 1teaspoon cracked black pepper
-
Chopped fresh rosemary leaves (optional)
-
-
Day 1, 10:00 p.m.—refresh your levain: In a small saucepan, warm the water to 105 degrees. Pour the water into a pint-size mason jar, add the levain, and stir with a small silicone spatula until homogenous. Add the flour and mix thoroughly. Scrape down the sides of the container and cover, loosely tightening the metal band. Let stand overnight at room temperature.
-
Day 2, 8:00 a.m.—feed the final levain: In a small saucepan, warm the water to 90 degrees. Pour it into a small bowl, add the refreshed levain, and stir until dissolved. Add the flour and mix until no dry bits remain and the mixture is homogenous. Cover tightly with plastic wrap and place in a warm spot, one where the mixture will maintain an internal temperature of about 80 degrees.
-
Day 2, 8:10 a.m.—mix the poolish: In the same small saucepan, warm the water to 90 degrees. Pour it into another small bowl, then add the yeast and flour. Stir until the mixture resembles a smooth batter. Cover tightly with plastic wrap, mark the mixture “poolish” (to avoid confusing it with the final levain), and place alongside the other bowl.
-
Day 2, 11:30 a.m. —mix the autolyse: In a small saucepan, warm the water to 90 degrees. Pour it into a medium bowl (ideally one made of heavy ceramic), then add the olive oil, followed by the flour. Incorporate by squeezing and kneading with your dominant hand while rotating the bowl until the flour is fully hydrated; this is a rather wet dough and will feel loose and weak. Occasionally scrape the bowl and your hand with a plastic bowl scraper. Cover with plastic wrap and place in the warm area next to both the final levain and poolish.
-
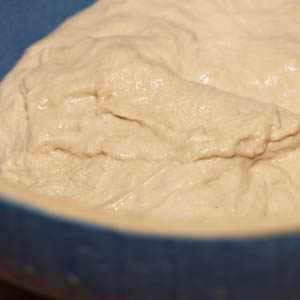
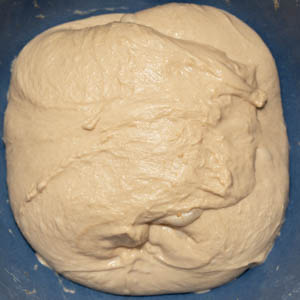
Day 2, 12:00 p.m. —mix the final dough: At this point, both the final levain and poolish will appear very active and will have nearly tripled in size. To the autolyse, add 150 grams of the final levain (reserve the remainder for future levain feedings), all of the poolish (155 grams), the salt, and water. Squeeze with your hand to break everything up and force the ingredients to combine. Initially the dough will look ruined, but after a few minutes of squeezing, stretching, and gentle kneading, the mixture will come together into a single mass (fig. 5.1). If the sides of the bowl are mucky, scrape them clean with a plastic bowl scraper. Cover tightly with plastic wrap and place in a warm area, one where the dough will maintain an internal temperature of 74 to 76 degrees. Let rest for 15 minutes.
-
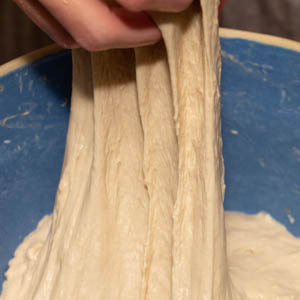
Moisten your dominant hand with water and insert it down the side of the bowl at the 12 o’clock position, then stretch and fold the dough down to the opposite side of the bowl (fig 6.1). Rotate the bowl 180 degrees and stretch and fold the dough in the same way. Now rotate the bowl 90 degrees in the same direction and fold, then rotate the bowl 180 degrees in the same direction and fold. You will have given the dough a set of four folds. Cover the bowl again and let rest for another 15 minutes.
-
Repeat the stretching and folding again, one more set of four folds. Let rest for another 15 minutes. Repeat a third set of folds and then allow the dough another 15-minute rest. All the while check the internal temperature to ensure it remains 74 to 76 degrees.
-
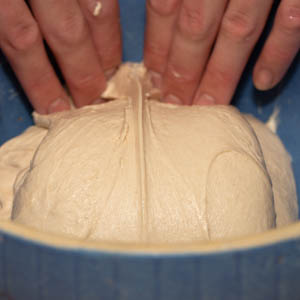
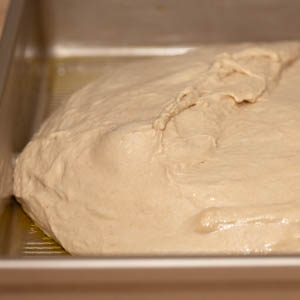
Perform a fourth and final set of folds using a lighter touch (fig. 8.1); as you develop the dough’s strength, you want to retain the gases that have built up during the rising periods. The dough should now be strong enough to stand away from the sides of the bowl. It will also be noticeably bouncier and more elastic, and the surface will be smoother (fig. 8.2). Cover the bowl with plastic wrap and let rise until the dough has doubled in volume, about 45 minutes.
-
Grease a nonstick heavy-gauge 9 by 13-inch metal baking pan with 1 tablespoon of the olive oil. Wet the bowl scraper with water and run it around the edge of the dough, gently scrape the entire dough mass into the center of the prepared pan (fig. 9.1). Cover the pan with plastic wrap and let rest for 10 minutes.
-
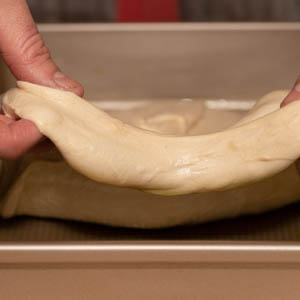
Uncover the pan. Moisten your hands with water, slide your fingers under the dough near the center on opposite sides, and gently lift and stretch the dough to fill the pan, working your way to one side (fig 10.1). The dough will probably resist somewhat and spring back. This is okay—do not force the dough and risk tearing its surface. Now gently lift and stretch the other side of the dough as much as it’s willing. Cover the pan and let for 10 minutes. Repeat the stretching process, followed by 10-minute rests, until the dough fills the pan to its corners (fig 10.2) and is mostly even in thickness; this should take only 3 rounds, but if your dough is very resistant, don’t force it. Give it another rest and another round of lifting and stretching. Once snug in the pan, cover the pan and let the dough rise until doubled in volume and lumpy with blueberry-sized bubbles, about 2 hours (with an internal dough temperature of about 75 degrees).
-
When 30 minutes remain in the final fermentation, adjust the oven rack to the middle position and heat the oven to 450 degrees.
-
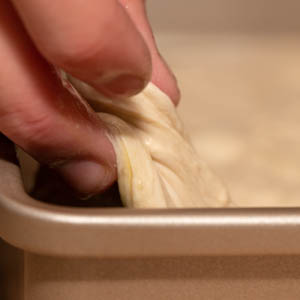
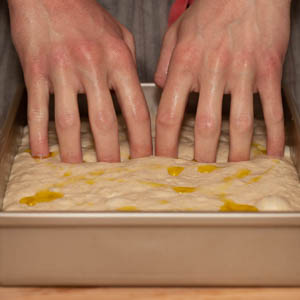
When the dough is ready, drizzle the entire surface with the remaining 1½ tablespoons olive oil. Moisten your fingertips with water, then press indentations into the dough by poking your fingers straight down into the dough, pressing all the way to the pan; space the indentations about 1 inch apart (fig. 12.1). Do not over-dimple the dough, which may cause it to deflate. Sprinkle the dough with the flaky salt, black pepper, and rosemary (if using).
-
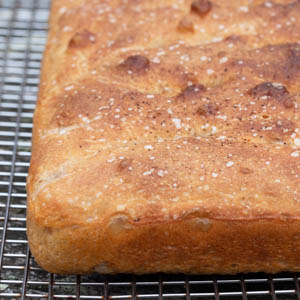
Slide the pan into the oven and immediately lower the oven temperature to 425 degrees. Bake for 10 to 12 minutes, rotate the pan 180 degrees, and continue to bake until the sides are golden and the surface shows thin, crisp, dark bubbles (fig. 13.1), 10 to 12 minutes longer. If you’re unsure of the doneness, test the temperature of the center of the loaf with an instant-read thermometer; it should register about 200 degrees. Remove from the oven and, with a wide spatula, carefully lift the loaf out of its pan and slide it onto a wire rack. Let cool for at least 15 minutes before slicing, ripping, and dipping. As with any bread, if you desire thin, uniform slices, portioning will be much easier after the loaf cools for a few hours.
-
-
5.1
-
-
-
6.1
-
-
-
8.1
-
8.2
-
-
-
9.1
-
-
-
10.1
-
10.2
-
-
-
12.1
-
-
-
13.1
-