French Mediterranean Natural Levain Boule
introduction
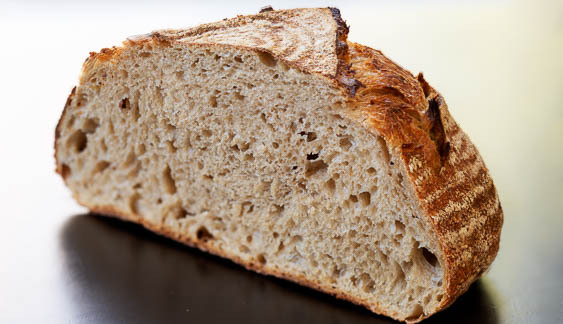
With its mildly sour, creamy crumb, and high, round shape, this boule might have taken its place at the table of an aristocratic family in 18th century Virginia or South Carolina. Patrician Southerners rejected the coarse brown breads consumed by their laborers in favor of bread produced from bolted or sifted flour—bread that took quadruple the effort and cost substantially more to produce than whole-grain bread. Peasant breads were considered too coarse for the delicate digestions of ladies and gentlemen. Now, of course, the paradigm has shifted, and we recognize whole-grain breads to be more wholesome than white breads that dominated the world of modern agricultural, milling, fermenting, and baking processes for decades. But the ineluctable appeal of white bread and its historic proximity to upper class wealth remains in our culture and on our tongues.
Anson Mills bolted French Mediterranean White Bread Flour, which is made from a white heirloom wheat with a particularly fine bran layer, produces breads with a creamy beige crumb that bear no trace of tannin in their palate finish. The process we use to prepare this boule is very similar to that of the naturally leavened Red Fife boule, but this boule’s flavor is mild and sweet, as opposed to nutty and robust. The flavor complexity of French Mediterranean bread flour can, on the other hand, make you swear you’re eating whole grain. It’s a winning combination all round.
Baking Notes
To launch on this recipe, you will need a fully fermented Red Fife Natural Levain.
Because it lacks the thirstier bran of whole-grain flour, this dough does not require as much water as its companion Red Fife boule, yet produces a firm, easily shaped dough. We’ve abandoned the “stitching” technique to build tension in the final shape and rely instead on two-handed rounding. The dough also feels quite extensible—the baker’s hands aren’t forced to compete with sharp shards of bran that can cut through the gluten network.
Unsurprisingly, French Mediterranean White Bread Flour ferments differently than Rustic Red Fife Wheat. Whereas nutrient-dense whole-grain flours provide plenty of food for bacteria and yeasts, a white-wheat dough—stripped of these nutrients—ferments more slowly. The dough requires approximately one hour longer in bulk fermentation, needs more time resting on the bench, and stays out on the bench longer before being put to bed in the fridge. The slower ferment does offer more flexibility in the final phase—unlike a 100 percent whole-grain dough, it won’t overproof as easily. Our time frame suggests you bake this bread at 10:00 a.m. on the final day, but if your schedule doesn’t allow, the timing can be pushed out for several hours with minimal impact on the dough’s performance.
As always, pay close attention to ambient temperatures and the temperature of the dough. Also, use caution with hot and heavy cast-iron combo cookers.
Day 1
10:00 p.m. – Refresh the levain
Day 2
8:00 a.m. – Feed the final levain
11:00 a.m. – Mix the autolyse
12:00 p.m. – Mix the final dough
12:15 p.m. – Begin bulk fermentation
4:15 p.m. – Divide & pre-shape the dough
5:15 p.m. – Final shape & proof the dough
Day 3
9:00 a.m. – Heat the oven & combo cookers
10:00 a.m. - Bake
equipment mise en place
For this recipe, you will need a digital kitchen scale; a digital instant-read thermometer; a small saucepan and a medium saucepan; a pint-size mason jar with lid; a small silicone spatula; a small bowl; a large bowl (ideally, one made of heavy ceramic); a plastic bowl scraper; a metal bench knife; two clean kitchen towels; two 8- to 9-inch round brotforms (aka bannetons); two Lodge 3-quart cast-iron combo cookers; parchment paper; a pizza peel; heavy-duty oven mitts; a baker’s lame or a small, razor-sharp knife; a ruler; and a wire cooling rack.
-
for refreshing your levain:
-
25grams spring or filtered water
-
10grams Red Fife Natural Levain
-
25grams Anson Mills French Mediterranean White Bread Flour, freezer-cold (about 5 degrees)
-
-
for feeding the final levain:
-
55grams spring or filtered water
-
45grams refreshed levain
-
90grams Anson Mills French Mediterranean White Bread Flour, room temperature
-
-
for the autolyse:
-
650grams spring or filtered water
-
1kilogram Anson Mills French Mediterranean White Bread Flour, room temperature
-
-
for the final dough:
-
170grams final levain
-
80grams spring or filtered water
-
25grams fine sea salt
-
Anson Mills French Mediterranean White Bread Flour, for dusting
-
-
Day 1, 10:00 p.m. —refresh your levain: In a small saucepan, warm the water to 105 degrees. Pour the water into a pint-size mason jar, add the levain, and stir with a small silicone spatula until homogenous. Add the flour and mix thoroughly. Scrape down the sides of the jar, then cover and loosely tighten the metal band. Let stand overnight at room temperature.
-
Day 2, 8:00 a.m. —feed the final levain: In a small saucepan, warm the water to 90 degrees. Pour it into a small bowl, add the 45 grams refreshed levain, and stir until well combined. Add the flour and mix until no dry bits remain and the mixture is homogenous. Cover the bowl with plastic wrap and place in a warm area, a spot where the dough will maintain an internal temperature of about 80 degrees.
-
Day 2, 11:00 a.m. —mix the autolyse: In a medium saucepan, warm the water to 90 degrees. Pour it into a large bowl (ideally one made of heavy ceramic, though metal will work), then add the flour. Incorporate the flour by squeezing and kneading the mixture with your dominant hand while rotating the bowl until the flour is fully hydrated and has gained a little strength; occasionally scrape your hand and the bowl with a plastic bowl scraper. Cover the bowl with plastic wrap and place it next to the one containing the final levain.
-
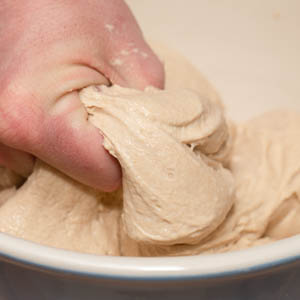
Day 2, 12:00 p.m. —mix the final dough: At this point, the final levain will have nearly tripled in size and boast a pleasant, yeasty aroma; the autolyse will not appear much different than when it was mixed. Add 170 grams of the final levain (reserve the remainder for future levain feedings) and 40 grams of the water to the autolyse and squeeze with your hand, forcing the two to combine into a dough (fig. 4.1). Knead the dough in the bowl for about 1 minute. Cover with plastic wrap and let rest for 15 minutes.
-
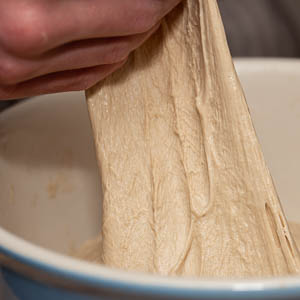
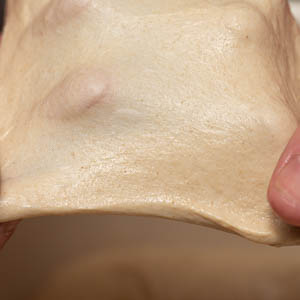
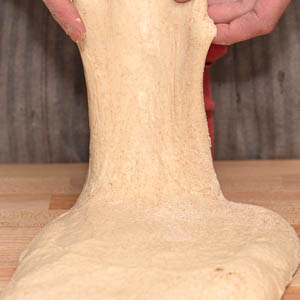
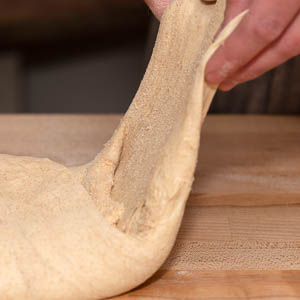
In a small saucepan, warm the remaining 40 grams of water to 90 degrees, then stir in the salt. Add the salted water to the dough and, utilizing the same squeezing method, incorporate the water into the dough; the dough may break apart but will eventually come back together into a uniform mass. Moisten your dominant hand with water and, with the bowl near the edge of the counter, slide your hand, fingers first, down the inside of the bowl at the 12 o’clock position. Grab the dough, stretch it up, and fold it over to the opposite side of the bowl (fig. 5.1). Rotate the bowl 90 degrees and repeat the process; moisten your hand as needed to prevent sticking, working swiftly and with decisive movements. Continue stretching, folding, and rotating the dough for about 1 minute, until it begins to resist stretching. Allow the dough to rest for 2 minutes, then repeat the stretching and folding until it once again begins to resist. Repeat this intermittent mixing method until the dough is smooth and very extensible. To test the dough for sufficient gluten development, pinch off a 2-inch piece and gently stretch it with both hands; it should stretch to translucency (fig. 5.2) but will tear rather easily. If it tears before it reaches translucency, continue to stretch and fold the dough for a few minutes more, then retest.
-
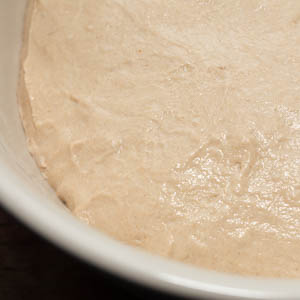
Day 2, 12:15 p.m. —begin bulk fermentation: If there are a few inches of headroom in the bowl for the dough to rise, leave the dough in the bowl (fig 6.1); if the sides of the bowl are mucky, scrape them clean with a plastic bowl scraper. If the bowl lacks adequate headroom, transfer the dough to a larger thick-walled bowl. Cover tightly with plastic wrap and place in a warm area, one where the dough will maintain an internal temperature of 78 to 80 degrees. Let the dough rise for 30 minutes.
-
Moisten your hands with water and insert them down the side of the bowl at the 12 o’clock position, then stretch and fold the dough down to the opposite side of the bowl. Rotate the bowl 180 degrees and stretch and fold the dough in the same way. Now rotate the bowl 90 degrees in the same direction and fold, then rotate the bowl 180 degrees in the same direction and fold. You will have given the dough a total of 4 folds. Cover the bowl with plastic wrap and let the dough rise in a warm spot for 30 minutes.
-
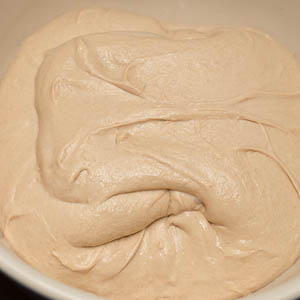
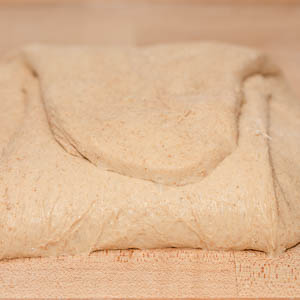
Repeat the stretching and folding process once again, this time using a lighter touch—even while developing the dough’s strength, you want to retain the gases that have built up during the rising periods. Cover the bowl and let the dough rise once again for 30 minutes. Repeat the stretching and folding process for a third and final time, using an even gentler hand. The dough should now be strong enough to stand away from the sides of the bowl and it will have grown slightly in volume (fig. 8.1). Cover the bowl with plastic wrap and return it to the warm spot.
-
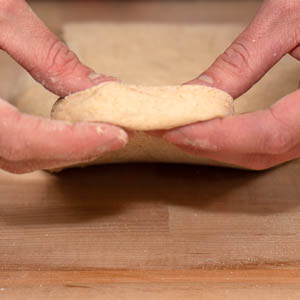
Day 2, 4:15 p.m. — divide and pre-shape: At this point, the dough will have increased about 30 percent in volume. It should have some pockets of trapped gas and feel very aerated and supple. Lightly dust the top of the dough with flour, as well as a large area of your work surface. Run a plastic bowl scraper around the inside of the bowl to release the dough from the sides. Flip the bowl onto the floured work surface and allow the dough to drop from the bowl. Set the bowl aside and lightly flour the dough. With a metal bench knife, evenly divide the mass in two. Flip one half over, positioning it directly in front of you. Take the bottom of the dough, at 6 o’clock, and fold it to the center (fig. 9.1), then fold the top of the dough, at 12 o’clock, to the center (fig. 9.2). Do the same with each side, at 3 and 9 o’clock (fig. 9.3). The dough should now be squarish in shape (fig. 9.4). Using the bench knife, to flip the dough over once again.
-
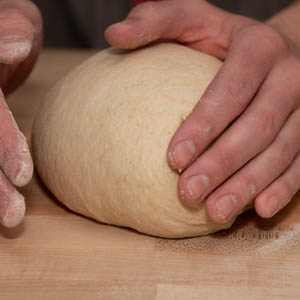
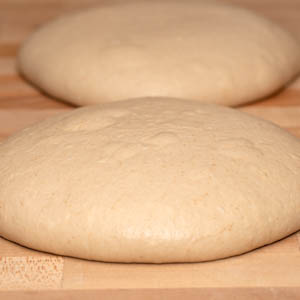
Cup both hands around the dough and move the dough in small circular motions; the idea is to allow the base of the dough to grip the work surface so that as it moves about, the mass forms a taller, more spherical shape (fig. 10.1). When the dough ball is nice and tight, set it aside, lightly dust the top with flour, and drape with a clean kitchen towel. Shape the other half of the dough in the same way, set it at least 4 inches away from the first dough round (fig. 10.2), and cover with another clean kitchen towel. Let the dough rest for at least 45 minutes if the ambient temperature in your kitchen is about 80 degrees or up to 75 minutes if your kitchen is 65 to 70 degrees; the rounds will sink and pool out slightly (fig. 10.3). While the dough rests, dust each of two 8- to 9-inch round brotforms with about 25 grams flour, evenly coating the insides.
-
Day 2, 5:15 p.m. — final-shape and proof the dough: Uncover one portion of dough and lightly dust it with flour. Using the bench knife, gently flip the dough over. You will now utilize the same pre-shaping technique to final-shape the dough. Fold the bottom of the dough to the center, then fold the top to the center. Do the same with the left and right sides, then flip the dough over. Use cupped hands to “round” the dough, re-forming it into a taut sphere; set the dough aside. Shape the second portion of dough in the same way. Lightly dust each boule with flour and invert it into a prepared brotform; what was facing up is now against the bottom of the basket. Cover each brotform with a kitchen towel and let rest at room temperature for about 1 hour; when poked with a finger, the indentation in the dough should slowly spring back. Replace the kitchen towels, covering the brotforms with plastic wrap, then refrigerate overnight.
-
Day 3, 9:00 a.m. — heat the oven and combo cookers: Adjust the oven rack to lower-middle position and heat the oven to 500 degrees. When the oven comes up to temperature, carefully slide two Lodge 3-quart cast-iron combo cookers, the two pieces stacked in place, in the oven, then allow them to heat for about 20 minutes.
-
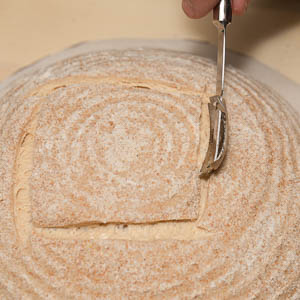
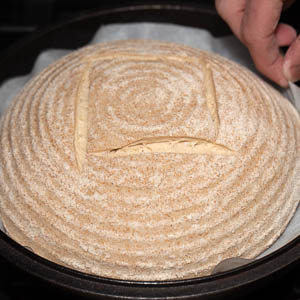
Day 3, 10:00 a.m. — bake the loaves: Remove the brotforms from the refrigerator. Cut out two 10-inch rounds of parchment paper and place one on a pizza peel. Uncover one of boules and lightly dust it with flour. Using heavy-duty oven mitts, very carefully remove one of the combo cookers from the oven; close the oven door. Separate the combo cooker into its two components; the boule will be loaded into the shallower pan and the deeper pan will serve as a cover to create a sealed environment. Using your fingertips, very gently pull the edge of the dough away from the brotform to release it from the sides, then carefully tip the dough out of the basket onto the parchment round on the peel. With a baker’s lame or small, razor-sharp knife held at a 45-degree angle to the boule, slash a 4-inch square at the center (fig. 13.1); don’t cut too deeply, as this could collapse the dough’s structure. Swiftly slide the boule with its parchment into the shallow pan of the combo cooker; center the boule in the pan if needed (fig. 13.2). Cover with other part of the combo cooker and place in the oven. Repeat the process with the remaining loaf and combo cooker.
-
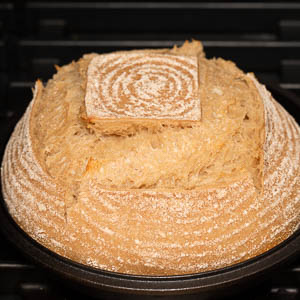
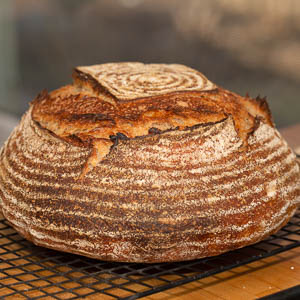
Bake for 15 minutes, then remove the first boule and its combo cooker from the oven. Carefully remove the lid of the cooker; the loaf will have expanded and risen (fig. 14.1). Return the pan, uncovered, to the oven, then repeat with the second loaf. Reduce the oven temperature to 450 degrees and continue to bake until the loaves are deeply browned, 10 to15 minutes longer (fig. 14.2). Another way to test doneness is to tap the boules on the bottom—they should sound hollow. Quickly transfer the loaves to a wire rack; remove and discard the parchment. Let cool to room temperature before slicing; if you’re going for thin slices, let the boules cool for at least 4 hours.
-
-
4.1
-
-
-
5.1
-
5.2
-
-
-
6.1
-
-
-
8.1
-
-
-
9.1
-
9.2
-
9.3
-
9.4
-
-
-
10.1
-
10.2

-
10.3
-
-
-
13.1
-
13.2
-
-
-
14.1
-
14.2
-
recipe developed by Henry Jones