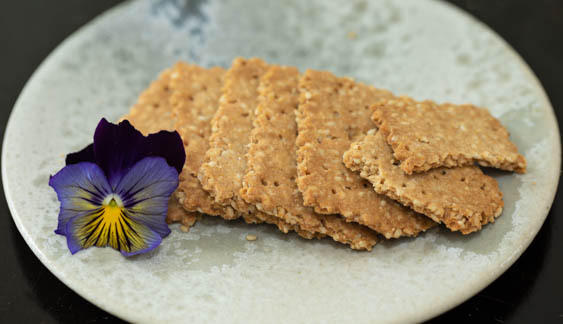
Benne Wafers
introduction
As Southern legacy crackers, benne wafers are so popular that they’re sold in airports and gift shops—rarely a good sign. Consider this recipe a revival of sorts. It’s easy, its ingredients are simple and good, and the wafers are light, buttery, crisp, and rich with benne flavor. They are also gluten free. A blend of Carolina Gold rice flour, oat flour, and bennecake (solid particles that remain after benne seeds are pressed for oil and subsequently milled to flour), Anson Mills gluten-free flour might have been custom-created for very this recipe.
The wafers are superb with pimento cheese, hummus, and any soft cheese—even butter and jam, should you fancy.
Baking Notes
The finished dough should be moist and soft—not dry and flaky or patchy. It shouldn’t be wringing wet, either. It’s mixed in a bowl with a spoon, so start with 1.2 ounces of water and get a read on the texture, adding additional water in droplets as necessary.
With some reluctance we chose a gallon-size zipper-lock bag to envelope the dough while rolling. Plastic is never our first choice for storage, but in this instance it works so beautifully compared with parchment, we couldn’t resist. The dough transits quickly in and out of the plastic. We store the baked wafers in glass, of course.
Despite the dial setting or digital display, temperatures vary from oven to oven. Allow the wafers to bake long enough for them to really color before removing them from the oven. This will ensure their finest possible flavor and texture.
equipment mise en place
For this recipe, you will need a digital kitchen scale, a mortar and pestle, a whisk, a silicone spatula, a heavy-duty gallon-size zipper-lock bag, a pair of sharp scissors, a rolling pin, a baking sheet, parchment paper, a fluted pastry wheel, a small offset spatula, and a wire rack.
-
-
2
-
4
-
½teaspoon fine sea salt
-
⅛teaspoon baking powder
-
0.5ounce egg white
-
0.5ounce honey
-
1.7ounces clarified unsalted butter, melted and cooled until warm to the touch
-
1.2ounces spring or filtered water
-
-
Turn the benne seeds into a mortar and pound with a pestle to crush some of them and release their oil. (Alternatively, turn the benne seeds onto a cutting board and chop with a knife.) In a small bowl, whisk together the flour, salt, baking powder and benne seeds; set aside.
-
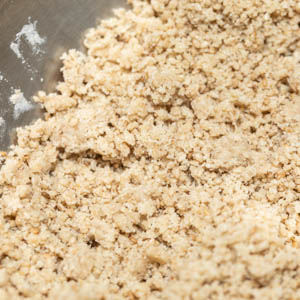
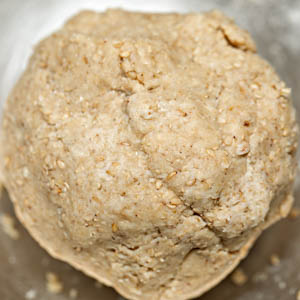
In a small bowl, combine the egg white, honey, and clarified butter, then whisk until glossy and emulsified. Pour the butter mixture into the dry ingredients and rub with your fingertips until the mixture is sandy (fig. 2.1). Add the water and stir with a silicone spatula, finishing with your fingertips, until an evenly moistened dough forms; if it feels dry or patchy at this point, mix in a few more droplets of water. The dough should form a ball and clean the sides of the bowl (fig. 2.2).
-
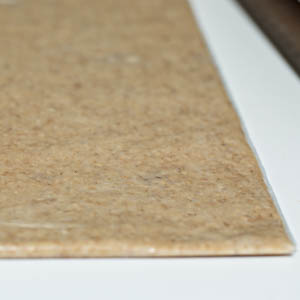
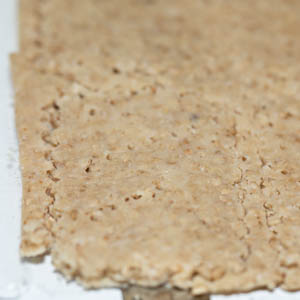
Turn the dough into a heavy-duty gallon-size zipper-lock bag, placing it in the center and seal the bag. Using sharp scissors, trim the tiniest triangle of plastic from the two bottom corners of the bag. Use a rolling pin to roll the dough out in the bag until the dough is perfectly flat and fills all edges and corners (fig. 3.1). Slide the dough block onto a baking sheet and refrigerate for at least 15 minutes. Adjust a rack to the lower-middle position and heat the oven to 300 degrees. Line a baking sheet with parchment paper.
-
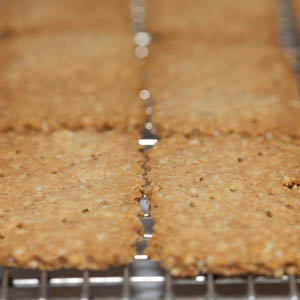
Remove the dough from the refrigerator. Using the scissors, cut off and discard the zipper-lock seal. Using a sharp knife, slice off the two opposite sides of the bag. Peel off the top sheet of plastic to loosen it from the dough, then lay it back down lightly. Flip the bag and peel off the new top sheet. Using a fluted pastry wheel, trim off the very edges of the dough, then cut it into a five by five grid, yielding 25 wafers. Prick the entire sheath of dough with a fork. One at a time, transfer the wafers to the prepared baking sheet by sliding a small offset spatula under each and lifting it off (fig. 4.1). Bake until deep golden brown, about 20 minutes. Invariably, some wafers will brown more quickly; transfer the earliest to brown to a wire rack and continue baking the rest until they, too, are deep golden brown before transferring them to the rack. Let cool to room temperature (fig. 4.2). Store in an airtight container; the wafers are best consumed within 3 days.
-
-
2.1
-
2.2
-
-
-
3.1
-
-
-
4.1
-
4.2
-