Lacquered Scallops

introduction
Not to be snobs about it, but when we say we’re an “artisan” operation, we’re not throwing the word around like a latter-day replacement for “gourmet.” We hew to strict definitions. Artisan means “by hand.” The men who work in the various rooms at Anson Mills work by hand, milling, screening and custom blending all manner of our heirloom grains for chefs and home cooks. (Many of them farm, too.) While the retail website has 50-odd products, the wholesale site has well over 200. These men have intimate understanding of our products. They have fingerspitzengefühl, sensitivity in the tips of their fingers.
They also cook Anson Mills grains at home. A while back, Glenn turned up with two small bags and a high level of excitement, “Hey, we have to try this breader! The guys at the mill say it’s fantastic for fish and seafood!” He meant a combination of toasted oat flour and rice flour dusted on a fish fillet or something similar and pan fried. Since then, this breader (which is really all too coarse a term for treatment so fine) has been used on every sized scallop from bay to divers. The bigger the scallop in this application, the better. We explain why below.
Anyway, the flour combination does create a phenomenal exterior finish on a scallop, particularly on a scallop that has dipped itself briskly in lemon juice for a little while and patted itself dry. There is the sweetness of the scallop itself, the lingering liveliness of the lemon cure, and an almost butterscotchy richness in the varnish created when the flours make extended contact with a hot veil of butter in a very hot pan. Simply ethereal. Thanks, guys!
Cooking Remarks
This recipe works best with diver scallops, those that are hand harvested from the ocean floor by professional scuba divers and show up or show off on the kind of restaurant menus where first courses often exceed $25. Diver scallops are BIG—under 10 count per pound. They happen to work best with this breader because they can comfortably stay in the pan getting their butts fried without overcooking and beginning to exude liquid. Get the biggest ones you can find and make sure they’re dry packed and not resting in embalming fluid.
We worked with a traditional black (cast-iron) skillet, but left it in favor of an All-Clad nonstick. The sear grabs more reliably, we think, on a nonstick finish, and the crust, which can be a little testy, releases with ease.
equipment mise en place
For this recipe, you will need a small saucepan, a 1-cup liquid measuring cup or small bowl, paper towels, two shallow medium-sized baking dishes, a heavy-bottomed 10-inch nonstick skillet, a large fine-mesh sieve, and a pair of tongs.
-
-
1.5ounces (3 tablespoons) unsalted European-style butter
-
1pound extra-large sea scallops (about 8 scallops per pound)
-
Juice of ½ large, juicy lemon
-
2ounces (generous ⅓ cup) Anson Mills Carolina Gold Rice Flour
-
1ounce (generous ¼ cup) Anson Mills 18th Century Style Rustic Toasted Oat Flour
-
Fine sea salt and freshly ground black pepper
-
-
Melt the butter in a small saucepan over low heat. Remove the pan from the heat, tilt it gently, and, using a spoon, skim off and discard the foam on the surface. Spoon the clear yellow butterfat into a 1-cup liquid measuring cup or small bowl, leaving the watery milk solids in the pan. Discard the milk solids. Set the clarified butter aside.
-
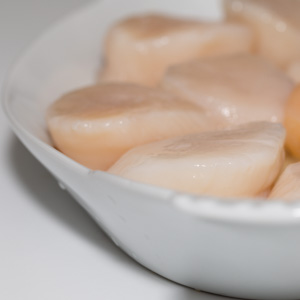
Pull off and discard the crescent-shaped muscle from the side of each scallop. Dry the scallops on paper towels, arrange in a single layer in a shallow medium-sized baking dish, and sprinkle with the lemon juice (fig. 2.1). Turn the scallops in the juice so they are evenly coated and leave them for a few minutes. Remove and dry them again on paper towels.
-
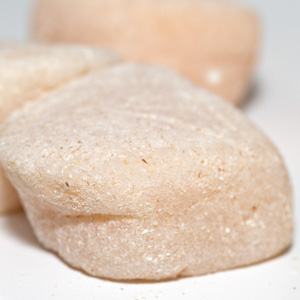
Heat a heavy-bottomed 10-inch nonstick skillet over high heat until hot, 2 or 3 minutes. Combine the flours in a bowl, mix well, and turn them into a shallow medium-sized baking dish.
-
Sprinkle the scallops with salt and pepper. Place them in the flour mixture and toss until coated on all sides. Remove the scallops from the flour and shake off the excess (fig. 4.1).
-
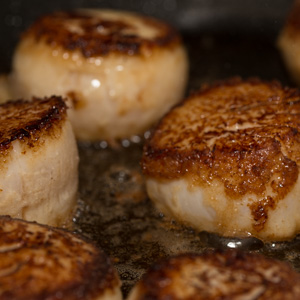
Pour the clarified butter into the hot skillet and swirl to coat the surface of the pan. Lay the coated scallops in the skillet in a single layer—they should sizzle immediately—and cook without disturbing, tilting the skillet to distribute the fat, until a deep golden band is visible along the bottom circumference of each scallop, about 2 minutes. Turn them one by one with tongs and continue to cook until their tops are just firm to the touch, about 1½ minutes longer (fig. 5.1). Remove the scallops from the skillet and serve immediately.
-
-
2.1
-
-
-
4.1
-
-
-
5.1
-