Brioche
introduction
We don’t particularly care who uttered the legendary chewed-over phrase that begins with “let them” and ends with “cake.” What we love is the scathing subtlety of the original French. No bread? Then perhaps some brioche?
Better bread. Aristocratic bread. Exquisitely unobtainable bread. Take that, starving peasants!
Of course, the English translation of this bon mot went straight to “cake.” Not because English-speaking people of the time wouldn’t have seen or heard the word brioche. They might have enjoyed a slice or three on holiday. But they wouldn’t have immediately grasped, perhaps, the sheer significance of bread in French culture, a significance so striking that the French need almost as many names for bread as the Inuits have for snow. No native English word calls forth a fine, lofted, buttery loaf with aromatic dimensions as complex as fine scent. We had to call it “cake.”
We took brioche into development sufficiently apprised of its famous idiosyncrasies, its requirements for windowpane extensibility, a buttery formula, its handling difficulty, its fermentation demands, its shaping challenges. We were also aware that experts found themselves in disagreement over additional issues, from butter ratios to baking temperatures. What we weren’t prepared for, ultimately—after we slogged with due diligence through trial after trial, testing variable after variable—was how absolutely worth it, it is, to make brioche at home. Brioche, in the flesh, can easily fall short of the grandeur of its reputation. But this! Our final loaf resting before us on a cutting board, we were thrilled to discover we’d never tasted brioche of this quality before. Transcendent, particularly, in the first 5 or 6 hours after baking, the teeth-first plunge into our brioche crust was riveting: lightly springy and micro-crisp at the same time, and with the Maillard browning principle in its full, elegant expression, this crust had none of the eggy flaccidity to which some brioche crusts fall prone. The interior was gauzy and light with complex fermentation flavors and an open, buttery crumb.
It always comes back to ingredients. In this recipe, we use freshly laid farm eggs with bright orange yolks, fine European-style butter, and Anson Mills French Mediterranean bread flour—finely milled and sweet, offering both strength and delicate crisping factors.
Baking Notes
This recipe is not difficult to execute. So burdened by eggs and butter is the formula that a mixer produces more consistently favorable results than the hands (we tried both). Treat the dough like it’s having a day at the spa: nice and easy, a gentle pace, a light touch. Give it a nice slow, slumbering rise, a long chilly overnight nap, etc. Precision in weighing and mixing is paramount. Allow the dough enough time to complete its first proof, and enough to finish its second in-pan rise. Don’t be tempted to throw flour down on the counter or onto the dough. Oh, and work quickly during the hands-on phase. Brioche dough will quite literally have a meltdown if it gets too warm. Rising times are based on an ambient temperature of 74 degrees Fahrenheit.
The 10 by 5 by 3-inch loaf pan we use is this recipe is larger than a standard loaf pan. It is available for purchase online.
Because the ingredient ratios for this bread are important, you’ll note we call for a higher weight of milk in the ingredient list than what is used in the final recipe. That’s because, in our experience, milk heating in a pan on the stove tends to evaporate even if it doesn’t boil.
equipment mise en place
For this recipe, you will need a digital kitchen scale, a small saucepan, a stand mixer with a paddle attachment and a dough hook, an instant-read thermometer, a whisk, a wooden spoon, two medium bowls, a small bowl, a liquid measuring cup, a fine-mesh sieve, a rubber spatula, a plastic dough scraper, a heavy-gauge 10 by 5 by 3-inch loaf pan, a ruler, a pastry brush, kitchen twine or a rubber band, a pizza stone, a razor blade or lame, and a wire cooling rack.
-
for the starter:
-
4.2ounces whole milk
-
2teaspoons instant yeast, preferably SAF Gold
-
3
-
-
for the dough:
-
9ounces Anson Mills French Mediterranean White Bread Flour, plus additional for shaping
-
1.4ounces sugar
-
1teaspoon fine sea salt
-
½teaspoon ground cardamom
-
5large eggs
-
7ounces unsalted European-style butter, cool room temperature (softened but still waxy)
-
-
-
Unsalted butter, for greasing the loaf pan
-
1large egg yolk
-
1tablespoon whole milk
-
-
Make the starter: In a small saucepan, warm the milk over low heat just until it begins to bubble gently; do not allow it to reach a full simmer. Set the mixer bowl on your digital scale and tare the scale. Immediately pour the milk into the bowl; it should weigh 4 ounces. If it weighs more, spoon out the excess. Let the milk cool until it registers 115 degrees on an instant-read thermometer.
-
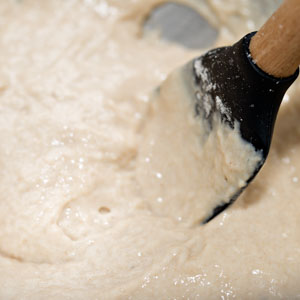
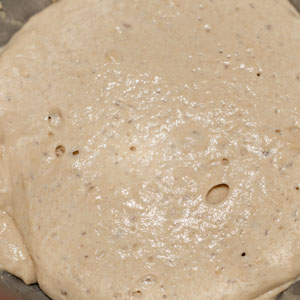
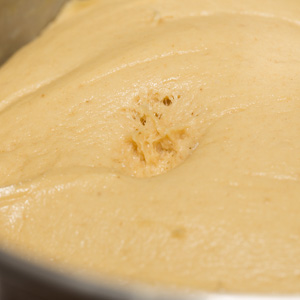
Sprinkle the yeast over the milk and allow it to soften without stirring for a couple of minutes, and then whisk until the yeast fully dissolves. Turn the flour into the yeast mixture and stir with a wooden spoon until a soft batter-like dough forms (fig. 2.1). Cover the bowl with plastic wrap and let proof at room temperature for 45 minutes, by which time the starter will be puffy and show small bubbles (fig. 2.2).
-
Make the dough: While the starter is proofing, in a medium bowl, whisk together the flour, sugar, salt, and cardamom and set aside. Crack the eggs into a second medium bowl and whisk until well combined. Set a fine-mesh sieve across a small bowl, pour the eggs into the sieve, and let them flow into the bowl. Lift off the sieve and discard its contents. Set a liquid measuring cup on the digital scale and pour in 7 ounces of the strained beaten eggs. Discard the excess or reserve it for another use.
-
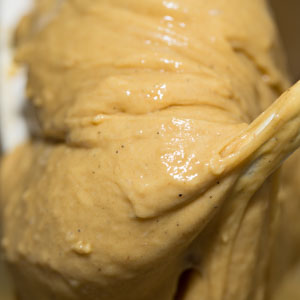
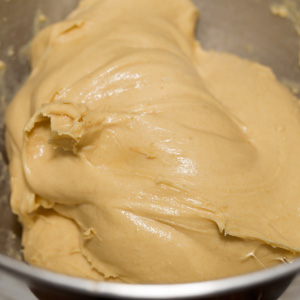
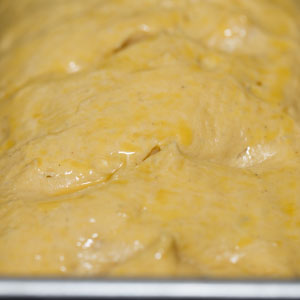
Attach the bowl and flat beater attachment to the mixer. With the mixer running on low speed, add about a cup of the dry ingredients and beat to create a strong dough, about 3 minutes. Add half of the beaten eggs and mix well, and then add half of the remaining dry ingredients and mix until combined. Scrape down the bowl with a rubber spatula as needed. Add the remaining eggs and dry ingredients in the same way. You will have a shiny, wet, scrappy dough (fig. 4.1). Mix on medium speed for 10 seconds, and then reduce the speed to low. Add the butter 2 to 3 tablespoons at a time, mixing until the butter is fully incorporated after each addition before dropping in more; this process should take about 4 minutes. Pull the dough off the flat beater and replace the beater attachment with the dough hook. Knead the dough on low speed until it is smooth, shiny, and extensible and pulls away from the sides of the bowl (fig. 4.2), about 8 minutes. Remove the bowl from the mixer and pull the dough off the hook. Cover the bowl with plastic wrap and allow the dough to rise at room temperature until it has nearly doubled in volume and a floured thumb leaves a depression in the surface (fig. 4.3), about 2 hours.
-
Dust your knuckles with flour and gently deflate the dough with the backside of your hand. Use a plastic dough scraper to scrape down the sides of the bowl and fold the edges of the dough toward the center; rotate the bowl after each fold. Cover the bowl with plastic wrap and refrigerate. The dough will continue to rise in the refrigerator until it is well chilled. For the next 4 hours, deflate the dough every 15 to 20 minutes by gently pressing down on it with the backside of your hand. When the dough feels relatively cold and firm, cover the dough flush with plastic wrap, cover the bowl with plastic wrap, and refrigerate overnight.
-
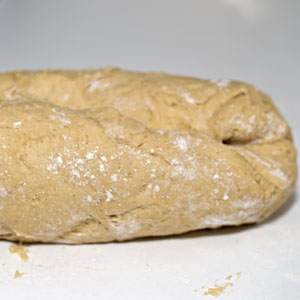
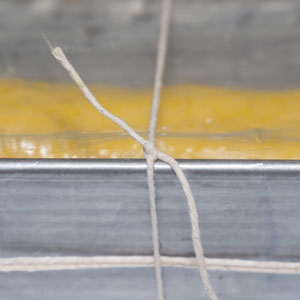
When you are ready to shape the dough, grease a heavy-gauge 10 by 5 by 3-inch loaf pan with butter. Remove the dough from the refrigerator and use the plastic dough scraper to turn it out onto the work surface. Flour your hands and pat the dough into a rough rectangle. Roll the rectangle into a tight cylinder (fig. 6.1) about 7 inches long, pressing along the seam every quarter turn or so. Pinch the outer seam to seal well. Turn the cylinder seam side down and use your hands to roll the dough into a uniformly thick cylinder (fig. 6.2) about 10 inches long. Place the dough in the prepared pan—it should make contact with the pan on both ends. In a small bowl, beat together the egg yolk and milk and brush the dough sparingly with the egg wash, taking care not to let it run down the sides of the pan; reserve the remaining egg wash for later. Cover the pan with plastic wrap and secure the plastic with a piece of kitchen twine (fig. 6.3) or a rubber band. Let the dough proof at room temperature until it is well risen and slightly pocked, about 2 hours. One hour into proofing, adjust an oven rack to the middle position, set a pizza stone on the rack, and heat the oven to 350 degrees.
-
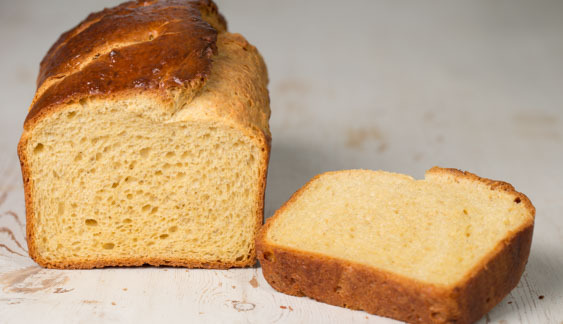
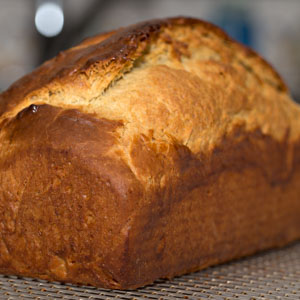
When the bread is ready to bake, gently brush it with the reserved egg wash. Let the egg wash dry for 5 minutes. Using a razor blade or lame, cut a ½-inch-deep slit down the center of the loaf or use scissors to snip along the top at regular intervals (fig. 7.1). Bake the brioche on the pizza stone until the surface is deep golden brown and the center registers 190 degrees on an instant-read thermometer, 35 to 40 minutes. Remove from the oven and immediately invert the brioche out of the pan onto a wire rack. Turn the loaf upright and let cool completely before slicing (fig. 7.2). For best enjoyment, slice thickly and eat the bread as soon as possible after it cools. Brioche will keep in a zipper-lock bag for up to 5 days, but by that point, it should have become toast or French toast.
-
-
2.1
-
2.2
-
-
-
4.1
-
4.2
-
4.3
-
-
-
6.1
-
6.2

-
6.3
-
-
-
7.1
-
7.2
-