Neapolitan-Style Pizza
introduction
From the crisply toqued chef with her basket of summer-ripe tomatoes, handmade mozzarella di bufala, and custom beehive oven, to the tired guy behind the counter slinging slices, you want pizza? You’ve got it. You want delivery? You’ve got it. Want DiGiorno? Got it. Want to make it at home? Let us count the ways.
Why are we wading into this mess? Because we can. The truth is no one in this country is producing real heirloom pizza flour these days—that we know of—but everyone seems to want pizza. Anson Mills’ beautiful custom blend of ultrafine strong bread flour and sweet European flatbread flour—which Glenn created exclusively for this recipe—produced pizza that left us wanting to eat around the filling to get to the crust.
Getting to the crust, however, was no piece of cake. As we’ve said in the past, home baking at high temperatures involves convincing your oven it’s really a forge hearth lined with quarry stones and fueled by hardwood. And no matter how cleverly contrived the machinations, even the best home oven isn’t going to cooperate completely. But we got pretty close. Close enough to make it worthwhile.
You’ll note we call our pizza “Neapolitan-style.” The word “style” in the title suggests we’re aware of deficits, and although we’ve struggled to get as close to authenticity as possible, we know we’ll finish shy. (Sometimes even purists must administer the caveat that warns, “Don’t let the perfect be the enemy of the good.”)
Widely regarded as the best pizza in the world, real Neapolitan pizza must be produced according to the guidelines established by Associazione Verace Pizza Napoletana (Association of True Neapolitan Pizza) which seeks to govern preparation and ingredients and prevent louche Americans like us from absconding with its good name.
Una verace pizza napoletana must use only natural ingredients: flour, salt, natural yeast, and water. No oil. Check. The dough must be kneaded by hand without mechanical intervention except by approved mixers. By hand. Check. The dough must be shaped by hand, without the use of a rolling pin. Check. The pizza must be crowned with nothing more than tomato, mozzarella di bufala, olive oil, and basil; or tomato, garlic, oregano and olive oil. Margherita. Check. The pizza must bake in a wood-fired dome oven at about 800 degrees Fahrenheit for no longer than 90 seconds. Uhhhh. How about 550 degrees for 4 minutes in a 1980’s Jenn-Air?
Make that “Neapolitan-style.”
(All the same, pretty fair marks!)
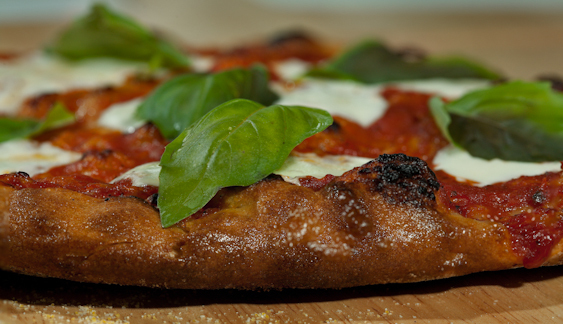
Once baked, a Neapolitan pizza should have a high edge that is crisp, but not overbaked, an open crumb with a pleasing chew, and well-developed flavor. We got those, too.
Baking Notes
When all is said and done, pizza is a flatbread, the most ancient bread known to man. And understanding this bread’s antiquity helped us more with our recipe than adhering to the DOC guidelines. We were fortunate to attend the Maine Kneading Conference in Skowhegan at the end of July 2009 and catch a workshop with master baker Stephen Lanzalotta. Until then—one third of the way through development of this pizza—our dough tasted phenomenally good, but its rise and texture were less than sublime.
Mr. Lanzalotta’s workshop concentrated on slack doughs, the term bread bakers use to describe doughs that are wet and tricky to handle. Bakers speak of dough in terms of hydration: a baguette dough, for instance, is comprised by weight of 3 parts flour to 2 parts water, giving it a baker’s hydration of 67 percent. The older the dough, historically, the wetter, harkening back to beer barm stirred with flour to make a slurry. The farther east a dough’s antecedents, the wetter it’s also likely to be according to Mr. Lanzalotta, who cited the Egyptian bedja with a flour to water ratio of 1 to 1 as among the wettest and most ancient breads. So pizza, a flatbread, wants a pretty high hydration.
Over the course of his demonstration, Mr. Lanzalotta manipulated 30 pounds of very wet dough possessing a hydration of about 89 percent with grace and dexterity, clarifying, among other things, what had, for us, been a central mystery of slack dough handling: how you can get your hands on a dough like this without gluing your fingers together. You do this by sealing the dough within a veil of flour, thus protecting it from drying out and tearing. Once that veil is in place, additional flour will not infiltrate the dough itself; the additional flour will, however, give the baker a means of moving the dough around and working with it.
By increasing the hydration of our dough to 85 percent (heirloom new crop flour is moister than shelf-stable flour or we would have gone even farther), we were able, essentially, to use our existing recipe but with very different, and significantly superior, results. There is so little muscularity within the gluten matrix of a slack dough that nothing interrupts its oven spring in the first moments of punishing heat. The heat drives moisture from the dough quickly, leaving it moist in the center and lightly crisp outside.
The other good news is that preparing this dough is virtually effortless. A slack dough is such a pussycat, it needs no muscular kneading, just a short round of rhythmical push-pull after its initial mixing.
We prefer the flavor of the crust after the dough has rested overnight in the refrigerator, but this is not strictly necessary. You may make the dough and bake the pizza the same day. Once the dough begins to look lively (2 to 3 hours after mixing if not refrigerated overnight, or 4 to 5 hours if the dough was cold), it will require three or four brief “interventions” (Mr. Lanzalotta’s term for light hand manipulations) to refresh the environment. We did this with a plastic dough scraper and light folding motions while the dough was still in the bowl.
Thereafter, the trick is to get the dough into the oven before it overproofs. The oven needs 10 minutes recovery time between baking pizzas.
The mixed ancient emmer and heirloom corn semolina that comes with the pizza flour offers beautiful flavor nuance to the crust bottom and allows easy transfer from peel to stone. It won’t burn on the crust bottom, but what remains on the stone after baking will burn if left there. Between batches of pizza, we sweep any semolina that remains scattered on the stone into a bowl using long mitts and an old, clean cloth.
An adjustment we do make is to bake the pizza for 2 minutes with olive oil and sauce before laying the cheese on the dough. We brave nuclear heat to lay the mozzarella slices on the top of the pizza once the crust is set. We do this to prevent the cheese from overbaking and looking like curdled plastic, as it otherwise would, because our conventional oven can’t get the job done in 90 seconds.
One last thing. If you find yourself having difficulty stretching this dough on a peel or getting the dough off the peel onto the stone, you may wish to use a sheet of parchment paper. The dough is easily stretched by oiling the parchment—forget the semolina in this case—and can be transferred to the stone directly on the paper. The crust won’t be quite as nice, but the work will be much easier.
equipment mise en place
For this recipe, you will need a digital kitchen scale; a large mixing bowl; a whisk; a wooden spoon; a plastic dough scraper; a small heavy-bottomed saucepan; a pizza stone; a metal bench knife; a tea strainer; a pizza peel; a couple of pastry brushes; two long oven mitts; and an old, clean cloth for wiping semolina off the hot pizza stone.
-
for the dough:
-
12ounces (just over 2 cups) Anson Mills Pizza Maker’s Flour, plus additional for shaping the dough
-
1generous teaspoon fine sea salt
-
½teaspoon instant yeast
-
10.3ounces (about 1⅓ cups), cool spring or filtered water
-
-
for the sauce:
-
1teaspoon minced garlic
-
4teaspoons good-quality olive oil
-
1½cups Bionaturae Organic Strained Tomatoes or other pure strained tomato product
-
Red pepper flakes
-
Fine sea salt and freshly ground black pepper
-
-
-
for the bottom crust:
-
3tablespoons Anson Mills Heirloom Baker’s Semolina, plus additional, if needed
-
-
for the topping:
-
Extra-virgin olive oil
-
1(5-ounce) ball fresh buffalo mozzarella, cut into ⅛-inch slices
-
15 fresh basil leaves
-
-
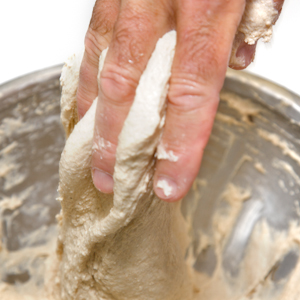
Make the dough: Place the flour, salt, and yeast in a large mixing bowl and whisk well to combine. Make a well in the flour and pour the water into the well. Stir with a wooden spoon until the ingredients come together to form a wet dough, about 1 minute. When the dough has come together, begin kneading it by hand, using pulling and pushing motions to lift the dough up from the bowl and snap it back down (fig. 1.1). Continue kneading the dough in this fashion until it is smooth and elastic, 2 to 3 minutes. Scrape down the bowl and cover it with plastic wrap. Refrigerate overnight.
-
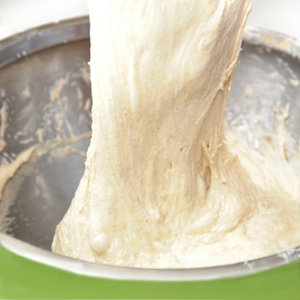
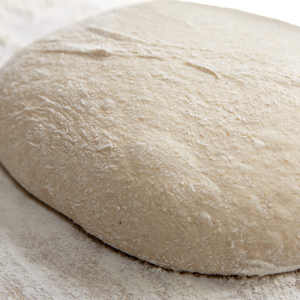
Proof the dough: Remove the dough from the refrigerator and let the bowl stand at room temperature until the dough loses its sluggish appearance and becomes lively and bubbly, 4 to 5 hours (fig. 2.1). Use a plastic scraper to scrape down the sides of the bowl and fold the dough over upon itself with a few light strokes. Cover the bowl and let the dough rest at room temperature for 30 minutes. Repeat the folding strokes and let rest for 15 minutes. Repeat folding once more and let rest for 15 minutes.
-
Make the sauce: While the dough is rising, in a small, heavy-bottomed saucepan over low heat, warm the garlic in the olive oil until fragrant, about 3 minutes. Add the tomatoes, bring to a simmer over medium heat, and then turn down the heat to maintain a light simmer and cook until the flavors come together, about 5 minutes. Do not reduce the mixture to a thick sauce. Season to taste with red pepper flakes, salt, and pepper. Remove from the heat and set aside.
-
About 1 hour before baking, adjust an oven rack to the middle position; remove additional racks. Place a pizza stone on the rack and heat the oven to 550 degrees.
-
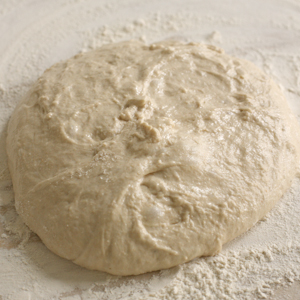
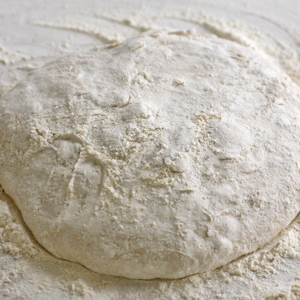
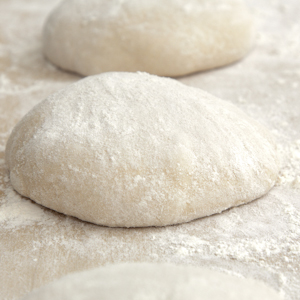
Round the dough: Liberally flour a work surface or wooden dough board. Scrape the dough out of the bowl and onto the board (fig. 5.1). Toss a generous amount of flour on top of the dough (fig. 5.2) and round the dough by cupping both hands around the sides and dragging its bottom against the surface, using the dough’s stickiness to stretch and tighten it into a smooth, round ball sealed with a veil of flour (fig. 5.3). Let the dough rest for 10 minutes. Use a metal bench knife to cut the dough into three 7-ounce pieces. Flour and round each piece (fig. 5.4). Let the dough pieces rest about 10 minutes.
-
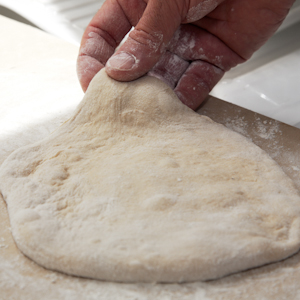
Shape the dough: Working with one piece at a time, flatten the dough lightly with your fingertips (fig. 6.1). Sprinkle or, using a tea strainer, sift 1 tablespoon of semolina over the surface of a baker’s peel. Transfer the dough to the peel. Flour your hands and stretch the dough from the center out into a 10-inch round. If the dough sticks, gently lift an edge where it is sticking and sprinkle more semolina underneath, on the peel.
-
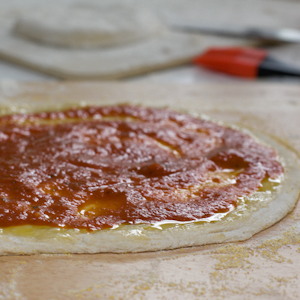
Drizzle the dough with olive oil and brush the oil across the dough’s surface. Use a clean pastry brush to brush any excess semolina off the peel. Spoon about ¼ cup of the tomato sauce over the dough and smooth lightly with the back of a spoon (fig. 7.1). Slide the dough onto the pizza stone and close the oven door quickly. Bake for 2 minutes. Open the oven door and quickly pull the rack out slightly using long oven mitts. Arrange one-third of the mozzarella slices on the pizza. Shove the rack back in and close the door. Continue to bake until the pizza is dark golden and the cheese has melted, about 2 minutes longer.
-
Using the pizza peel, remove the pizza from the oven and transfer it to a cutting board. Let cool for about 5 minutes, and then top with 5 fresh basil leaves. Cut the pizza and serve it right away. Sweep the semolina that remains scattered on the pizza stone into a bowl using long oven mitts and an old, clean cloth. Let the oven recover its temperature while you shape and sauce the next piece of dough. Bake the second pizza, and then repeat the process again to bake the third.
-
-
1.1
-
-
-
2.1
-
-
-
5.1
-
5.2
-
5.3
-
5.4
-
-
-
6.1
-
-
-
7.1
-