Southern Fried Chicken
introduction
If you think the world can get by without another recipe for fried chicken, you’re right. But fried chicken is more than a recipe. It is the right chicken, the right fat, the right pan, the right cook, and the right “leave well enough alone.” With that in mind, a few pointers. By “the right chicken,” we mean a whole fresh, pastured, Amish, heritage, or local organic chicken—not chicken parts—and one that weighs about three pounds. Backbone, neck, and wing tips can bounce into a quick, flavorful pan-gravy base, a reliably excellent companion for fried chicken.
By “the right fat,” we mean fat measured by flavor and performance, not simply heat tolerance. The lard, butter, and bacon combination recommended for this recipe comes by way of Edna Lewis (though she uses country ham) and makes an enormous difference in the final flavor of the fry. The fat will reach but halfway up the sides of the skillet because Southern fried chicken is not a deep-fried affair. And speaking of “the right skillet,” we mean one that is cast-iron, straight-sided, 11 to 12 inches in diameter, and 2 to 2½ inches deep. Our current favorite? Butter Pat’s “Joan” with its matching domed glass lid.
Which brings us to “leaving well enough alone.” We suggest plain seasoned flour for the dredge. But it doesn’t have to be totally plain, of course. Anson Mills Thirteen Colony Rice Waffle Flour creates a beautifully crisp patina and rich burnished flavor.
This chicken is fantastic cold, too, by the way.
Cooking Remarks
We’re the first to acknowledge that a single three-pound chicken isn’t going to feed a big family, to say nothing of a crowd. For larger gatherings, simply double the recipe. Some cooks fry two chickens simultaneously in two skillets but we use the same skillet, even the same fat. We fry all of the dark meat first and the white meat second.
We buy leaf lard by mail order from the upper Midwest at Prairie Pride Farm. It keeps beautifully for a year or so in the freezer.
The quality of smoke in the bacon has a profound impact on the final chicken flavor. Allan Benton’s signature hickory-smoked country bacon, made in the Smoky Mountains near Madison, Tennessee, has been a favorite of chefs for years. But there are a number of small batch bacon producers working today. Goldbelly is a reliable source for products like this—or look around locally.
Soaking the chicken overnight in salt water is standard practice in many Southern recipes. Not strong enough to be a brine, the solution adds a simple seasoning boost to the meat and seems to purge it as well. The chicken emerges from its salt water sparkling clean.
Southern recipes soak the chicken parts in buttermilk several hours or overnight after the salt water. The process tenderizes the meat. Unable to locate buttermilk made from live cultures at our store, we opt for Organic Valley Cultured Lowfat Buttermilk. Supremely thick, it gives the flour dredge something to hang on to. We use a touch of buttermilk in the pan gravy as well, for a trace of tang.
A dance of undulating temperatures, frying a chicken requires constant attention. Use a thermometer. The chicken enters the fat when the fat is between 360 and 365 degrees. After that, be ready to raise the temperature to compensate for heat loss and lower it again when the temperature races back. Optimum fat temperature should be around 350 degrees throughout. The chicken is turned once—and only once.
If you are packing a picnic basket or setting up an outdoor buffet, gravy probably won’t be on the menu. However, fried chicken and waffles are not going to be happy without it.
equipment mise en place
For the saltwater soak and to cut up the chicken, you will need a large bowl and a sturdy chef’s knife. A cleaver might also come in handy.
To prepare the frying fat, you will need a digital kitchen scale, a medium saucepan, a fine-mesh strainer lined with cheesecloth, and a 2-cup liquid measuring cup.
For the buttermilk soak, you will need an 8-inch square glass or ceramic baking dish.
To fry the chicken, you will need two rimmed baking sheets and two wire racks; an 8-inch square glass or ceramic baking dish; an 11- or 12-inch fairly straight-sided cast-iron or enamel-coated cast-iron skillet with a depth of about 2-inches with a lid; and an instant-read thermometer.
To make the gravy, you will need a wooden spoon, a whisk, and a fine-mesh strainer.
-
for the saltwater soak:
-
2tablespoons kosher salt
-
1cup hot spring or filtered water, plus 4 cups cold spring or filtered water
-
1whole 3-pound chicken
-
-
-
8ounces leaf lard
-
2ounces (4 tablespoons) unsalted European-style butter
-
2ounces high-quality thick-cut bacon
-
-
for the buttermilk soak:
-
1tablespoon fine sea salt
-
3 or 4garlic cloves, peeled and sliced
-
2cups buttermilk
-
-
for frying the chicken:
-
8ounces (about 1¾ cups) Anson Mills Thirteen Colony Rice Waffle Flour or Colonial Style Fine Cloth-Bolted Pastry Flour
-
1½teaspoons fine sea salt
-
1¼teaspoons freshly ground black pepper
-
-
for the gravy:
-
1.25ounces (¼ cup) Anson Mills Colonial Style Fine Cloth-Bolted Pastry Flour
-
2cups Rich Homemade Chicken Stock, hot
-
1Turkish bay leaf
-
1cup buttermilk
-
Fine sea salt and freshly ground black pepper
-
1ounce (2 tablespoons) unsalted European-style butter
-
-
Day One—Cut up and soak the chicken in salt water: Add the salt to a large bowl, pour in the hot water, and stir until the salt dissolves. Add the 4 cups cold water and stir.
-
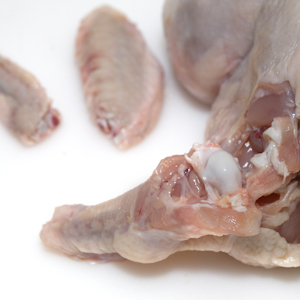
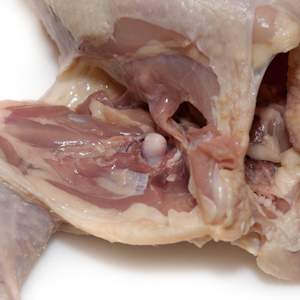
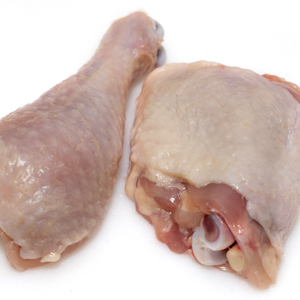
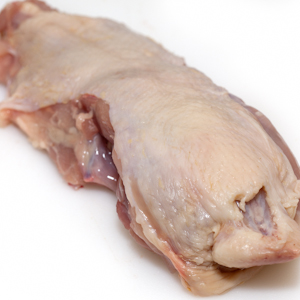
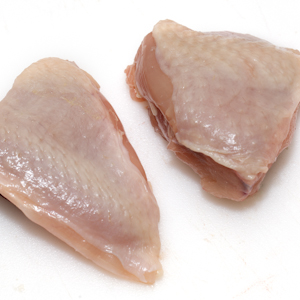
Using a sturdy chef’s knife, cut off the wing tips from the chicken; discard or reserve them for stock. Cut off each wing flat, then remove each drumette at the shoulder joint (fig. 2.1). Separate each leg from the body at the hip joint (fig. 2.2), then cut each leg into drumstick and thigh pieces (fig. 2.3). Cut through the ribs on either side of the backbone to separate the backbone from the breast (fig. 2.4); discard the backbone or reserve it for stock. Turn the breast skin side down and cut lengthwise, through the breastbone, to separate the breast into halves. Cut each breast in half crosswise (fig. 2.5). Add the chicken parts to the bowl, cover and refrigerate for 8 to 10 hours.
-
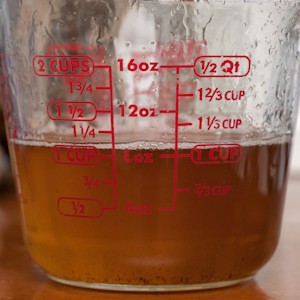
Prepare the frying fat: Place the lard, butter, and bacon in a medium saucepan and render over medium-low heat until the bacon is crisp and brown and the water has evaporated from the butter, 15 to 20 minutes (fig. 3.1). Strain the fat through a fine-mesh strainer lined with cheesecloth into a 2-cup liquid measuring cup. You should have about 1½ cups dark-golden liquid fat. Set the fat aside and eat the bacon.
-
Drain the chicken and soak it in buttermilk: After the chicken has soaked in the salt water for 8 to 10 hours, drain off the water. Add the salt and garlic to an 8-inch square glass or ceramic baking dish, pour in the buttermilk, and stir until the salt dissolves. Shake the chicken pieces dry over the sink and submerge them in a single layer in the buttermilk, turning the pieces to coat. Cover with plastic wrap and refrigerate overnight.
-
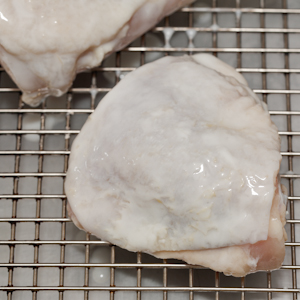
Day Two—Fry the chicken: Transfer the chicken from the buttermilk to a wire rack set over a rimmed baking sheet (fig. 5.1), picking off any garlic that clings to the chicken. Turn the flour, salt, and pepper into a clean 8-inch square glass or ceramic baking dish and stir to combine.
-
Transfer 1¼ cups of the frying fat to a heavy-bottomed 11- or 12-inch fairly straight-sided cast-iron or enamel-coated cast-iron skillet with a depth of about 2 inches. Line a second rimmed baking sheet with paper towels and set it aside. Bury the chicken piece by piece in the flour, carefully pressing flour into the skin. Gently dust off the excess flour and set the chicken skin side up on a second wire rack. Allow the flour to dry on the chicken for 10 to 15 minutes.
-
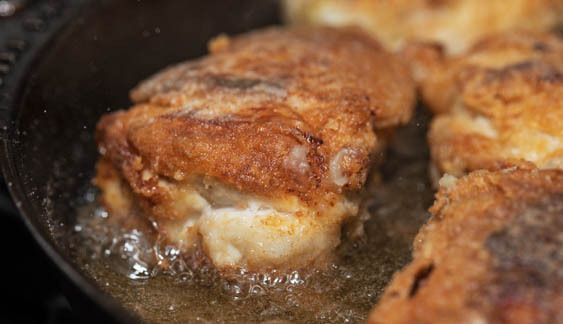
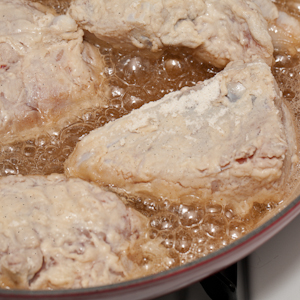
Set the skillet over medium heat and warm the fat until it reaches 360 to 365 degrees. Lower the dark-meat pieces skin side down into the skillet, followed by the breast pieces. The fat should come about halfway up the sides of the chicken (fig. 7.1); if needed, add more of the frying fat. Partially cover the pan and increase the temperature to high to compensate for the heat loss. As the fat’s temperature comes back up to 350 degrees, lower the heat again. The fat should emit a cheerful snap and sputter. (Test its temperature from time to time with an instant-read thermometer and make adjustments to keep it around 350 degrees.) Fry the chicken partially covered, without turning, until deep golden brown, 10 to 12 minutes. Carefully turn the chicken, raise the temperature slightly, and fry the second sides uncovered until deeply golden, about 8 minutes; as the heat gains momentum, lower the temperature again. When they are done, the thickest part of the breast pieces will register about 160 degrees and the thickest part of the thigh pieces about 175 degrees. Pull the pieces out of the fat and drain them on the paper towel–lined baking sheet. (If you’d like to keep the chicken hot while you make the gravy, transfer the pieces to a clean wire rack set over a rimmed baking sheet and set the baking sheet in a warm oven.) Remove the skillet from the heat and pour or spoon off and discard all but 2 tablespoons of the fat.
-
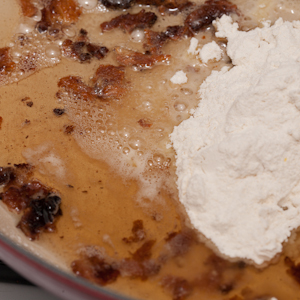
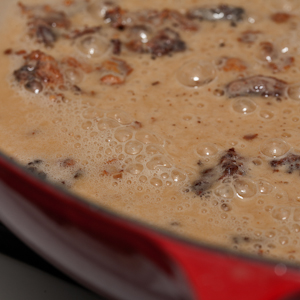
Make the gravy: Sprinkle the flour onto the hot drippings remaining in the skillet (fig. 8.1) and stir with a wooden spoon to make a smooth paste, or roux. Set the skillet over medium heat and cook the roux, stirring constantly, until it is molten and begins to color slightly, about 5 minutes (fig. 8.2). Whisk the hot stock into the roux in three additions. Add the bay leaf and bring to a simmer over medium-high heat, whisking constantly. Reduce the heat to medium and simmer gently for 5 minutes. Whisk in the buttermilk and simmer 5 minutes more. Season with salt and pepper and whisk in the butter. Strain the gravy through a fine-mesh strainer into a warmed gravy boat.
-
-
2.1
-
2.2
-
2.3
-
2.4
-
2.5
-
-
-
3.1
-
-
-
5.1
-
-
-
7.1
-
-
-
8.1
-
8.2
-