Classic Danish Pastry Dough
introduction
The story of Danish is a chapter in the story of laminated dough, and the story of laminated dough is a chapter in the story of butter. Let’s review: dough is made by working flour (typically wheat), fat, and water into a paste (pie dough); or by kneading flour and water with natural or commercial yeast into a paste (bread dough). Take a lean version of the former, roll and fold it successively with additional butter and the dough will bake into flaky, separate (laminated) layers known as puff pastry. Take a yeast dough, roll and fold it successively with additional butter, cut and shape it into crescents, and it will bake into flaky laminated layers known as croissant. If, however, the initial yeasted dough has seen a bit of egg and sugar enrichment before it is rolled and folded successively with butter and baked, then you have the ultimate pastry: Danish. Some will argue that croissants represent the higher form—fewer ingredients, more layers, a more crystal shatter, and a gauzy honeycomb interior. The croissant is a noble thing. But, given the choice, we would choose great Danish any day. Luckily for our waistlines, there are not many great Danish to choose from. It is far easier to find a decent croissant.
Croissants may try to claim French ancestry—the French have certainly put their signature refinement on the form—but croissants aren’t any more French than Danish. And Danish aren’t even Danish! Each was originally Austrian (or Austro-Hungarian). The Danes are hip to this, and call their Danish Wienerbrød (Vienna bread). In a tacit nod to Vienna, most cultures refer to Danish as viennoiserie. Except the Germans, of course, who have a different name for everything, and call it Plundergebäck. It is worth pointing out, that though the French make the best croissants, Danes still make the best Danish—names and origins notwithstanding.
The prize for dramatic beginnings must go to the croissant, however, which, according to culinary myth, makes its first appearance in kipferl form—the German word for moon or crescent and a shape long associated with Islam—after the Siege of Vienna in 1683, when Austrian forces were able to turn back Turks who sought to capture Vienna, putting an end to the Ottoman Empire’s western expansion. In an enduring culinary myth associated with this battle, Viennese bakers shaped pastries in the Islamic crescent shape to celebrate victory, and the kipferl (later croissant) became a symbol of victory in pastry form.
The best story about the origins of the decidedly more bourgeois Danish cites a bakers’ strike in 1863 that drew Austrian bakers to Denmark’s shores for work, and, with them, new shapes and formulas. Ah, well—there can only be one croissant.
Getting back to butter. Though oil and ghee produced coil-laminated bread and pastry forms associated with China, Assyria, Persia, India, and elsewhere from ancient times forward, the first doughs that were sheet-laminated with whole butter churned from the milk of cows, like croissant and Danish, claim European heritage—specifically, the dairy-producing regions of central Europe like Austro-Hungary. Nothing matches the performance and flavor of quality butter made with first-rate cream from cows masted in high pastures. Butter, quite simply, outperforms any other fat in baking, and laminated doughs represent the highest expression of pastry wrought from it.
Laminated doughs are, of course, notoriously tricky and demand a considerable investment of time and attention. American bakeries favor the simpler production of sweet rolls, sticky buns, monkey bread, and the like, which, though delicious, can never match the ethereal quality of great Danish. Great Danish combines the crackle and buttery crumb of a superlative croissant with a sweet roll’s irresistible yield to the tooth. Danish dough can be plied and twisted into different shapes and filled with everything from pastry cream to remonce, fruit, nuts, and cheese. It can be glazed, flocked, or painted. Danish is not remarkably sweet. It is light and moist, but never gooey. For adventurous home bakers, the following formula made with our French Mediterranean Bread flour and Fine-Cloth Bolted Pastry flour, is superb. Its attendant recipes offer the opportunity to create different shapes, flavors, and textures. Do give them a try. You’ll feel so accomplished, you might turn away from muffins in disgust. (Just kidding, muffins.)
Baking Notes
A few important tips to observe when making the recipe:
Pay close attention to times, temperatures, and weights suggested in the recipe.
Get yourself a baker’s couche or a heavy sheet of canvas on which to roll and shape the dough directly. It will make an enormous difference in efforts to manage the dough. A couche is a necessity for serious baguette bakers; one can be ordered from kingarthurflour.com.
Make sure to use European-style butter, which has a higher fat content than average butter.
Note in particular the dough and butter temperatures when encasing the butter in the dough.
Avoid excess flour when rolling, and brush off any excess.
Roll diagonally, not sideways, to widen the dough.
Keep the edges of the dough square when rolling.
Flip the block of dough occasionally to help keep the edges straight.
Allow no more than 40 minutes in the fridge between turns.
equipment mise en place
For this recipe you will need a digital scale, a stand mixer with a flat-beater and a dough hook attachment, a whisk, a small saucepan, a digital instant-read thermometer, a pair of scissors, three heavy-duty gallon-sized zipper-lock bags, a plastic dough scraper, a couche or 3-foot square heavy canvas cloth, a ruler, a rolling pin, a bench knife, a small bowl, a pastry brush, a rimmed baking sheet, parchment paper, and a clean kitchen towel.
-
Day 1:
-
8
-
8
-
2ounces sugar
-
⅝teaspoon fine sea salt
-
½teaspoon ground cardamom
-
7.2ounces whole milk
-
1¾teaspoons instant yeast
-
1ounce unsalted European-style butter, softened
-
2ounces beaten whole egg (from 1 or 2 large eggs)
-
-
Day 2:
-
Anson Mills French Mediterranean White Bread Flour or Colonial Style Fine Cloth-Bolted Pastry Flour, for dusting
-
10ounces unsalted European-style butter, cold
-
-
Day 1: Turn both flours into the bowl of a stand mixer bowl and whisk to lighten and combine. Measure 0.2 ounce (1 tablespoon) of the flour mixture into a small bowl, cover, and set aside. Add the sugar, salt, and cardamom into the mixer bowl and whisk well. Set aside.
-
In a small saucepan, warm the milk over medium heat until small bubbles appear around the edges. Remove from the heat and let the milk cool to 115 degrees. Sprinkle the yeast over the surface of the milk, let stand for a few minutes to soften, then whisk until the yeast fully dissolves.
-
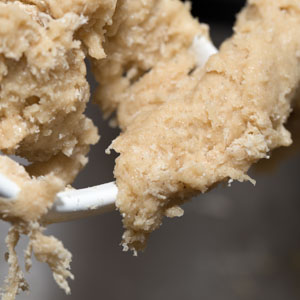
Attach the bowl and flat-beater to the stand mixer. With the mixer running on low speed, pour in the milk mixture. Add the eggs, followed by the softened butter and mix briefly, just until the wet and dry ingredients have incorporated (fig. 3.1). Replace the flat-beater with the dough hook and knead the dough on low speed until it is smooth, strong, supple, and clears the sides of the bowl, about 10 minutes (fig. 3.2).
-
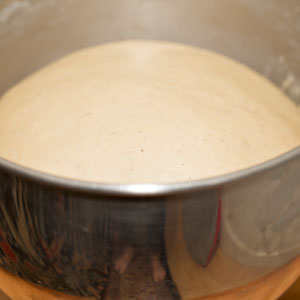
Turn the dough out onto the counter and round it into a ball. Return it to the bowl, cover tightly with plastic wrap, and let rise until nearly doubled in size, about 2 hours (fig. 4.1). Meanwhile, use a pair of scissors to trim tiny triangles from the bottom two corners of a heavy-duty, gallon-size zipper-lock bag to create little vent holes.
-
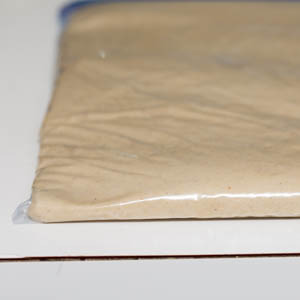
Gently deflate the dough by pressing down on it with the backside of your hand. Using a plastic dough scraper, scoop up the dough and transfer it to the prepared plastic bag. Press or roll the dough so that it fills the bag from edge to edge (fig. 5.1). Seal the bag and place in the refrigerator, laying it flat. Let rise overnight.
-
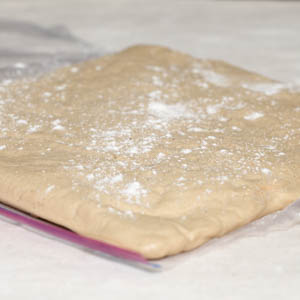
Day 2: Lay a couche or 3-foot square heavy canvas cloth on the counter and lightly dust it with flour. Remove the dough from the refrigerator. Unseal the bag, and, with the bag resting on the counter, use a pair of scissors to slit open the two side seams. Peel the plastic off the top and sprinkle the dough with flour (fig. 6.1). Using the bottom sheet of plastic, invert the dough onto the couche, positioning it as a diamond, with a corner pointing toward you. Leave the top plastic layer in place.
-
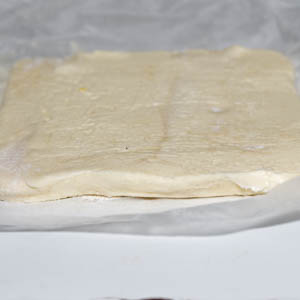
Prepare a second heavy-duty, gallon-size zipper-lock bag by slitting it open along one side seam and halfway down the other. Sprinkle half of the reserved flour mixture in the bag. Place the chilled butter in the bag on top of the flour; if it is more than one piece, simply push the pieces together. Sprinkle the remaining flour on the butter. Using a rolling pin, pound the butter through the plastic, occasionally lifting the edges of the plastic to flip loose flour back onto the butter. From time to time as you pound, flip over the plastic-sandwiched butter, and if the butter pieces come apart, simply push them back together. With continued pounding, the butter will become pliant and elastic. Use a bench knife to square and tidy the edges and shape the butter into a 7-inch square of even thickness (fig. 7.1). With an instant-read thermometer, check the temperatures of the dough and the butter; they should each be about 60 degrees.
-
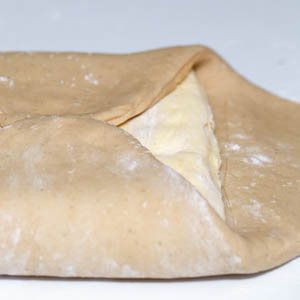
Have ready a small bowl of water and a pastry brush. Line a rimmed baking sheet with parchment paper. Peel the top layer of plastic off the butter and invert the butter onto the center of the dough diamond, positioning it parallel with counter’s edge sides so that the corners meet the midpoints of the sides of the dough. Peel the plastic off the butter (fig. 8.1). Brush the “tabs” of the dough lightly with water. Beginning with the uppermost point of the dough diamond, draw the dough down over the butter, stretching it gently. Fold in the remaining dough corners to meet in the center (fig. 8.2), completely enclosing the butter. Pinch the seams to seal. Transfer the dough to the prepared baking sheet, cover it with plastic wrap followed by a kitchen towel to hold the plastic in place, and refrigerate for 30 minutes—not longer.
-
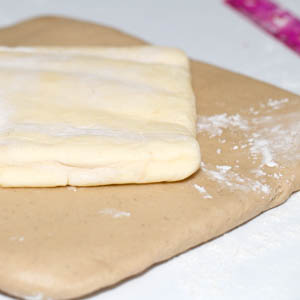
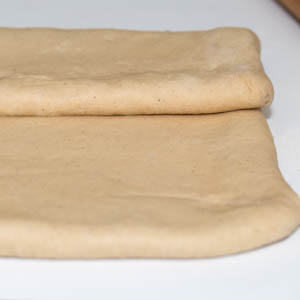
Remove the dough from the refrigerator and return it to the couche, placing it parallel with the counter’s edge. Roll out the dough to an 8- by 16-inch rectangle, with a short end nearest you; as you roll, diligently square the edges and corners with a bench scraper. Fold the top third of the dough down (fig. 9.1), then fold the bottom third up to overlap, creating a 5½- by 8-inch rectangle. Return the dough to the baking sheet, cover, and refrigerate for 30 minutes.
-
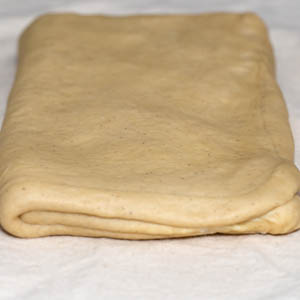
Remove the dough from the refrigerator and set it on the couche like a book, with the closed edge as the spine (fig. 10.1). Begin rolling the dough lengthwise to extend, then flip it vertically so that the spine remains on the left, but the bottom of the dough is now the top. This will prevent the layers from sliding as you continue to roll. Using a light hand, roll the dough once again into an 8- by 16-inch rectangle about ⅜ inches thick, blocking the edges and squaring the corners with the bench scraper. Fold the top third of the dough down and the bottom third up to again to create a 5½- by 8-inch rectangle. Return the dough to the baking sheet, cover, and refrigerate 30 minutes.
-
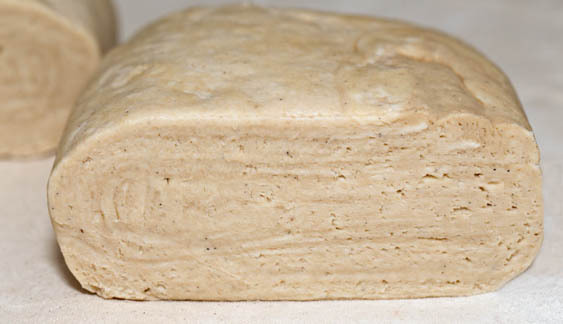
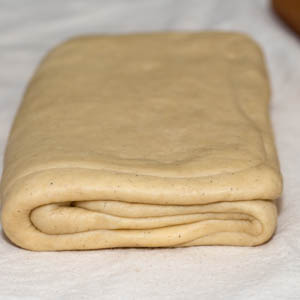
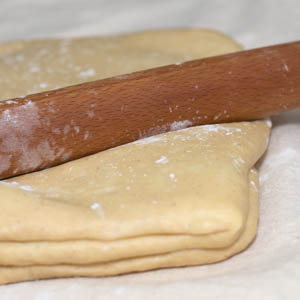
Remove the dough from the refrigerator and set it on the couche, positioning the “spine” to the left (fig. 11.1). Lightly flour the dough and roll it into a 9- by 15-inch rectangle, taking care to keep the seams and edges even, widening the dough by rolling on the diagonal (not horizontally) (fig. 11.2), and flipping the dough vertically just once or twice to prevent the layers from sliding. Use the bench knife to block the edges and square the corners. Tri-fold the dough once again. Return the dough to the baking sheet, cover, and refrigerate for 30 minutes.
-
Once again, roll the dough “book” to a 9- by 15-inch rectangle, tri-fold it, cover, and refrigerate for 30 minutes. Give the dough a fifth and final roll and fold. Wrap the finished dough in plastic wrap, place it in a heavy-duty, gallon-size zipper-lock bag and refrigerate it, laid flat, for at least 2 hours or up to overnight. If you refrigerate the dough overnight, gently press it down after a couple of hours so it doesn’t overproof.
-
-
3.1
-
3.2

-
-
-
4.1
-
-
-
5.1
-
-
-
6.1
-
-
-
7.1
-
-
-
8.1
-
8.2
-
-
-
9.1
-
-
-
10.1
-
-
-
11.1
-
11.2
-