A Wicked Good Lobstah Roll
introduction
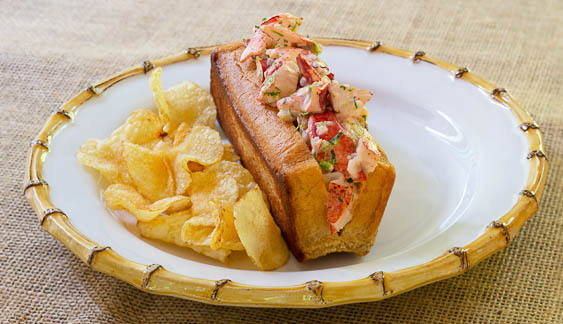
Here in New England we take lobster rolls seriously. We want the lobster meat to be poached gently in butter or dressed lightly with mayonnaise, and we want the filling to be shoved into a soft, rich roll. Strict traditionalists demand only lemon juice, salt, and pepper as the seasonings, but we took matters a bit further. Not to a cheffed-up place—just far enough to allow a sprinkle of minced shallot and celery leaves to fall into the filling. Nobody’s trying to reinvent the wheel here. Rather, we are trying to express an appreciation for the subtleties of this beloved crustacean and to give the small, decadent bites it offers the respect they deserve.
For instruction on lobster preparation and insight into its seasoning, we offer thanks to Anson Mills social media director and fellow test cook, Nina Levin, a coastal Massachusetts native. It was Nina’s expertise and guidance that helped inform the beautifully clean and crisp properties of this recipe.
Cooking Remarks
If you prefer to avoid dealing with live crustaceans, you can buy cooked lobster meat (you’ll need 18 to 20 ounces) and skip to step 8 of the recipe—but the lobster rolls won’t be nearly as good. The technique laid out here is a way of processing the live animals as humanely as possible.
By breaking the lobsters down into parts rather than leaving them whole, the cook time is more efficient. Plus, no parts wind up overdone, so the meat is perfectly fresh and tender. For soft-shell lobsters, strong and nimble Joyce Chen scissors or sturdy kitchen shears cut cleanly through the shell for easy removal of the meat; hard-shell lobsters will likely require nutcrackers. No part of the lobsters need go to waste; the shells and bodies can be made into stock, if you’re so inclined.
Like all proteins from the sea, lobster meat must remain as cold as possible once it has been cooked, so work quickly when shelling and dicing. Make sure your freezer is stocked with plenty of ice for ice baths, and if you own foodsafe gloves, wear them when handling the cooked lobster, as the oils from your hands can hasten spoilage.
For the filling, we prefer celery leaves over ribs. The leaves provide the essence of celery without the ribs’ big crunch, which clashes texturally with the delicate cooked lobster. For the same reason, mince the shallots very finely.
equipment mise en place
For this recipe, you will need a large cutting board; a large, sturdy chef’s knife; a rimmed baking sheet; an 8- to 10-quart pot; a large bowl; a timer; a pair of tongs or a mesh skimmer; a medium bowl and a slightly smaller bowl; a pair of Joyce Chen kitchen scissors or other sturdy kitchen shears; a nutcracker (if the lobsters are hard-shell); a large skillet (preferably cast-iron); and a wide metal spatula.
-
-
Three 1¼-pound live lobsters
-
Fine sea salt
-
¾teaspoon freshly ground black pepper
-
2tablespoons juice from 1 large, juicy lemon
-
3tablespoons (1.5 ounces) very finely minced shallot
-
2tablespoons packed celery leaf chiffonade
-
1tablespoon finely chopped fresh flat-leaf parsley
-
1½teaspoons Aleppo pepper
-
¼cup (2.5 ounces) commercial mayonnaise, preferably Hellman’s or Best Foods
-
6 to 8
-
Unsalted butter, room temperature, for griddling the buns
-
-
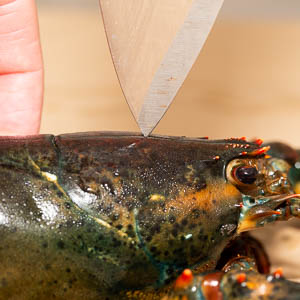
Place one of the lobsters on a large cutting board. Hold it against the board and position the tip of a large, sturdy chef’s knife, blade parallel with the body but perpendicular to the board, about 2 inches behind the lobster’s eyes (fig. 1.1). Plunge the knife into the lobster until the knife tip meets the board—this action kills the lobster, however the tail and legs will to continue to move due to involuntary reflexes. Place the lobster on a rimmed baking sheet and repeat with the remaining two lobsters.
-
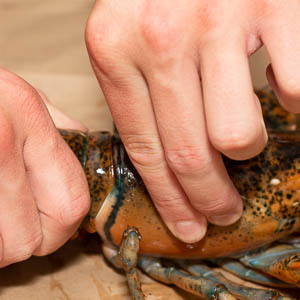
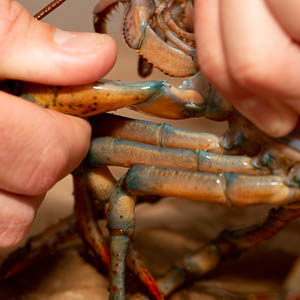
Fill an 8- to 10-quart pot with water and bring to a rolling boil over high heat. Fill a large bowl halfway with ice. One lobster at a time, separate the tail from the body by twisting and pulling the sections apart (fig. 2.1). Place the tails on the ice as you go. Now detach the large legs with claws by twisting and separating at the joint where the legs are attached to the body (fig. 2.2); place on the ice with the tails. Leave the small legs attached to the bodies. Discard the bodies or, if you plan to make stock, transfer to a container, cover, and refrigerate.
-
When the water reaches a boil, salt it heavily. One at a time, drop in the tails; they may flip reflexively—do not be alarmed. Immediately set a timer for 5 minutes. When 3½ minutes remain on the timer (that is, after 1½ minutes have elapsed), add the legs with claws to the pot and continue to cook. Meanwhile, discard the used ice. Add fresh ice and water to the bowl and sprinkle liberally with salt. When the timer sounds, use tongs or a mesh skimmer to transfer the lobster parts to the ice bath. Let cool for at least 10 minutes, then transfer the parts to a rimmed baking sheet; discard the ice water from the large bowl and reserve for holding the detritus as you shell the lobsters.
-
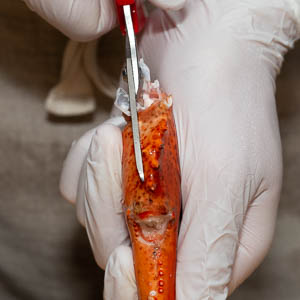
Fill a medium bowl halfway with ice and place a smaller bowl on top of it for holding the shelled meat. If you have foodsafe rubber gloves, slip them on. If the lobsters are soft-shell, use Joyce Chen scissors or sturdy kitchen shears to cut through the knuckle and claw shells (fig. 4.1), then extract the meat and add it to the ice-chilled bowl. If the lobsters are hard-shell, you will need a nutcracker to crack the shells. Make sure to remove the meat from the small moveable finger of the claws and also remove and discard the cartilage from the claw meat, if present. Toss the shells into the detritus bowl.
-
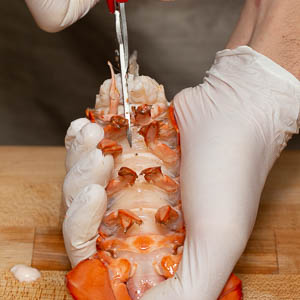
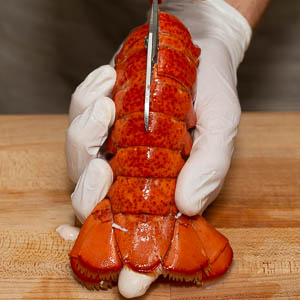
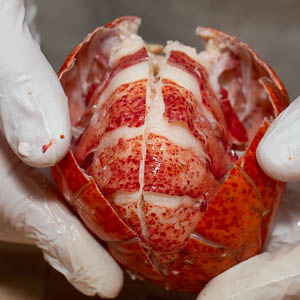
To remove the meat from the tails, using the scissors, snip along the center on the underside of each tail (fig. 5.1). Flip the tail over and cut along the center of the top side (fig. 5.2). Pull apart the shell and remove the tail meat (fig. 5.3). If you like, clean out any roe or tomalley. Transfer the tail meat to the chilled bowl and add the shells to the detritus bowl. When all parts have been shelled, discard the shells, or, if reserving for stock, cover and refrigerate.
-
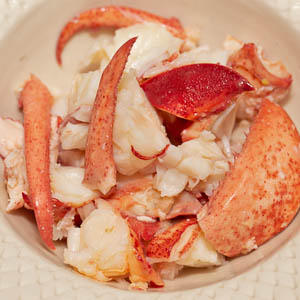
Cut the lobster tails into ½-inch dice. If the claw meat is very large, cut it into smaller chunks, then chop the knuckle meat, if desired. The pieces should vary in size (fig. 6.1); you should have 18 to 20 ounces. Return it all to the bowl, then sprinkle with ½ teaspoon salt, the pepper, and lemon juice. Add the shallot, celery leaf, parsley, Aleppo pepper, and mayonnaise. Mix with a spoon, then taste and season with additional salt, if needed. Cover and refrigerate while you prepare the buns.
-
Slice the top of each hot dog bun down the center, cutting about three-quarters through the bread, leaving the bottom hinged. Set a large skillet (ideally cast-iron) over medium heat and let warm for about 5 minutes. Meanwhile, spread butter on both sides of each bun. Place four or so buns (or however many fit comfortably) in the pan so the sides are in contact with the pan’s surface. Toast the buns, gently pressing them with a wide spatula for even browning, until the bottoms are golden brown, 1 to 2 minutes. Flip the buns and toast, pressing with the spatula, until the second sides are golden brown, 1 to 2 minutes longer. Remove from the pan and toast the remaining buns in the same way. Stuff the warm toasted buns with the lobster salad and serve right away.
-
-
1.1
-
-
-
2.1
-
2.2
-
-
-
4.1
-
-
-
5.1
-
5.2
-
5.3
-
-
-
6.1
-
recipe developed by Henry Jones